I have been looking at Home Domes and Skyshed Pods for about a month now but we ended up deciding that we needed to preserve what grass was left at the house for the dogs. Consequently, inspired by the other Suncast thread I purchased one of theses guys at Home Depot this morning on sale.
http://www.homedepot...-Resin-Stora...
It will be delivered Monday and I will post photos as the construction commences.
Since the grass is off-limits I'm going to put in the third most desirable location on the Southern end of the pool deck. This means I will only have optimum visibility from 72 to 294 degrees plus the zenith. My plan is to buy JMI wheely bars for use during the summer months and then use the observatory in the cooler winter months. Right now I'm dealing with four very important design considerations:
-How will I keep the observatory cool? In Dallas we occasionally get temps as high as 110 degrees. My plan right now is to use a small fan with timer and possibly put a tarp over the top.
-How will I keep the roof on during a thunderstorm? I will deal with this issue when I get to building the actual roof. Right now I'm thinking of doing some clip on cords from roof to wall. I'm also going to put some sand bags around the corners of the floor for extra weight.
-Drainage. My only concern about putting a shed on the cement pool deck is that it is ever so slightly sloped South. I worry a little about a flood in heavy rain.
-Power. Given the concrete pool deck doing a trench (even a short one) for a power cable is not an option. At the same time to run the fan or even a AC unit I need 24/7 power. The good news is the chance of mowing over it is non existent. However I'm worried about the cord itself getting wet or the outside house plug getting wet.

Suncast Sutton Observatory
Started by
akulapanam
, Jul 04 2014 07:30 PM
21 replies to this topic
#1

akulapanam
-

-
topic starter
- Posts: 2,907
- Joined: 26 Aug 2012
Mercury-Atlas
Posted 04 July 2014 - 07:30 PM
#2
nytecam
-
-
-

- Posts: 12,692
- Joined: 20 Aug 2005
Hubble
Posted 05 July 2014 - 01:21 PM
Well done Akulapanam with your purchase and I wish you well with its adaption to an obsy. Prime objective is, presumably, rolling the roof aside - best served by other's comments. To the other points...
1]A solar powered fan would be neat - make that Dallas sun work! Some sheet insulation under [or over!] the roof probably essential with shade planting against the sunny walls.
2]the roof on rollers to have storm guards to stop it lifting in high winds.
3]To stop groundwater ingree across the obsy floor the obsy should ideally be both level and raised concrete slab at a minimum 2"-3" above surrounding ground. A mastic seal around the perimeter direct on the ground will fail sooner rather than later! A compromise could be loose-laid concrete paving slabs across the whole floor + mastic perimeter seal so any water ingress can drain out and away.
4]Run an overhead power cable to obsy.
Good luck with your project
#3
bseltzer
-

-

- Posts: 1,028
- Joined: 28 Oct 2007
Apollo
Posted 05 July 2014 - 01:37 PM
Hi Akula,
Your Sutton is just about identical to my Cascade with the exception of the Cascade having a window on one of the side walls. A quick look at the assembly instructions confirms that it's design is indeed exactly the same. That said, you might find THIS thread useful.
I could be wrong, but my guess is you probably have more severe weather in TX than what I experience here in NorCal. If that's true and you intend to take a similar approach to a removable roof design as I did, you probably ought to invest in some addition 'hold-downs' on the roof. One method I've though about is using toggle bolts to anchor eye bolt pairs (one pair per roof panel) in the roof and wall panels and then use a turn buckle between each pair. That might be over kill since my roof panels are held in place by nothing more than the snap tabs on the outer edge of each roof section and the plastic 'C'-clips that straddle the center roof truss and engage the inner roof section edges. That arrangement has shrugged off sustained 15 mph winds with gusts to 30+. YMMV...
In terms of cooling, I have an 8000 BTU portable AC unit on its way here. Its a single exhaust unit that I plan to vent out through the side window. I'm told dual exhaust units are more efficient, but they're also more expensive and probably more involved to install. Since I don't have the AC up and running yet, I can't comment on its effectiveness with authority, but it should work OK.
I'm also on a concrete slab so for 120V AC, I've run a heavy duty extension cord from the outdoor outlet to the 'observatory' and used something like THIS to protect it.
Hope this is helpful.
-Bert
#4
rigelsys
-
-

-

- Posts: 1,235
- Joined: 21 Aug 2006
Vendor (Rigel Systems)
Posted 05 July 2014 - 02:48 PM
Hi Akula,
Here's the link to my suncast "roll out" observatory.
http://www.cloudynig...d=Observator...
For power, I use Harbor Freight solar panels to supply 12V DC. Inexpensive and you can set it on the concrete next to the observatory. More than enough power to run the telescope, laptop, fan, LED lights.
http://www.harborfre...tml?ccdenc=e...
for ventilation I use a 12V DC muffin fan with thermostat,
And white poly tarp from tarpsplus.com over the top for heat reflection and extra water proofing, and in your case, to help hold the roof on (if you leave it removable)
http://www.tarpsplus...hite-tarps.html
#5
akulapanam
-
-
topic starter
- Posts: 2,907
- Joined: 26 Aug 2012
Mercury-Atlas
Posted 06 July 2014 - 02:10 PM
bseltzer that is exactly the approach I'm going to take except I'm also putting the scope on wheels so I can take photos of the southern skies in the summer/on as needed basis. So more or less removable roof in the winter roll out in the summer.
The roll out portion of my plan does prevent me from putting the observatory on a 2" high pad. Perhaps I can figure out away to redirect the water around the base?
The overhead power cable seems like a good idea. Is a heavy duty extension cord safe for this purpose?
I also like the tarp approach for the reflection/extra water proofing.
#6
akulapanam
-
-
topic starter
- Posts: 2,907
- Joined: 26 Aug 2012
Mercury-Atlas
Posted 07 July 2014 - 10:54 PM
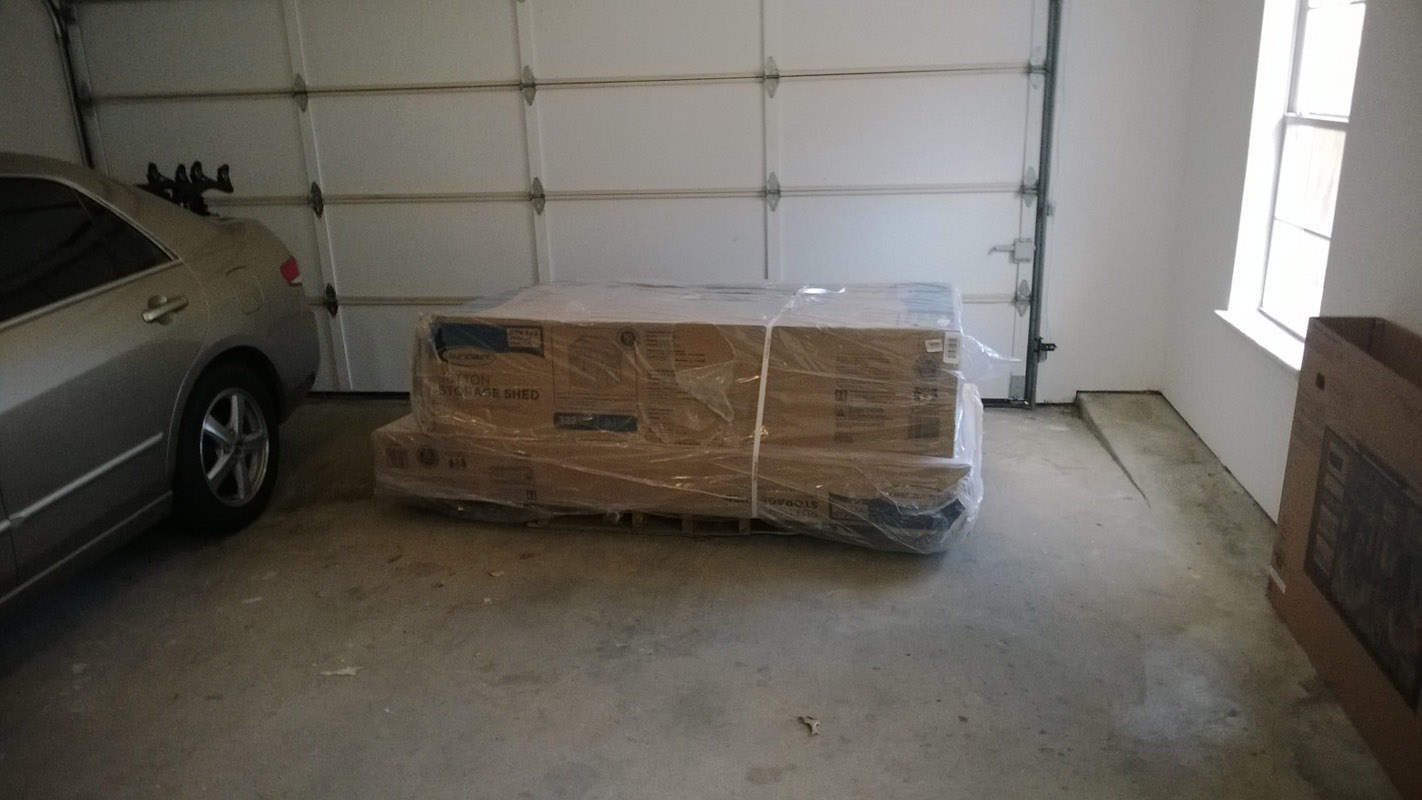
So the shed showed up this afternoon complete with pallet. They refused to bring it in the fence so it ended up in my garage and I ended up parking out front:-)
Attached Thumbnails
#7
akulapanam
-
-
topic starter
- Posts: 2,907
- Joined: 26 Aug 2012
Mercury-Atlas
Posted 07 July 2014 - 10:56 PM
So for the most part shed construction was easy until I got to the center truss which had locking bolts that were darn near impossible to screw on. Took only about an hour and a half to assemble what you see and then about an hour just to assemble the center truss. On top of that it refused to go in as assembled so I had to unscrew the vertical sides and then screw in the top section.
Attached Thumbnails
#8
akulapanam
-
-
topic starter
- Posts: 2,907
- Joined: 26 Aug 2012
Mercury-Atlas
Posted 07 July 2014 - 11:00 PM
Which brings me to the bad news. I have a hard time seeing how I'm going to safely take on and off the center truss without potentially damaging the scope even if I replace the provided bolts. It is ungainly and heavy. Unfortunately my shed may turn into a roll out only design:-(
#9
Lord Beowulf
-
-

- Posts: 2,305
- Joined: 13 Oct 2008
Vanguard
Posted 08 July 2014 - 12:01 AM
Hi Akulapanam:
Looking at the parts list on this (they don't seem to have a manual online) I'd agree that it's not viable to remove the roof on this one. The alternative to rolling out the scope, given enough room to do so, would be to put the shed on wheels and roll it off the scope. You could still put it on a pier and move the shed around it. Not as good for wind protection, etc., and it does require twice the deck space, but you need that to roll the scope out too. I note the pool to the left, so you're limited in space. I also see a big brick wall behind your fence which means you'll have limited range of viewing from that point anyway. I was thinking you could order a second "front" to put doors on the back side as well. That would allow for a pier in the corner and then you go into the shed, open the back doors, and pull the whole thing forward, but that may not be practical. You'd probably get a better FOV with the scope to this side of the shed. The other option of course is to put a pier in front and roll the shed back to where it is now when not covering the scope, but that would put it right in the of everything.
Beo
#10
akulapanam
-
-
topic starter
- Posts: 2,907
- Joined: 26 Aug 2012
Mercury-Atlas
Posted 08 July 2014 - 10:38 AM
Yea I think I'm going for a roll out on this one. bseltzer is doing a removable roof on this same shed (minus the window) and in theory this is a good shed for that from the standpoint that everything can really be held together with gravity. The problem for me is the truss is just to ungainly to remove without potentially hitting the scope. I would be curious to hear from bseltzer if he has found a easy way to move the truss that I'm not thinking of.
What you can't see from this photo is that the ideal place for the scope is actually on the other side of the pool so in summer I was planning to roll the scope out anyways. In winter I get about 180 degrees of sky plus the zenith from this location. What I will probably do is stay inside the shed and roll the scope right outside. That way I can use a space heater if I need to without impacting seeing.
My plan is to buy a different mount (right now I have CPC+ wedge) that is easier to reliably do a polar alignment on (CEM60) and put markers on both spots on the pool deck.
#11
bseltzer
-
-
- Posts: 1,028
- Joined: 28 Oct 2007
Apollo
Posted 08 July 2014 - 12:16 PM
Akulapanam,
You can make the job of removing the center truss much easier by leaving the horizontal brace out of it, and rather that bolting the ends of it into the side wall brackets, use clevis pins to fix the ends in the brackets.
If you do this, lifting the truss off the ridge beam is easily done from a step stool after pulling the pins, and at least in my experience, there's no real sacrifice of structural rigidity.
The other option I considered was to cut a slot in the floor wide enough to accommodate my pier, the mount the whole structure on a frame made of 2X4's with casters attached at the corners to make the whole shed a roll-off affair. I ended up rejecting that idea because I didn't think the floor was stiff enough for that alternative to work reliably. and it would have made weather proofing around the bottom of the shed difficult.
#12
donnie3
-
-
- Posts: 2,712
- Joined: 15 Dec 2004
Mercury-Atlas
Posted 08 July 2014 - 08:26 PM
I bought a rubbermaid shed last year to store my scope in. the floor and sides went together ok but when I got to the roof, hole different story!!! I had to force most of its parts to get them to come together then using screws not bolts to secure them, some of the parts would pop loose. after finally getting it put together it would at times pop loose at the roof parts. I got tired of this and took it apart, took it to a outreach place and donated it. never again.
#13
bseltzer
-
-
- Posts: 1,028
- Joined: 28 Oct 2007
Apollo
Posted 08 July 2014 - 10:40 PM
Donnie,
Sorry to hear your experience with the Rubbermaid shed was so frustrating.
I've got 2 different Suncast sheds (one as an observatory while the other one has stored gardening tools well for many years now) and they both performed their respective tasks well to date.
Sorry to hear your experience with the Rubbermaid shed was so frustrating.
I've got 2 different Suncast sheds (one as an observatory while the other one has stored gardening tools well for many years now) and they both performed their respective tasks well to date.
#14
altair1956
-
-
- Posts: 293
- Joined: 05 Jul 2009
Mariner 2
Posted 09 July 2014 - 01:39 PM
I have the Rubbermaid Big Max 7.5 x 10 footer with a 14" meade SCT inside. I know this may sound radical, but I too grappled with the issue of the central rail and in the end, i just leave it in place. I have found that even with it bisecting whatever the scope is pointed at that there is no noticable loss of brightness either visually or when I image. Also, much of the time is spent off to the sides when the rail doesn't interfere. All in all, I have found that that leaving the central rail up while observing is really no big deal. you might want to try for yourself before going to the added expense and hassle of more modifications. Here is the link to the thread with pics and info about my setup. Steve
http://www.cloudynig...6548176/page...
http://www.cloudynig...6548176/page...
#15
akulapanam
-
-
topic starter
- Posts: 2,907
- Joined: 26 Aug 2012
Mercury-Atlas
Posted 09 July 2014 - 10:47 PM
I'll post more photos in the morning but for now I finished construction but I'm leaning towards a roll out scope approach. I found the roof panels to be pretty hard to manage and I also found that the rear roof corners don't quite lock down as well as I would like unless the roof is screwed on.
The rest of the assembly went well and I concur with bseltzer that removing the horizontal joint improves the removability of the truss. My left door has a bit too much plastic on one of the hinges and bottom of door and consequently doesn't close well. This should easy to fix. I did acquire 4 60 pound sandbags for all of $12 and place one in each corner because the Home Depot garden guy noted they had a couple of sheds roll over because they weren't full of items.
Finally the last challenge is how I'm going to create a hole for the power plug and possibly ac vent. The challenge with the power plug is that the head is so much bigger then the cord itself.
#16
roscoe
-
-
- Posts: 12,392
- Joined: 04 Feb 2009
curmudgeon
Posted 11 July 2014 - 07:24 AM
Finally the last challenge is how I'm going to create a hole for the power plug and possibly ac vent. The challenge with the power plug is that the head is so much bigger then the cord itself.
You could perhaps mount a 3-way adapter to the inside of the shed with some straps, with the prongs sticking out to the outside, and just plug your cord on to it when in use.
#17
rigelsys
-
-
-
- Posts: 1,235
- Joined: 21 Aug 2006
Vendor (Rigel Systems)
Posted 11 July 2014 - 11:54 AM
Go inside with the doors shut, and look at a corner, you'll see light coming through. Where the light is coming through is enough room for an electrical cord. If you cut the head off the cord, you can push it through the gap then install a head.
http://www.homedepot...-Replacement...
http://www.homedepot...-Replacement...
#18
akulapanam
-
-
topic starter
- Posts: 2,907
- Joined: 26 Aug 2012
Mercury-Atlas
Posted 13 July 2014 - 12:20 AM
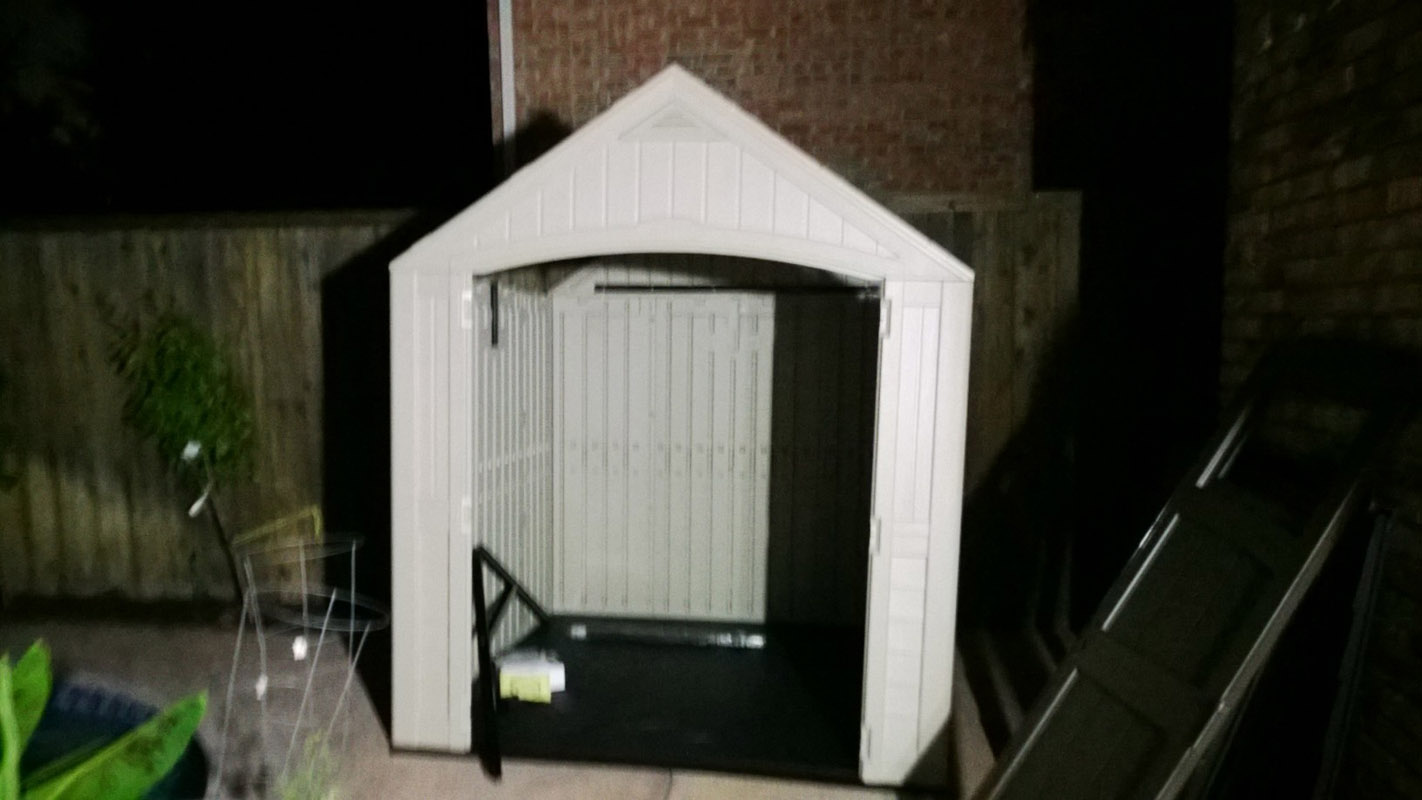
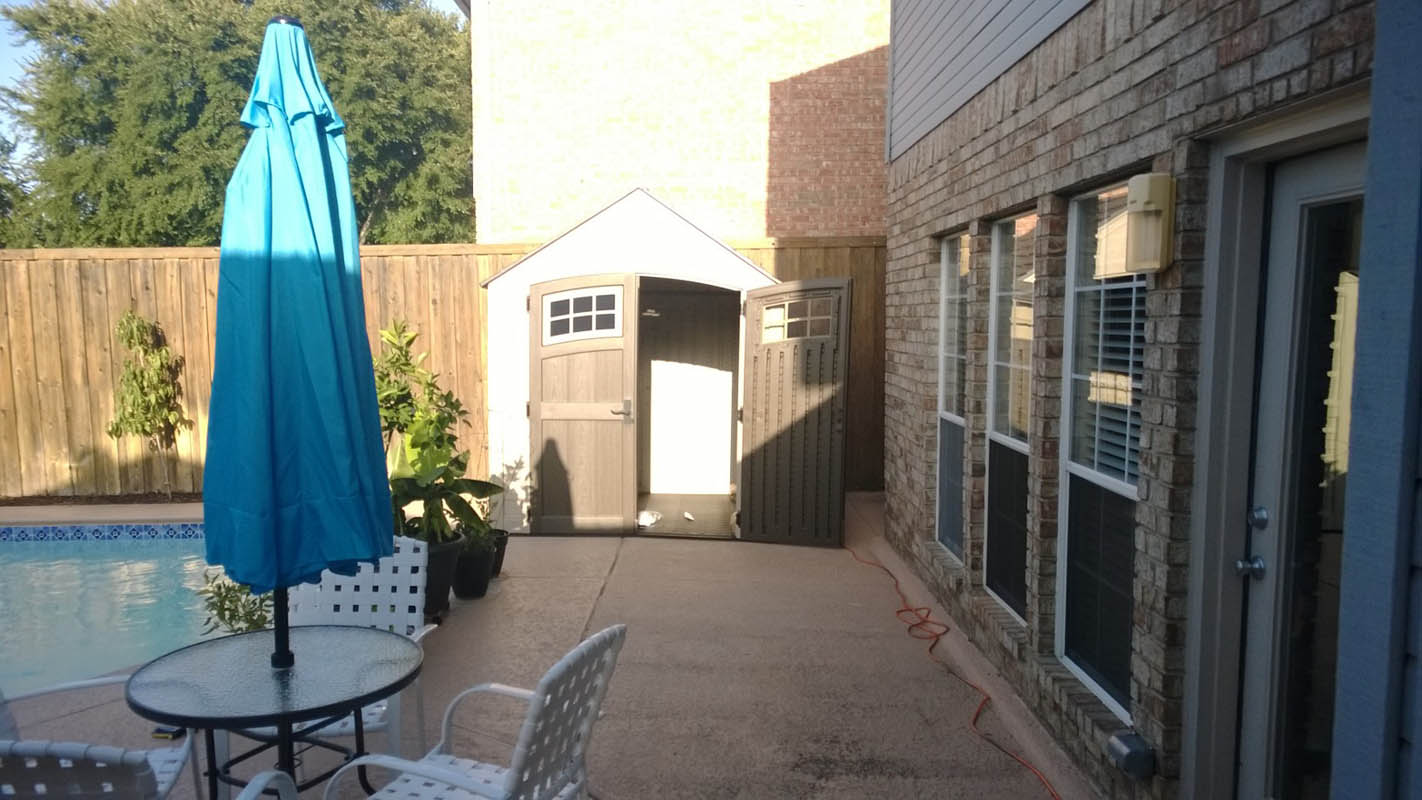
Here is a photo of the completed shed.
Attached Thumbnails
#19
akulapanam
-
-
topic starter
- Posts: 2,907
- Joined: 26 Aug 2012
Mercury-Atlas
Posted 13 July 2014 - 12:31 AM
The past couple of days the outside weather has been around 100 degrees. Inside the shed has been averaging about 115 max which is not quite as hot as I would have expected. My goal is to keep the shed inside under 100 max. To achieve this I'm going to start with a fan and white tarp over the roof. After that if needed I'll buy a portable AC unit.
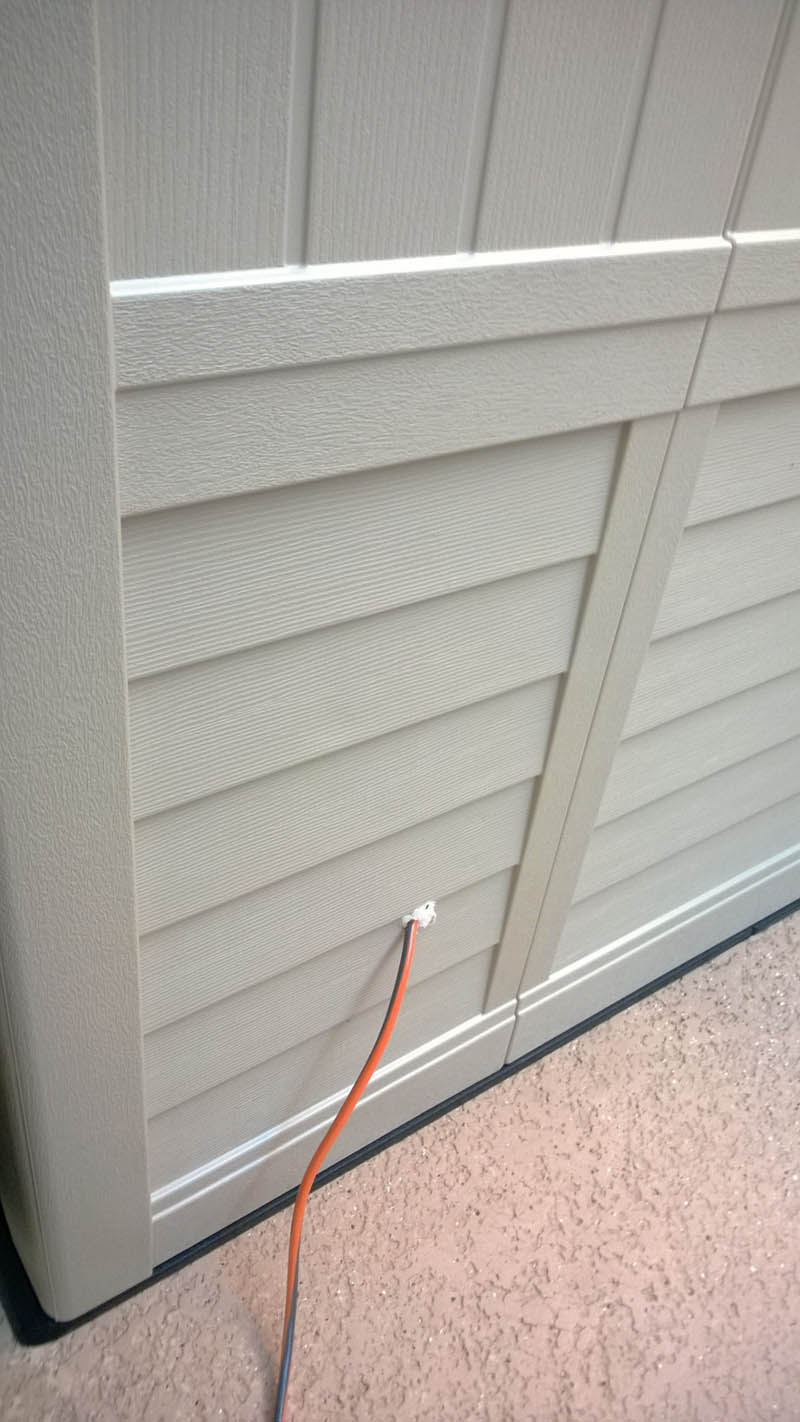
In order to get the electrical cord through I ended up drilling with a 1.5" paddle bit. Then I'm using several coats of silicon sealant around the cord itself. I also installed a extra duty electric socket protector (see photo above). Inside the shed the cord connects to a power strip and then a automatic light timer. The timer is set to turn a small fan on to run between about 11am and 9pm.
In order to get the electrical cord through I ended up drilling with a 1.5" paddle bit. Then I'm using several coats of silicon sealant around the cord itself. I also installed a extra duty electric socket protector (see photo above). Inside the shed the cord connects to a power strip and then a automatic light timer. The timer is set to turn a small fan on to run between about 11am and 9pm.
Attached Thumbnails
#20
bseltzer
-
-
- Posts: 1,028
- Joined: 28 Oct 2007
Apollo
Posted 13 July 2014 - 04:08 PM
If you eventually do consider getting a portable AC unit, have a look at the KoldFront PC801W. I've got one in the Cascade, and it keeps the interior temp 10-12° lower than the outside nicely.
One thing you'll find if/when you do look for one is that the reviews on these things run hot and cold (pun NOT intended). Of the 50 or so consumer reviews I saw on this unit about 50% were 4 stars or better about 15% were 3 stars, and all the rest were 1 star. Methinks a lot of people make unreasonable demands on portable AC units because the same was true of all the other units I looked regardless of price. Speaking of price, the KoldFront was very reasonably compared to other 8000BTU single exhaust units I looked at.
One thing you'll find if/when you do look for one is that the reviews on these things run hot and cold (pun NOT intended). Of the 50 or so consumer reviews I saw on this unit about 50% were 4 stars or better about 15% were 3 stars, and all the rest were 1 star. Methinks a lot of people make unreasonable demands on portable AC units because the same was true of all the other units I looked regardless of price. Speaking of price, the KoldFront was very reasonably compared to other 8000BTU single exhaust units I looked at.
#21
akulapanam
-
-
topic starter
- Posts: 2,907
- Joined: 26 Aug 2012
Mercury-Atlas
Posted 16 July 2014 - 09:51 PM
I'm thinking about it. I need a larger fan but I think that alone is going to keep it around 105 or so. How big was the hose? I assume you used a jigsaw to cut the opening and are using a piece of pipe between the hose and wall?
#22
bseltzer
-
-
- Posts: 1,028
- Joined: 28 Oct 2007
Apollo
Posted 17 July 2014 - 11:39 AM
The Cascade version of the your shed comes with a window one one side. As you suspected, I used a jigsaw to cut a suitably sized oval out of the clear plastic in the window to accept the exhaust hose adapter that came with the unit. A 5 or 6" diameter flexible exhaust hose came with the AC unit I got. It was a bit 'fiddly' to assemble but worked as designed.
With a small floor fan in the shed to circulate the air, I've been able to keep the interior of the shed right around 80 to 85° during the recent bout of triple digit daytime highs out here. I suspect throwing a white tarp over the shed as others have suggested would lower the temp even more.
With a small floor fan in the shed to circulate the air, I've been able to keep the interior of the shed right around 80 to 85° during the recent bout of triple digit daytime highs out here. I suspect throwing a white tarp over the shed as others have suggested would lower the temp even more.
CNers have asked about a donation box for Cloudy Nights over the years, so here you go. Donation is not required by any means, so please enjoy your stay.

Recent Topics
-
-

-
 Statue of Liberty Nebula - NGC 3576 / 3603 with plenty of SII
AaronH - Today, 10:28 PM
Experienced Deep Sky Imaging
-
 Sunrise on Copernicus and shadows in Plato: April 17, 2024
Physicsman - Today, 10:11 PM
Lunar Observing and Imaging
-

-

-
Losing detail on solar imaging. Is this tilt?
TrollShark - Today, 09:33 PM
Solar Observing and Imaging
-
-

-
Question about first DSO photography telescope
Antariksha1 - Today, 09:27 PM
Beginning Deep Sky Imaging


