I picked up three sheets of 18"x4' planked pine sheets. These are narrow pine boards glued together to make larger sheets, they are finished sanded and look nice, though they are on the heavy side. I cut 12" off of three, then glued the scrap up to make a 4th 3' section. I do love being frugal. Some sweating with a plane and some sanding, and the franken-piece will work fine.

My 16" f7.2 Newt project code named "Grace"
Started by
Sean Cunneen
, Jan 02 2013 11:18 AM
154 replies to this topic
#51

Sean Cunneen
-

-
-
 topic starter
- Posts: 4,670
- Joined: 01 Aug 2007
Let Me Think
Posted 06 April 2013 - 05:45 PM
Goings have been slow, but I am making progress now, I hit some snags and made some twists and turns in my initial design, working out some of those took quite some time...
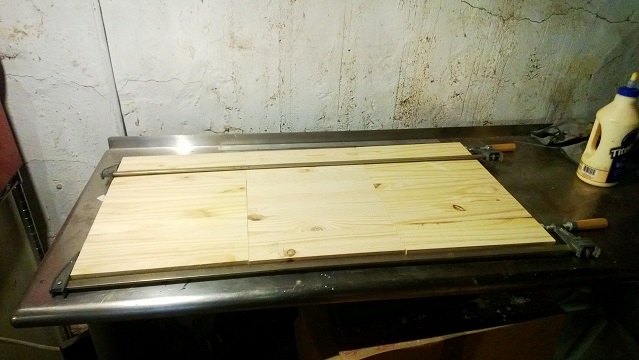
I picked up three sheets of 18"x4' planked pine sheets. These are narrow pine boards glued together to make larger sheets, they are finished sanded and look nice, though they are on the heavy side. I cut 12" off of three, then glued the scrap up to make a 4th 3' section. I do love being frugal. Some sweating with a plane and some sanding, and the franken-piece will work fine.
I picked up three sheets of 18"x4' planked pine sheets. These are narrow pine boards glued together to make larger sheets, they are finished sanded and look nice, though they are on the heavy side. I cut 12" off of three, then glued the scrap up to make a 4th 3' section. I do love being frugal. Some sweating with a plane and some sanding, and the franken-piece will work fine.
#52
Sean Cunneen
-
-
-
topic starter
- Posts: 4,670
- Joined: 01 Aug 2007
Let Me Think
Posted 06 April 2013 - 05:49 PM
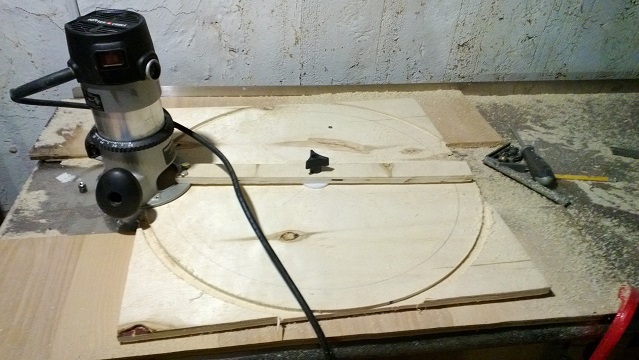
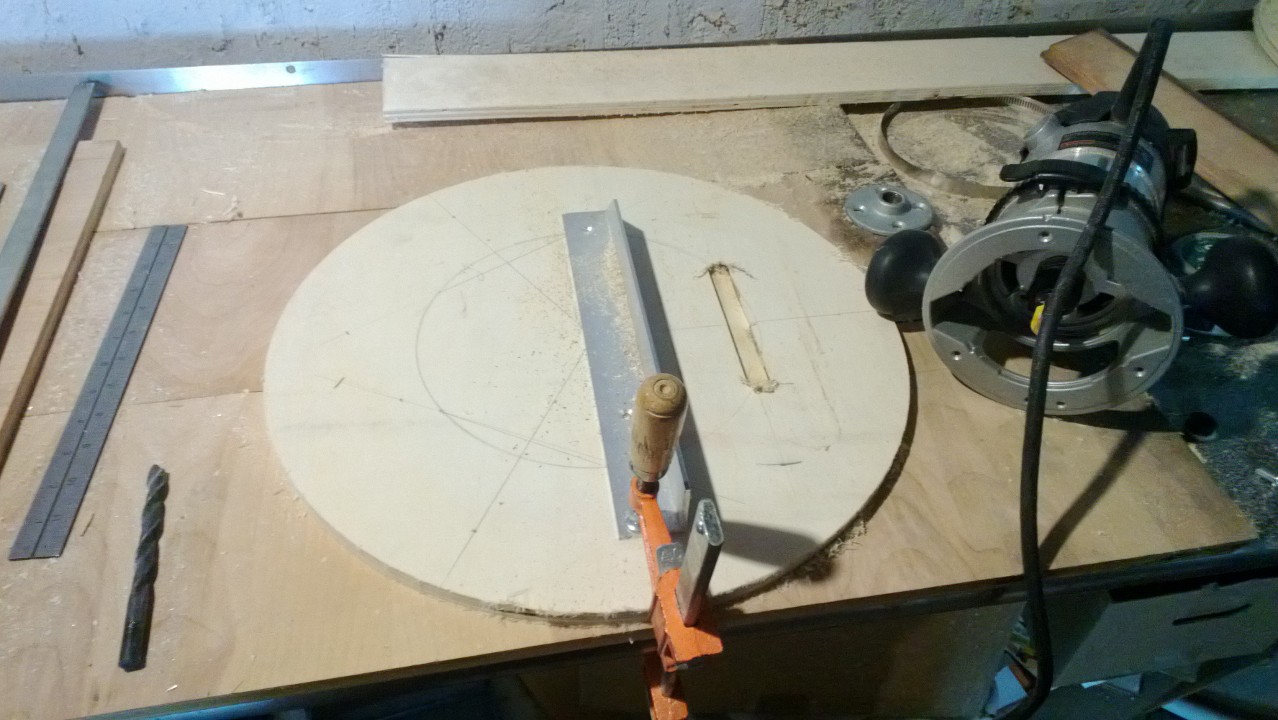
Next up is an 8' x24" sheet of birch ply... This will be cut into 24" squares and the scrap used for support pieces for the cell. A couple are used for the rings of the UTA, and 3 are cut for baffles for the LTA. Below is my circle jig for the OTA... The clamping knob makes it look so... so... classy.
Attached Thumbnails
#53
Sean Cunneen
-
-
-
topic starter
- Posts: 4,670
- Joined: 01 Aug 2007
Let Me Think
Posted 06 April 2013 - 05:52 PM
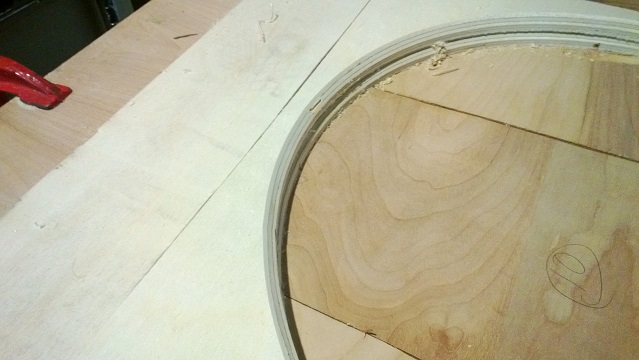
For the baffles, I then ran the router around the inner circle with an angle bit to rough cut what will be knife edges after some finish sanding...
Attached Thumbnails
#54
Sean Cunneen
-
-
-
topic starter
- Posts: 4,670
- Joined: 01 Aug 2007
Let Me Think
Posted 06 April 2013 - 05:56 PM
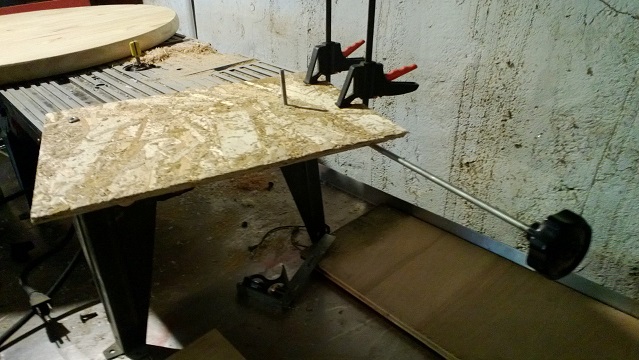
Next I had to make a jig to true and flatten the circle that will become the altitude bearings. I picked up a planked pine 24" round that had been dropped. It split in half so the floor manager let me have it for $2. I'll take that any day. Some glue, some clamping, wood putty and sanding and it looked like new.
For the jig I made a radius extension for my router table...
For the jig I made a radius extension for my router table...
Attached Thumbnails

#55
Sean Cunneen
-
-
-
topic starter
- Posts: 4,670
- Joined: 01 Aug 2007
Let Me Think
Posted 06 April 2013 - 05:58 PM
The circle mounts onto the threaded shaft then I spun the wheel against the cutting bit of the router. That gave me a true circle with an accurate center hole!
Attached Thumbnails
#56
Sean Cunneen
-
-
-
topic starter
- Posts: 4,670
- Joined: 01 Aug 2007
Let Me Think
Posted 06 April 2013 - 06:00 PM
A shot of my rigged radius control knob assembly...
Crawford Machining, beware, I'm coming for ya...
Crawford Machining, beware, I'm coming for ya...
Attached Thumbnails
#57
Sean Cunneen
-
-
-
topic starter
- Posts: 4,670
- Joined: 01 Aug 2007
Let Me Think
Posted 06 April 2013 - 08:38 PM
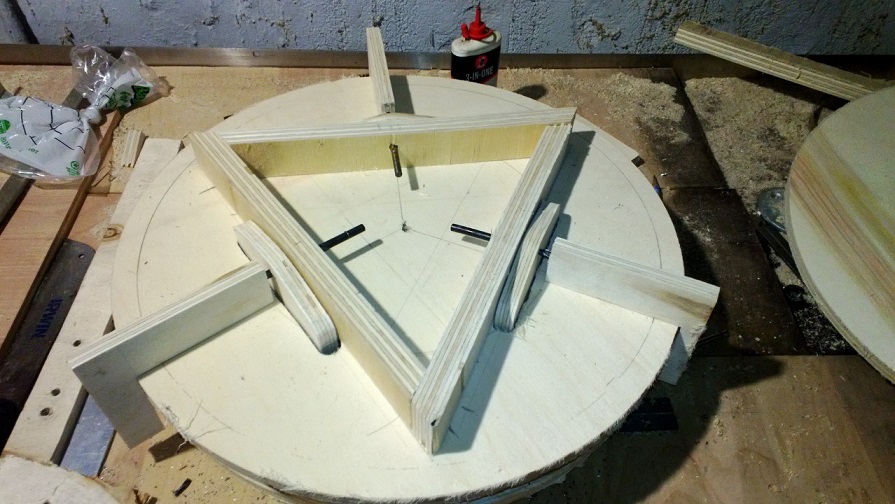
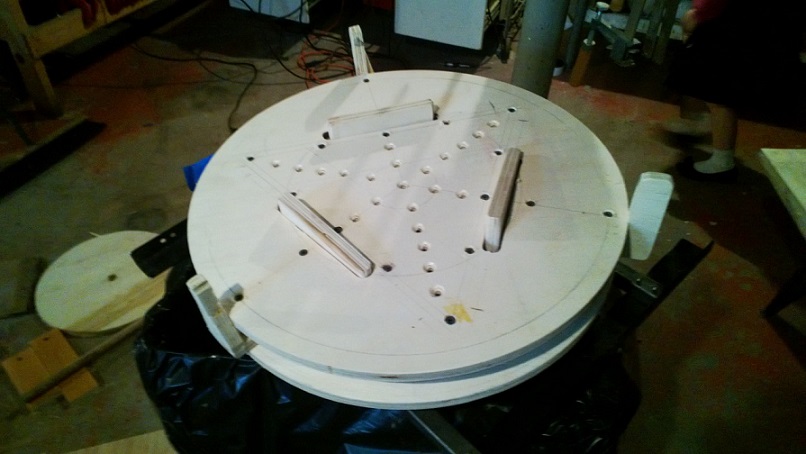
Now that I have the LTA sides cut, baffles cut, side trim cut, UTA rings cut, base cut, base sides cut, it's time for the cell. The mirror is a stout 40#, 1.75" thick Pyrex, so it won't be overly sensitive to mounting supports, but it will take a while to cool. After some Plop research and some Kriege and Berry(sp?) research, I've decided on a 6pt cell with 3 each 2 points on a teeter/totter. I am constructing the cell out of the rounds from the routing of the UTA with a stiffening structure in between that will hold the mirror supports. This design took a while to work itself out dimensions-wise. There was more than a few times I searched for a ready-made 16" cell. My children are cute however, and I am not allowed to trade them for Telescope parts.
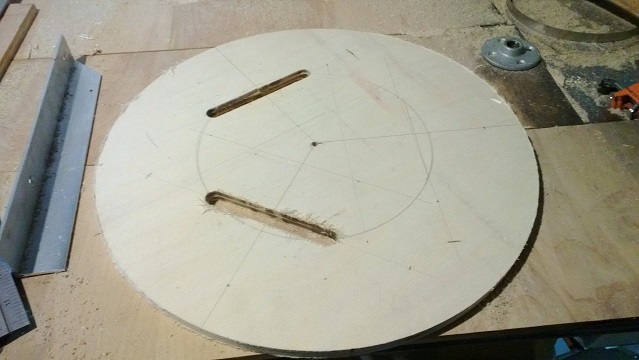
Below shows the upper cell round getting slots routed for the mirror supports. If you look close you can see all the geometry worked out and you might get a hint of what's to come!
Below shows the upper cell round getting slots routed for the mirror supports. If you look close you can see all the geometry worked out and you might get a hint of what's to come!
Attached Thumbnails
#58
Sean Cunneen
-
-
-
topic starter
- Posts: 4,670
- Joined: 01 Aug 2007
Let Me Think
Posted 06 April 2013 - 08:38 PM
and one more...
Attached Thumbnails
#59
jgraham
-
-

- Posts: 24,437
- Joined: 02 Dec 2004
ISS
Posted 06 April 2013 - 08:55 PM
What a neat project! My 16.5" is an f/6.5. I ground it long to give me a good chance at producing a good figure and allow me to use a small, affordable, diagonal. I've since bought a 16" f/4.5 to serve as a more compact companion, but I love my biggo 16.5".
#60
Jeff Morgan
-
-

- Posts: 16,170
- Joined: 28 Sep 2003
James Webb Space Telescope
Posted 07 April 2013 - 09:28 AM
Goings have been slow, but I am making progress now, I hit some snags and made some twists and turns in my initial design, working out some of those took quite some time...
I picked up three sheets of 18"x4' planked pine sheets. These are narrow pine boards glued together to make larger sheets, they are finished sanded and look nice, though they are on the heavy side. I cut 12" off of three, then glued the scrap up to make a 4th 3' section. I do love being frugal. Some sweating with a plane and some sanding, and the franken-piece will work fine.
Thanks for the progress report Sean, it's fun to watch your progress.
I'm starting a rebuild on my 16" f/7 today. The explanation is lengthy and I don't want to hijack your thread, perhaps I'll start a new thread.
The design allows me to build up some of the larger wood sheets like you're doing from the numerous scraps I have laying around. I'm done with furniture-quality clear/poly finishes, going with paint so the seams will never show.
Have you made a decision on truss connectors? I just got a set of quick release clamps from Aurora Precision, a clever design with excellent build quality. Check out their video on Youtube. Pretty reasonable on cost too if you go with the simple lower clamp system vs. the more traditional design.
#61
Sean Cunneen
-
-
-
topic starter
- Posts: 4,670
- Joined: 01 Aug 2007
Let Me Think
Posted 07 April 2013 - 10:49 AM
Thanks Jeff, I am going to have my trusses fasten semi-permenantly to the top baffle which will then bolt to my LTA. Because of the overall size of the scope, I had to think about construction and transportationo in terms of sub-assembly, so the scope will break down into 3 main pieces that should *just* fit in the back of my Caravan. If I should be forced to carry passengers or another scope, then the truss assembly will break down more traditionally and I'll assemble the trusses on the field. When the trusses look to be in the 7'-8' long range, I think you should evaluate traditional dob set up and breakdown proceedures very carefully. I'll be putting this thing together myself in low-light conditions and since the weights and moments of these long pieces will bend or snap their mounting points if something bad happens, I have to have some options!
#62
Sean Cunneen
-
-
-
topic starter
- Posts: 4,670
- Joined: 01 Aug 2007
Let Me Think
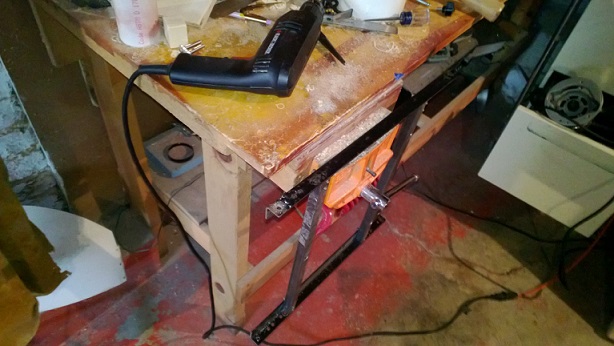
Posted 09 April 2013 - 09:26 PM
Some more progress:
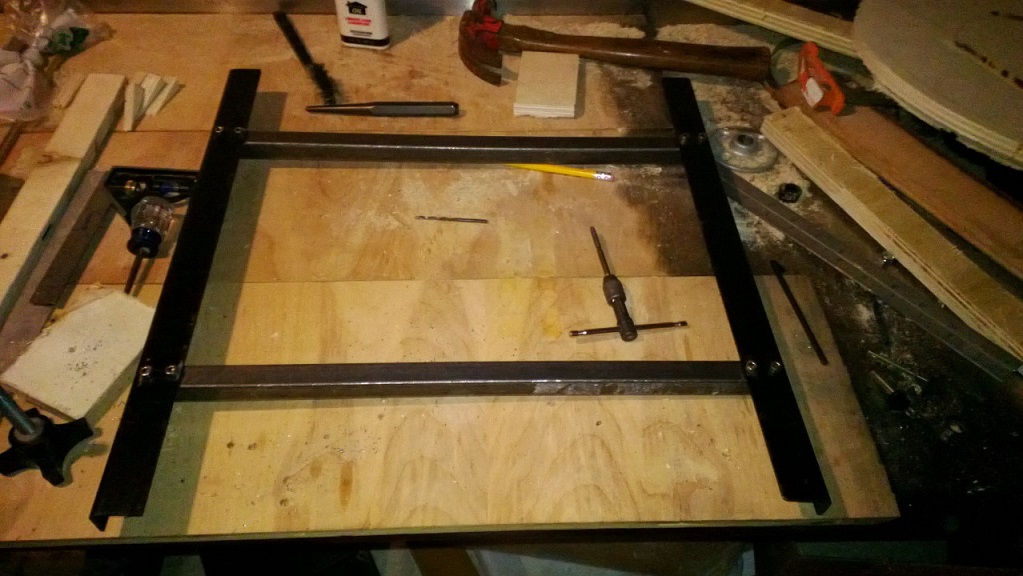
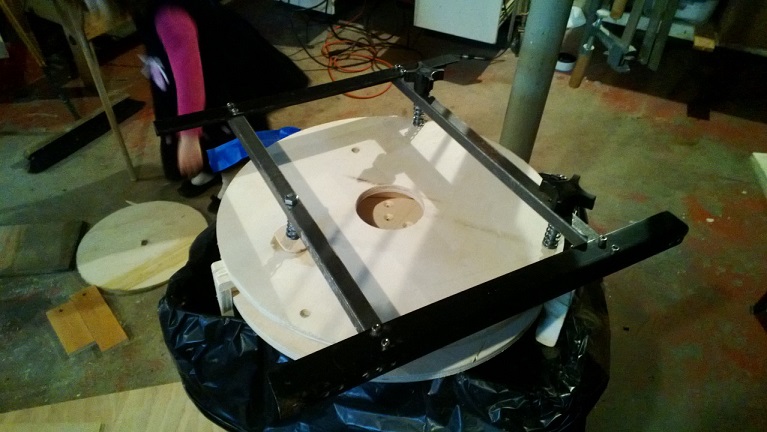
The cell support is built from angle iron scavenged from the chair and some 3/4" square iron stock. I can't weld, so some drilling, tapping and pretty stainless steel socket head screws. The cell and mirror will ride on this frame and I am going to hinge the assembly so that I can insert the mirror easily once the whole scope is assembled on the field.
The cell support is built from angle iron scavenged from the chair and some 3/4" square iron stock. I can't weld, so some drilling, tapping and pretty stainless steel socket head screws. The cell and mirror will ride on this frame and I am going to hinge the assembly so that I can insert the mirror easily once the whole scope is assembled on the field.
Attached Thumbnails
#63
Sean Cunneen
-
-
-
topic starter
- Posts: 4,670
- Joined: 01 Aug 2007
Let Me Think
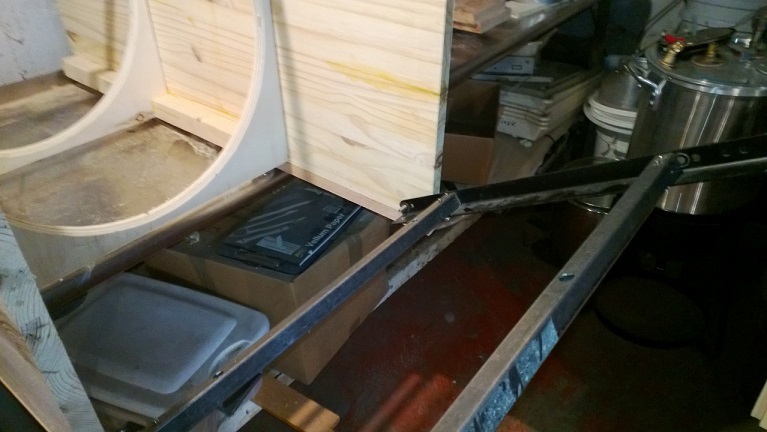
Posted 09 April 2013 - 09:34 PM
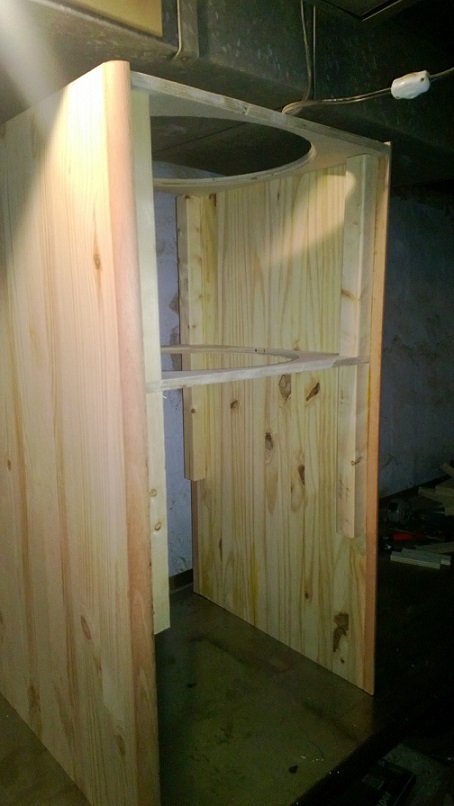
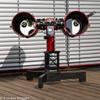
Now, here is where we get to some fun stuff. Lets be honest, there is not a whole lot you can do with a newt these days, so I had to have some fun somewhere! Bear in mind, the pictures that follow are only rough-fit, nothing is glued yet so things look pretty rough, but you'll get the idea soon enough!
Attached Thumbnails

#64
Sean Cunneen
-
-
-
topic starter
- Posts: 4,670
- Joined: 01 Aug 2007
Let Me Think
Posted 09 April 2013 - 09:36 PM
Here is the underside to show some structure. The mirror is pretty hefty, so the pieces are all stiff and thick. I'm not going to go into any detail about what the next few posts will show...
Attached Thumbnails
#65
Scanning4Comets
-
-

- Posts: 17,938
- Joined: 26 Dec 2004
Markus, a.k.a. Scanning4Comets
Posted 10 April 2013 - 03:09 PM

#66
Sean Cunneen
-
-
-
topic starter
- Posts: 4,670
- Joined: 01 Aug 2007
Let Me Think
Posted 26 May 2013 - 02:05 PM
Another update! Starting to feel the progress coming along. Worked through some mistakes and some miscalulations. I found some others but I'll keep those to myself 
The mirror cell is now roughed in and glued up... The Mirror supports have been reinforced, everything sanded and plenty of holes drilled.
The mirror cell is now roughed in and glued up... The Mirror supports have been reinforced, everything sanded and plenty of holes drilled.
Attached Thumbnails
#67
Sean Cunneen
-
-
-
topic starter
- Posts: 4,670
- Joined: 01 Aug 2007
Let Me Think
Posted 26 May 2013 - 02:08 PM
Here is the shot of the underside. I am looking for a third clamp knob, turns out the two I have are a weird size so the search is on for that one! I had to make a couple of trips to the hardware store to find stiff enough springs. The three I have now will provide a nice cushion for that big mirror!
Attached Thumbnails
#68
Sean Cunneen
-
-
-
topic starter
- Posts: 4,670
- Joined: 01 Aug 2007
Let Me Think
Posted 26 May 2013 - 02:13 PM
Next up is the framing of the lower OTA. Each pine panel is trimmed with 3/4' rounded red oak. I started with gluing in reinforcing strips of 2x2.
Attached Thumbnails

#69
Sean Cunneen
-
-
-
topic starter
- Posts: 4,670
- Joined: 01 Aug 2007
Let Me Think
Posted 26 May 2013 - 02:15 PM
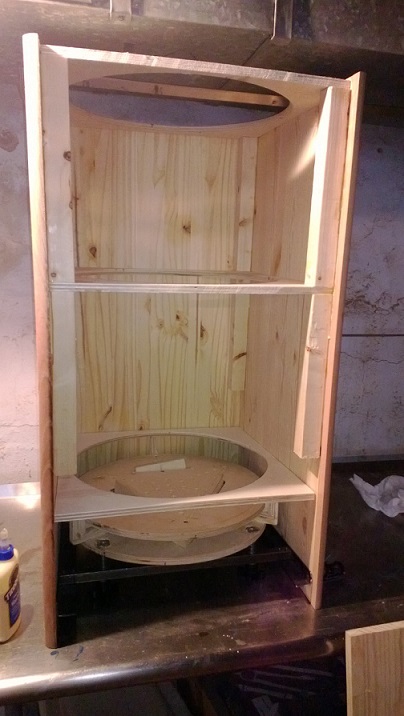
Then the first baffle is glued in with a partial assembly of the rest of the components to make sure the clearances are nice and tight. My daughter thought I was building her the castle she always wanted. I'll let her down easy when she turns 5.
Attached Thumbnails
#70
Sean Cunneen
-
-
-
topic starter
- Posts: 4,670
- Joined: 01 Aug 2007
Let Me Think
Posted 26 May 2013 - 02:16 PM
A final shot of everything coming together.
Attached Thumbnails
#71
cpr1
-
-

- Posts: 926
- Joined: 24 Mar 2012
Viking 1
Posted 26 May 2013 - 03:34 PM
It is really a joy watching you build this scope. Congrats on the progress, looks great. I will definitely follow your build progress. Thanks for posting.
#72
Sean Cunneen
-
-
-
topic starter
- Posts: 4,670
- Joined: 01 Aug 2007
Let Me Think
Posted 04 June 2013 - 09:47 PM
Thanks Christopher! It has been a fun build with some interesting challenges. Things are starting to work themselves out, so the build should progres fairly quickly in the next few weeks.
#73
Sean Cunneen
-
-
-
topic starter
- Posts: 4,670
- Joined: 01 Aug 2007
Let Me Think
Posted 04 June 2013 - 09:51 PM
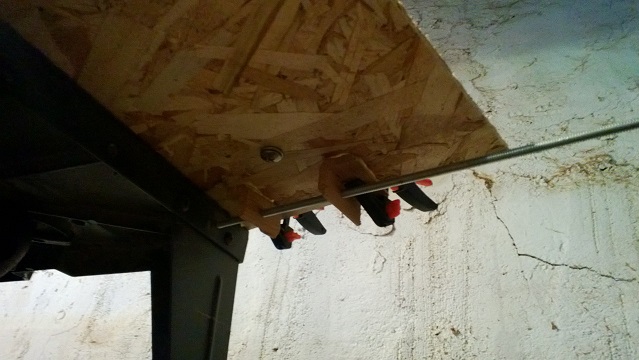
My youngest stayed home sick today so I snuck away for 20 minutes here and there to make some more progress. One gimmick I wanted to try out was a hinged mirror cell so that I can easily install the mirror when traveling. The mechanism is very simple, two carriage bolts through the side of the mirror box straight to the cell rails to act as hinges. Two small clamping knobs to hold the cell rails in the box. Here is the rail assembly getting the holes marked and drilled.
Attached Thumbnails
#74
Sean Cunneen
-
-
-
topic starter
- Posts: 4,670
- Joined: 01 Aug 2007
Let Me Think
Posted 04 June 2013 - 09:53 PM
Test fit...
Attached Thumbnails
#75
Sean Cunneen
-
-
-
topic starter
- Posts: 4,670
- Joined: 01 Aug 2007
Let Me Think
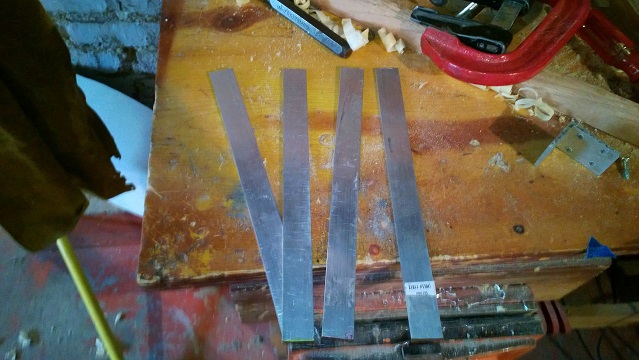
Posted 04 June 2013 - 09:54 PM
I made folding hangers for each side to hold the cell rails out of thin aluminum strips.
Attached Thumbnails
CNers have asked about a donation box for Cloudy Nights over the years, so here you go. Donation is not required by any means, so please enjoy your stay.

Recent Topics
-
 A medium refractor with a big heart....Markarian's chain
pyrasanth - Today, 11:57 AM
Experienced Deep Sky Imaging
-
 Any good NEAF sales happening?
brooklynlou - Today, 11:27 AM
Astronomy Clubs, Star Parties, Shows, & Conferences
-
-

-
-

-
RedCat 51 New Heat Ring - Internal Dew Heater
MonteWilson - Today, 10:49 AM
Vendor and Group Announcements
-
-
-
 Avoiding horizontal lines and taking them out of already existing post-processed images
CrossoverManiac - Today, 10:17 AM
Experienced Deep Sky Imaging


