I'm stuck at this point and can't disassemble the dec axis. Will someone tell you what to do next? How to unscrew the rod inside? I am afraid to use too much force not to destroy something ...
Thanks!
Lukasz

Surveyor 1

Posted 27 January 2021 - 03:33 PM
I'm stuck at this point and can't disassemble the dec axis. Will someone tell you what to do next? How to unscrew the rod inside? I am afraid to use too much force not to destroy something ...
Thanks!
Lukasz
Surveyor 1


Posted 27 January 2021 - 03:57 PM
Try peeling of the felt in the cradle. There may be a nut fastening the dec axis.
Surveyor 1
Posted 27 January 2021 - 04:28 PM
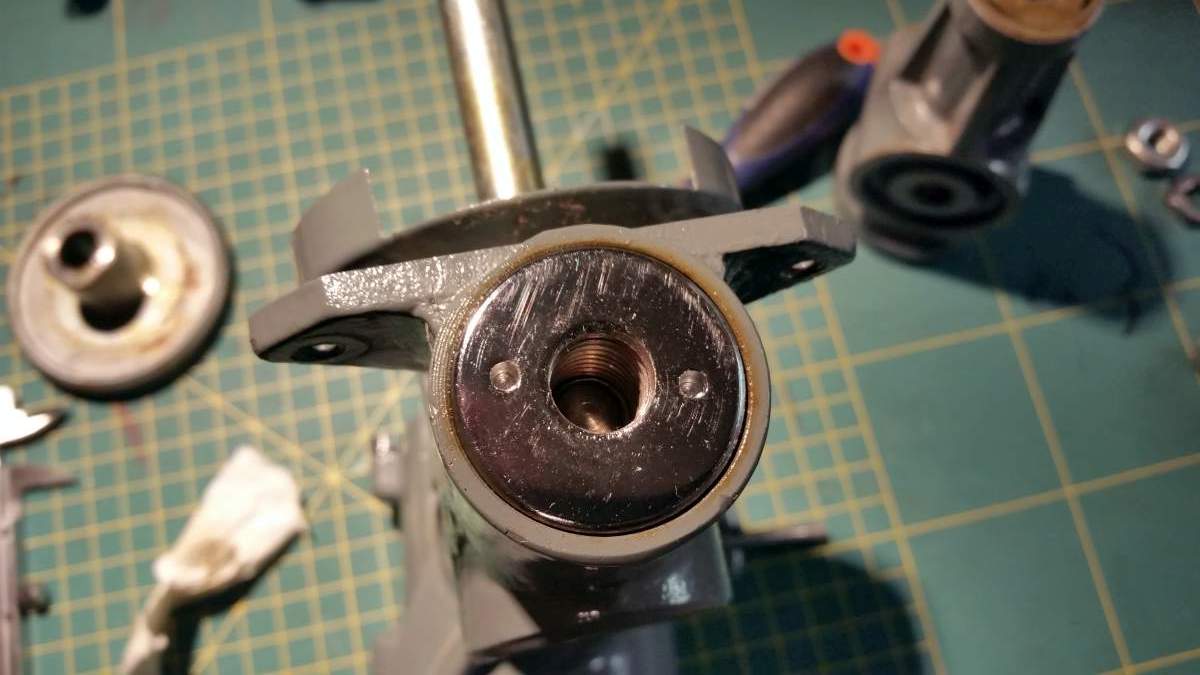
The screw is available, the problem is that everything, including the cradle, rotates with this screw and cannot be disassembled. On the opposite end, the screw is screwed into the socket, into which the counterweight rod is screwed in - the socket also rotetes with the screw... The only thing that comes in my mind is to immobilize the cradle and try to unscrew the socket using the two holes on its surface. But I'm afraid I'll break the cradle and first of all - I don't know if it's the right way.


Surveyor 1
Posted 27 January 2021 - 04:40 PM
OK, I have it! Under the layer of grease on the screw, I found a small allen grub. After unscrewing it, it was possible to unscrew the rod socket and disassemble the whole dec axis. When I'm finished, I'll try to prepare a photographic report.
Surveyor 1

Posted 27 January 2021 - 05:47 PM
can you post more photos of this mount disassembled as you go? it looks similar to the mount used in my eikow / polarascope. would definitely help to have
Surveyor 1
Posted 27 January 2021 - 06:35 PM
can you post more photos of this mount disassembled as you go? it looks similar to the mount used in my eikow / polarascope. would definitely help to have
Sure, when I'm done I'll prepare the documentation and will post it here for future reference (assuming I can reassemble it :-))
Surveyor 1
Posted 28 January 2021 - 11:03 AM
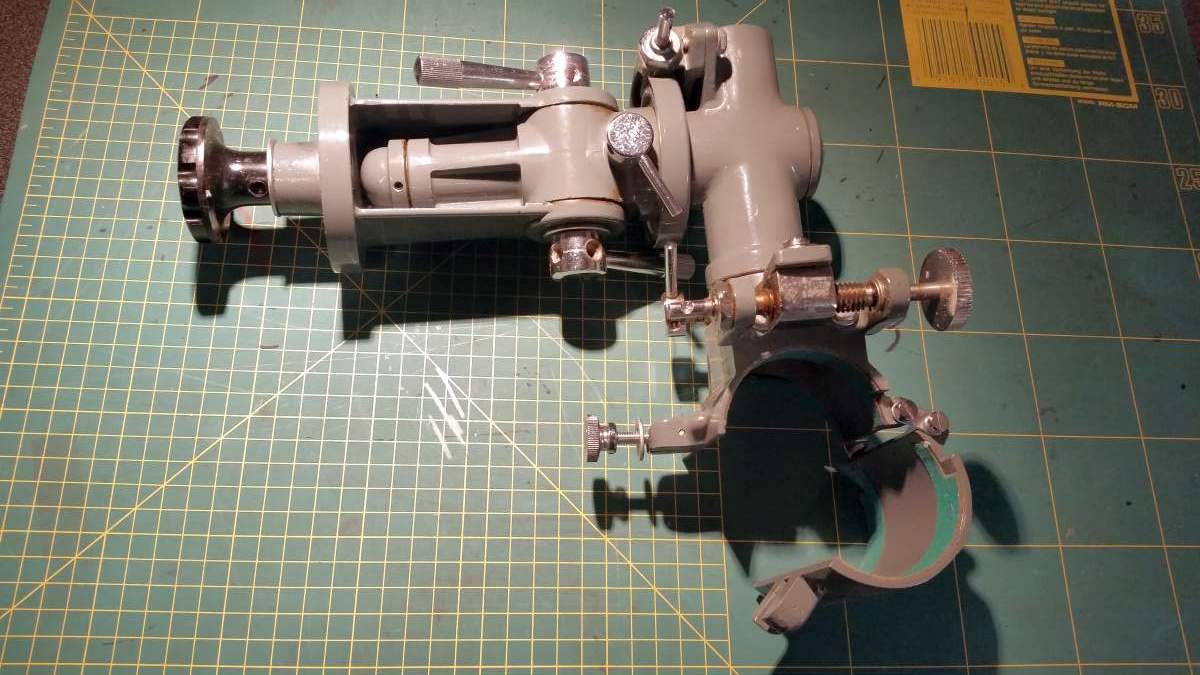
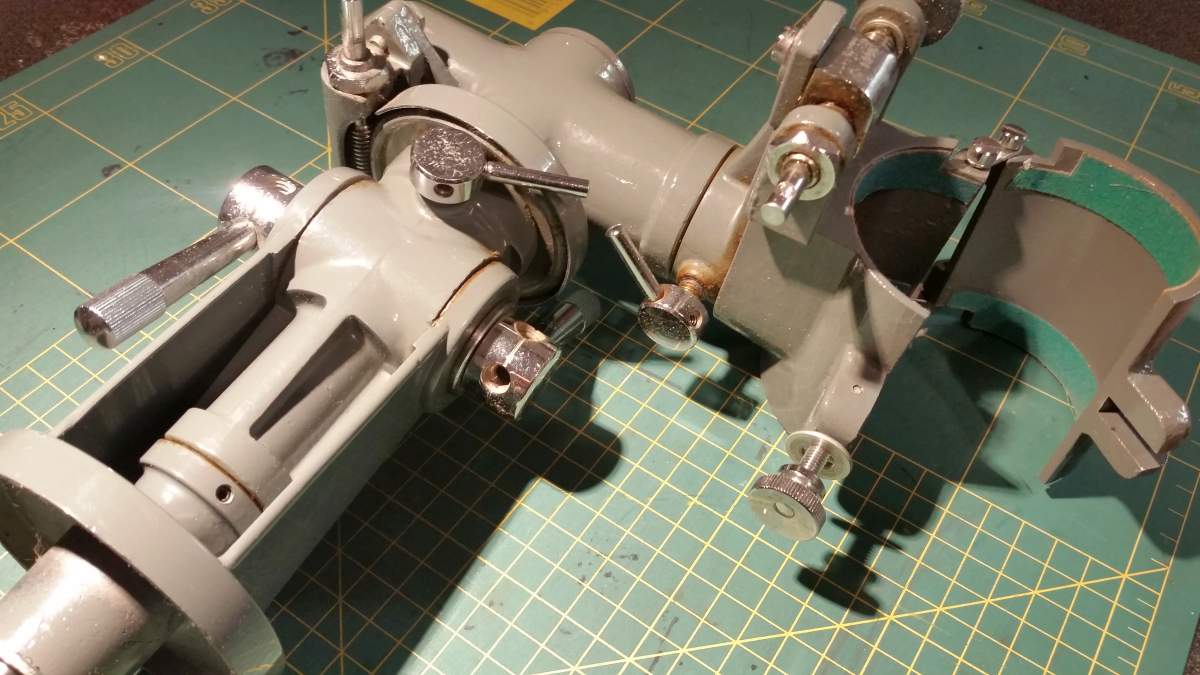
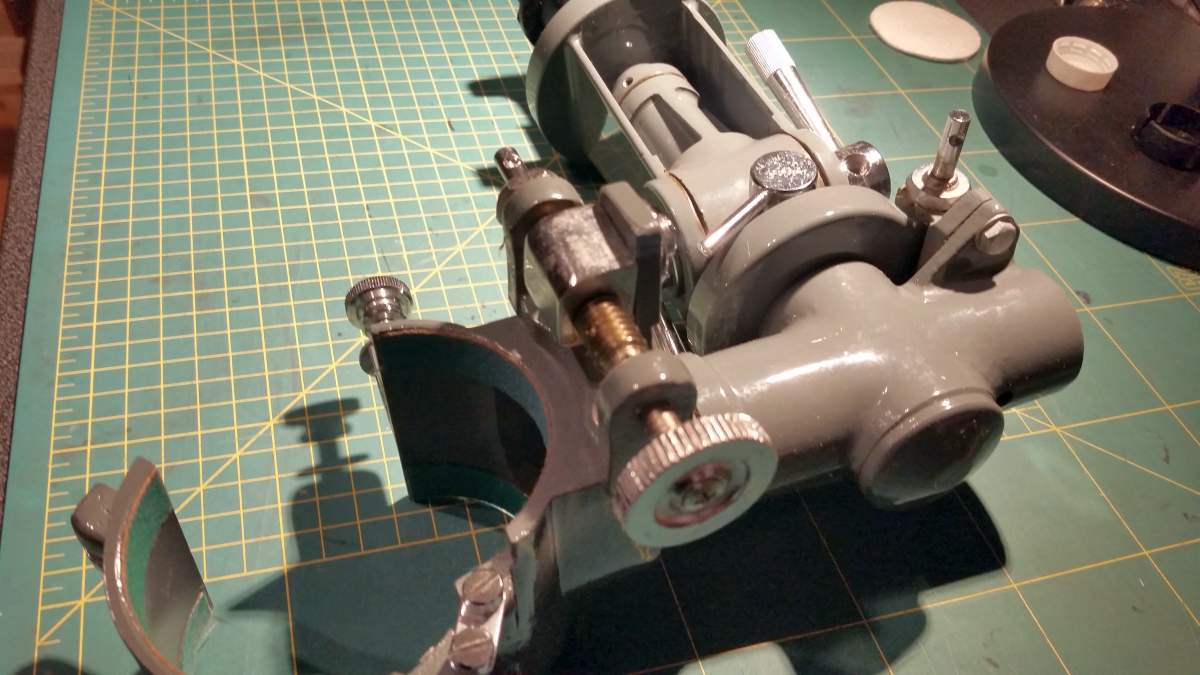
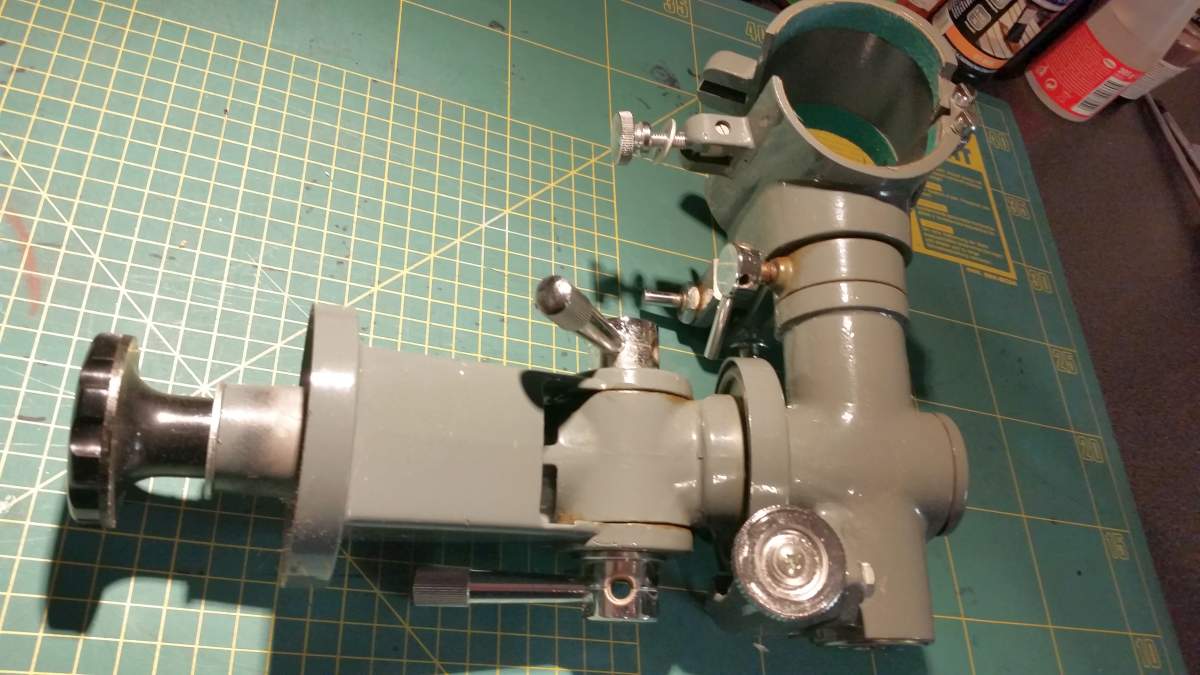
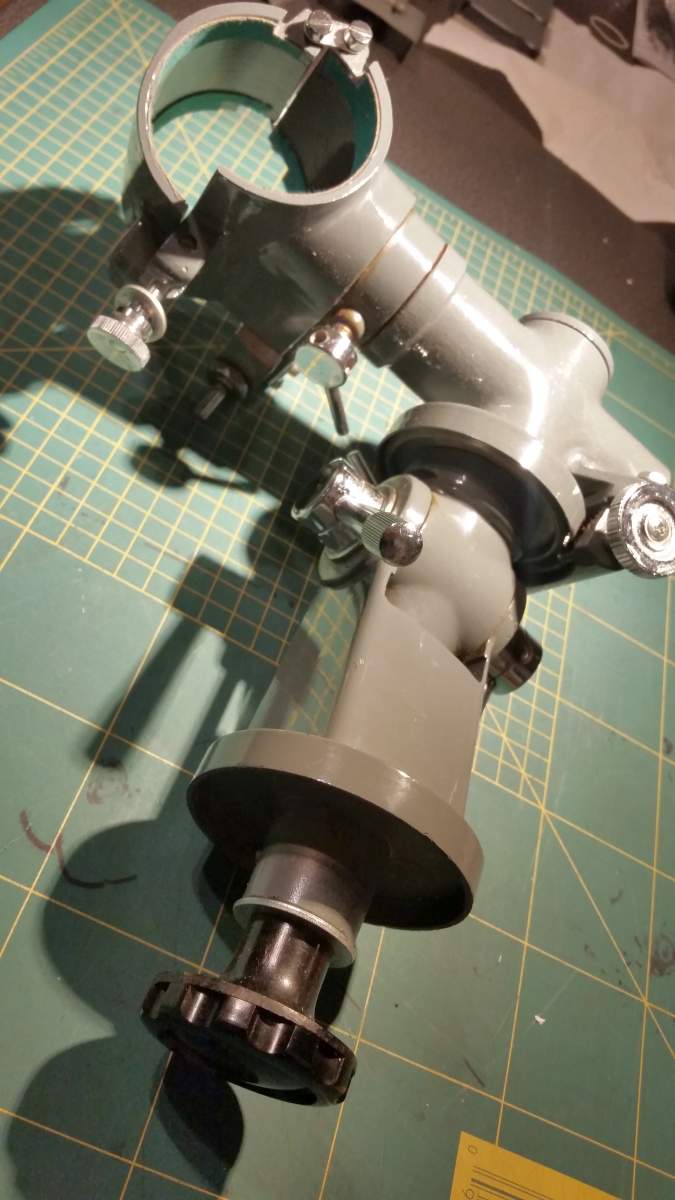
OK, let's start with a few general views of the mount before disassembling it. I will divide it into portions as allowed by file size limitations.
Surveyor 1
Posted 28 January 2021 - 11:04 AM
A few more...

Surveyor 1
Posted 28 January 2021 - 11:06 AM
and more...
Surveyor 1
Posted 28 January 2021 - 11:07 AM
and more...

Surveyor 1
Posted 28 January 2021 - 06:25 PM
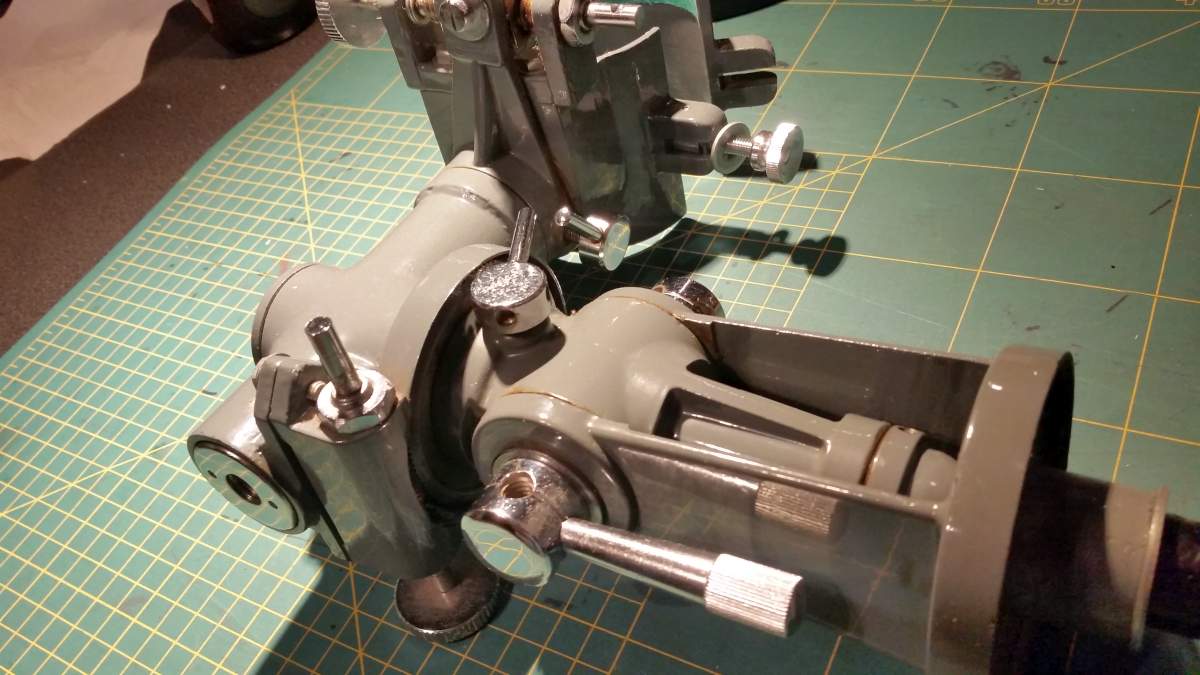
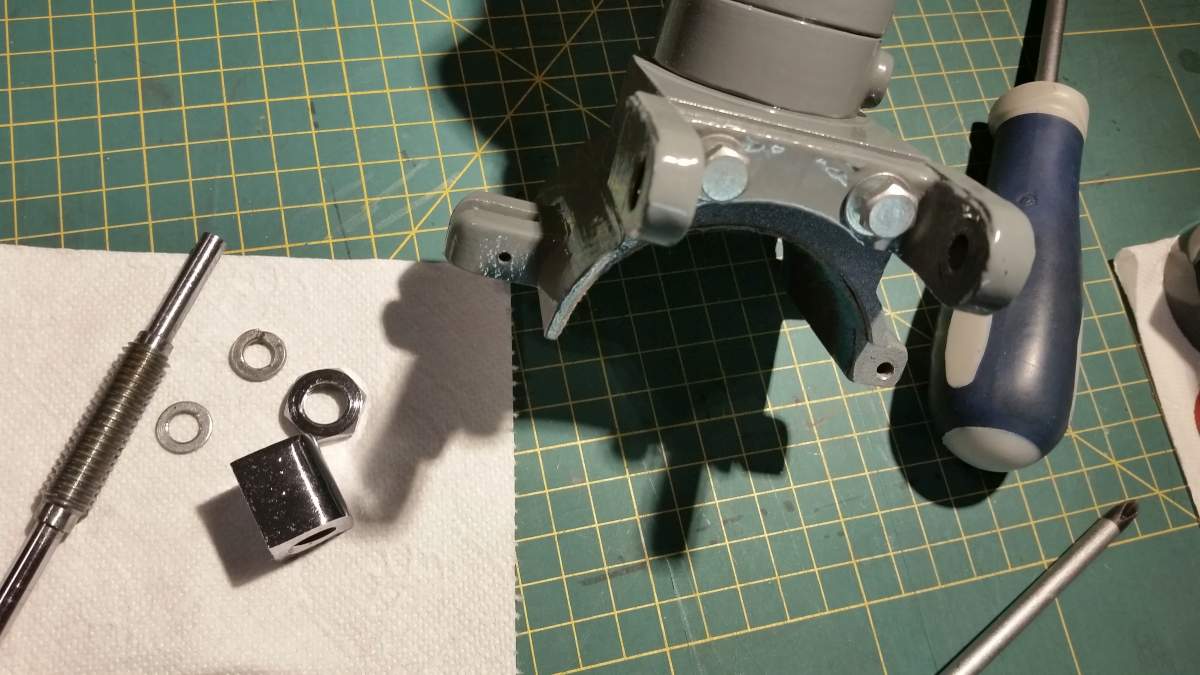
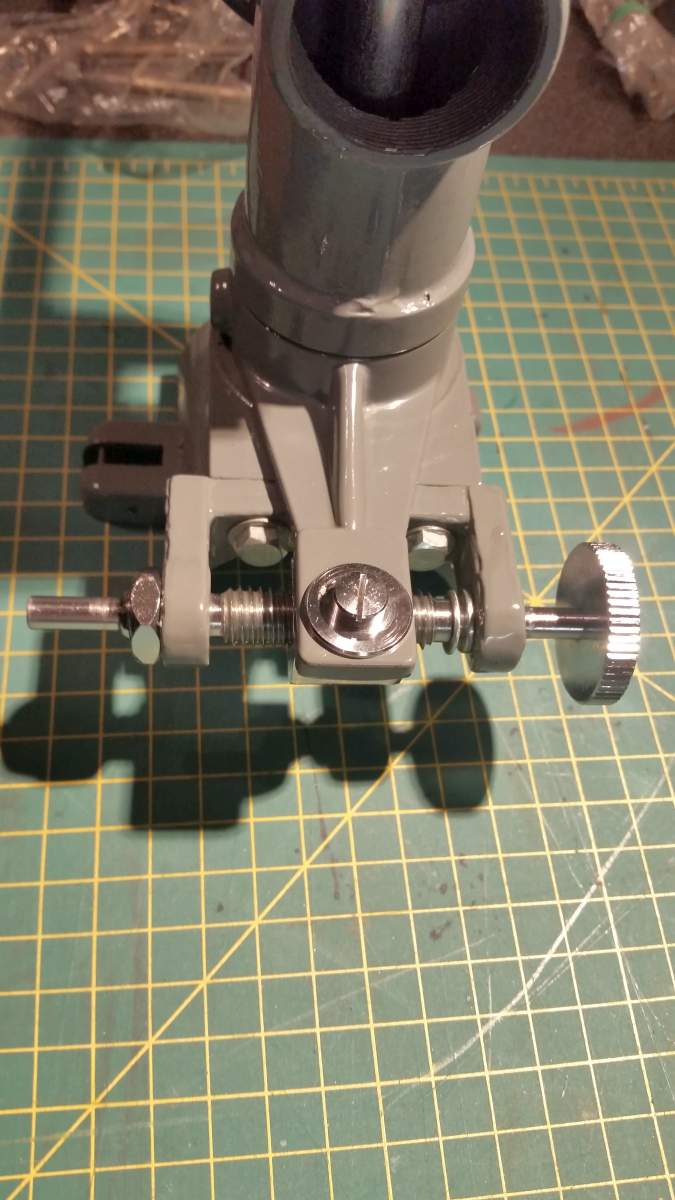
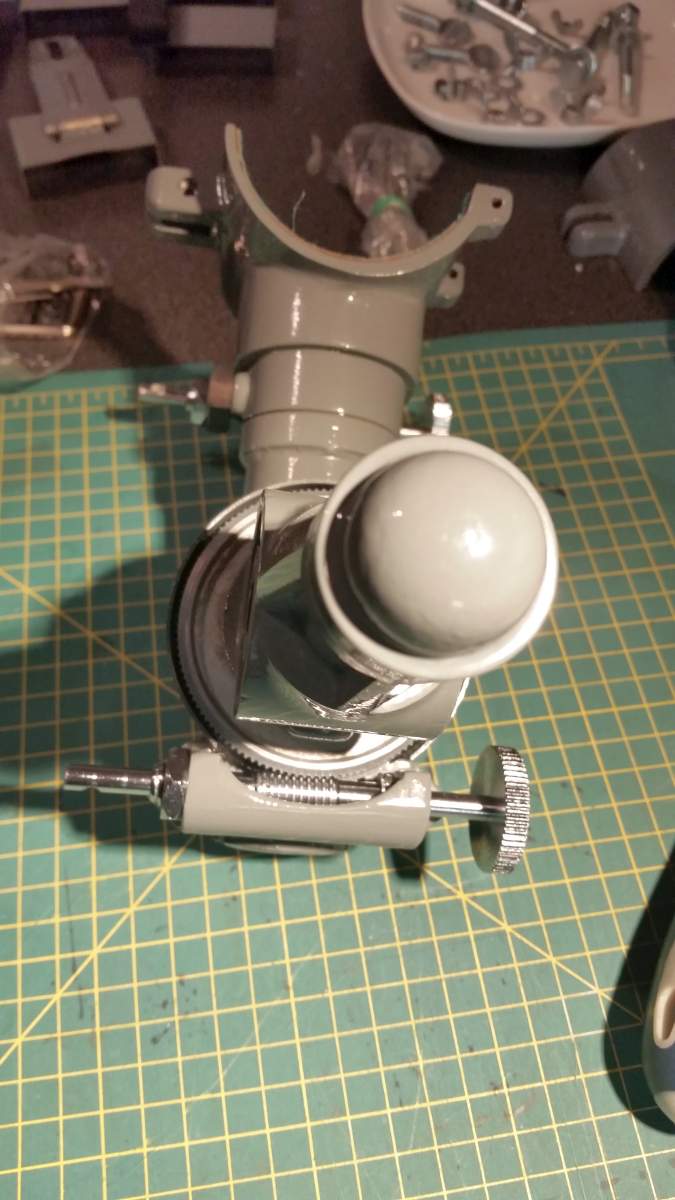
Lets go to disassembling. Removing the RA body from the yoke is easy - there are two chromed, decorative polar axis clamp screws that need to be unscrewed:
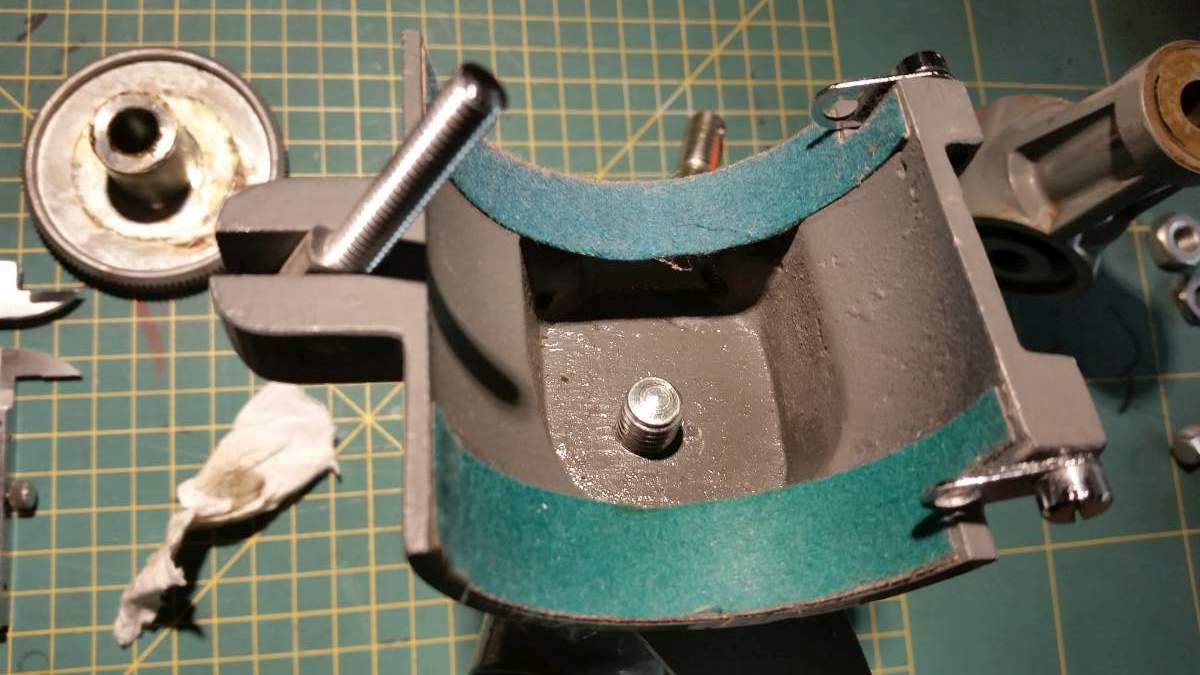
Next I've removed the lock knobs and the top of the cradle to avoid paint damage on this movable element during operation:
Then tripod attachment knob:

Surveyor 1
Posted 28 January 2021 - 06:33 PM
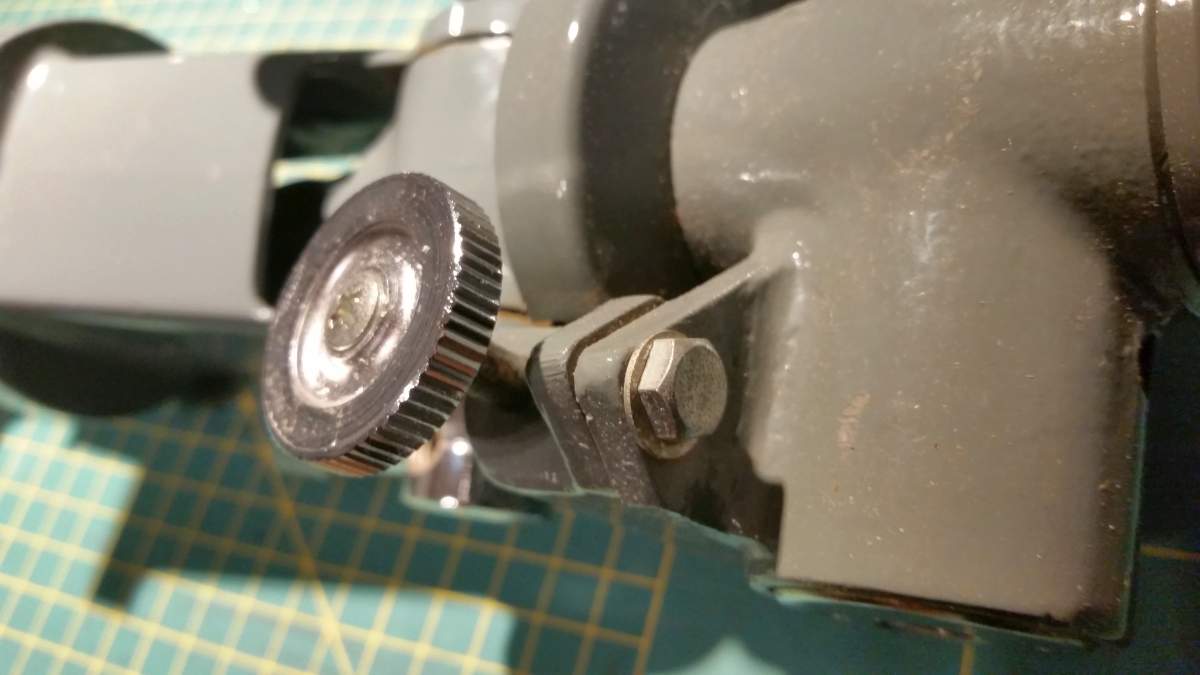
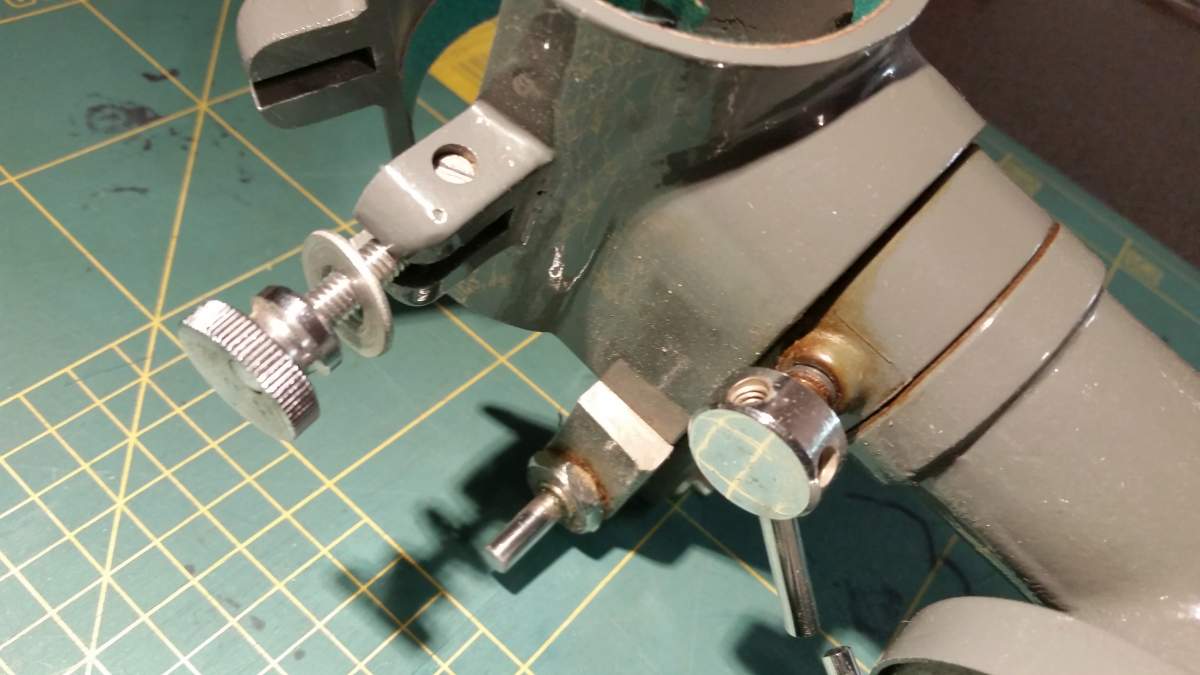
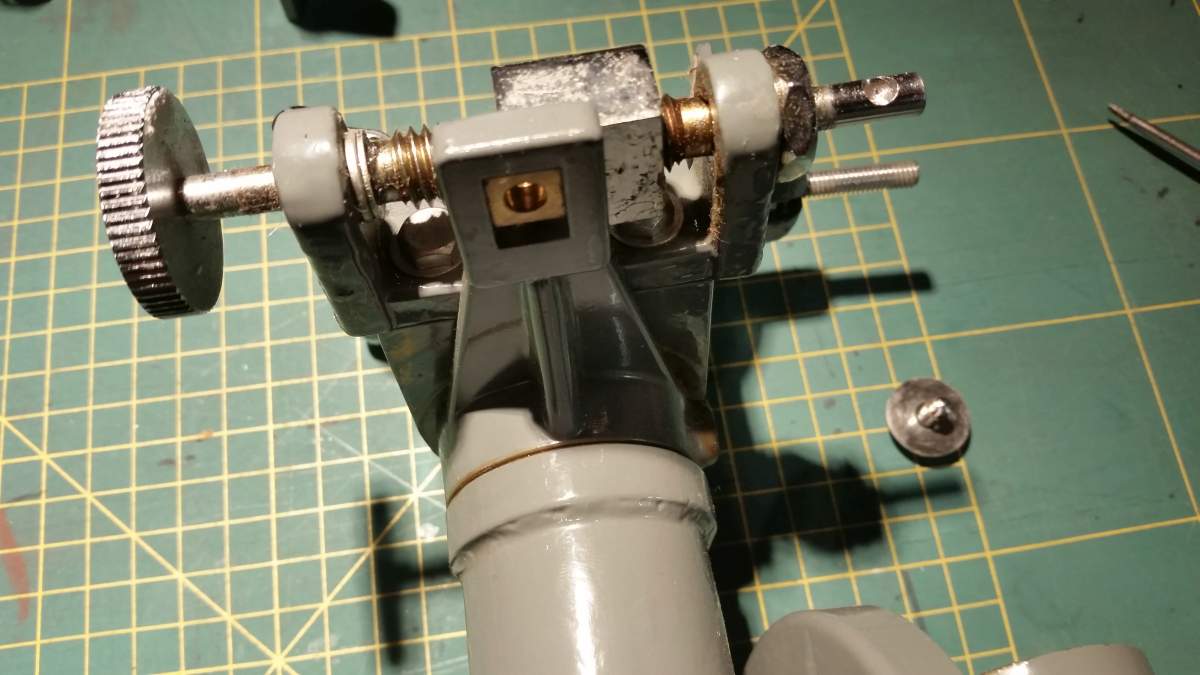
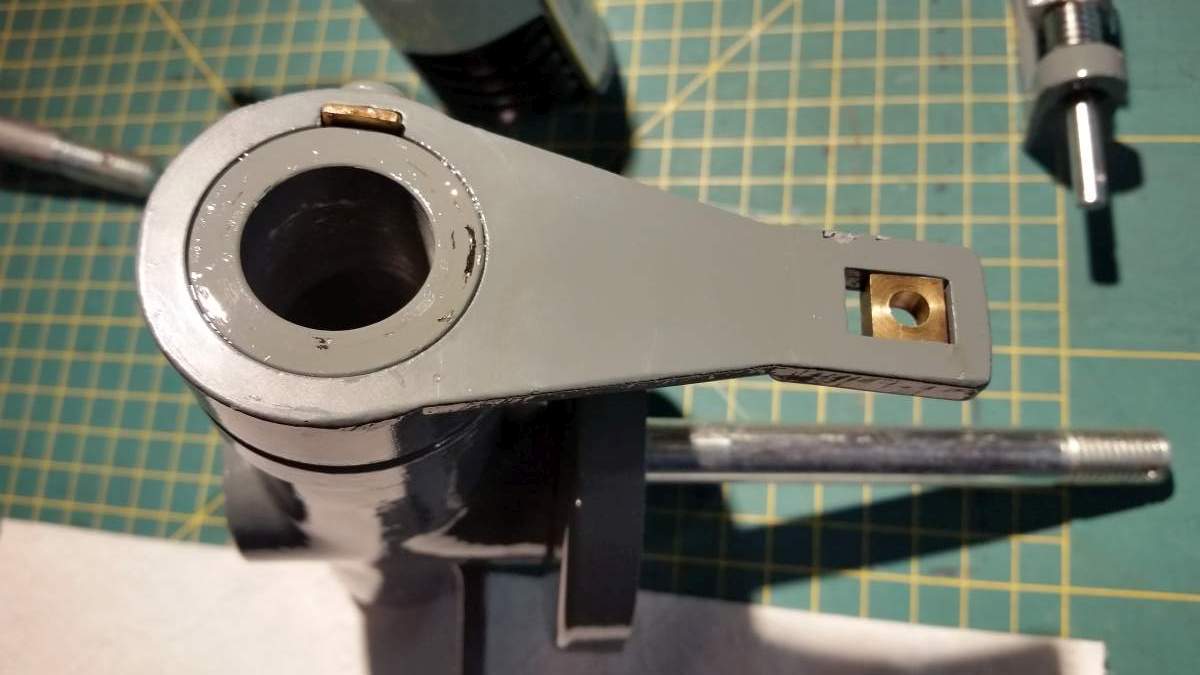
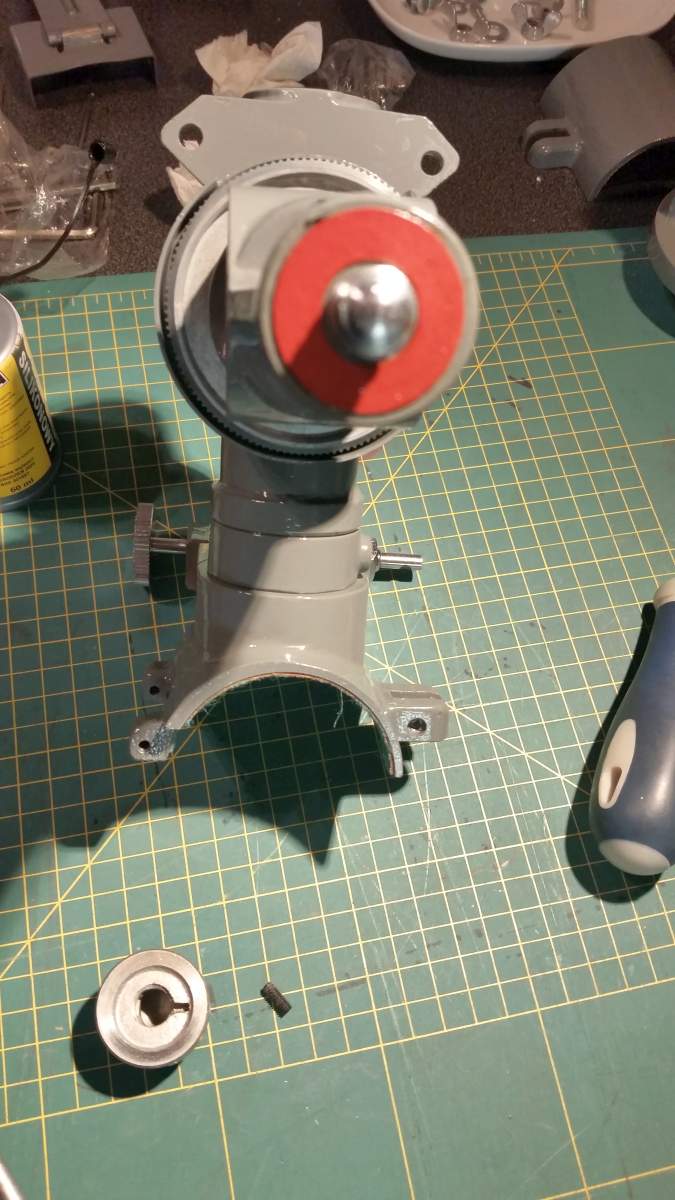
Next I've removed slow motion worms. It's possible to unscrew them without complete disassembling, however you'll need to disassemble them later. I've started with declination tangent arm:

Surveyor 1
Posted 28 January 2021 - 06:46 PM
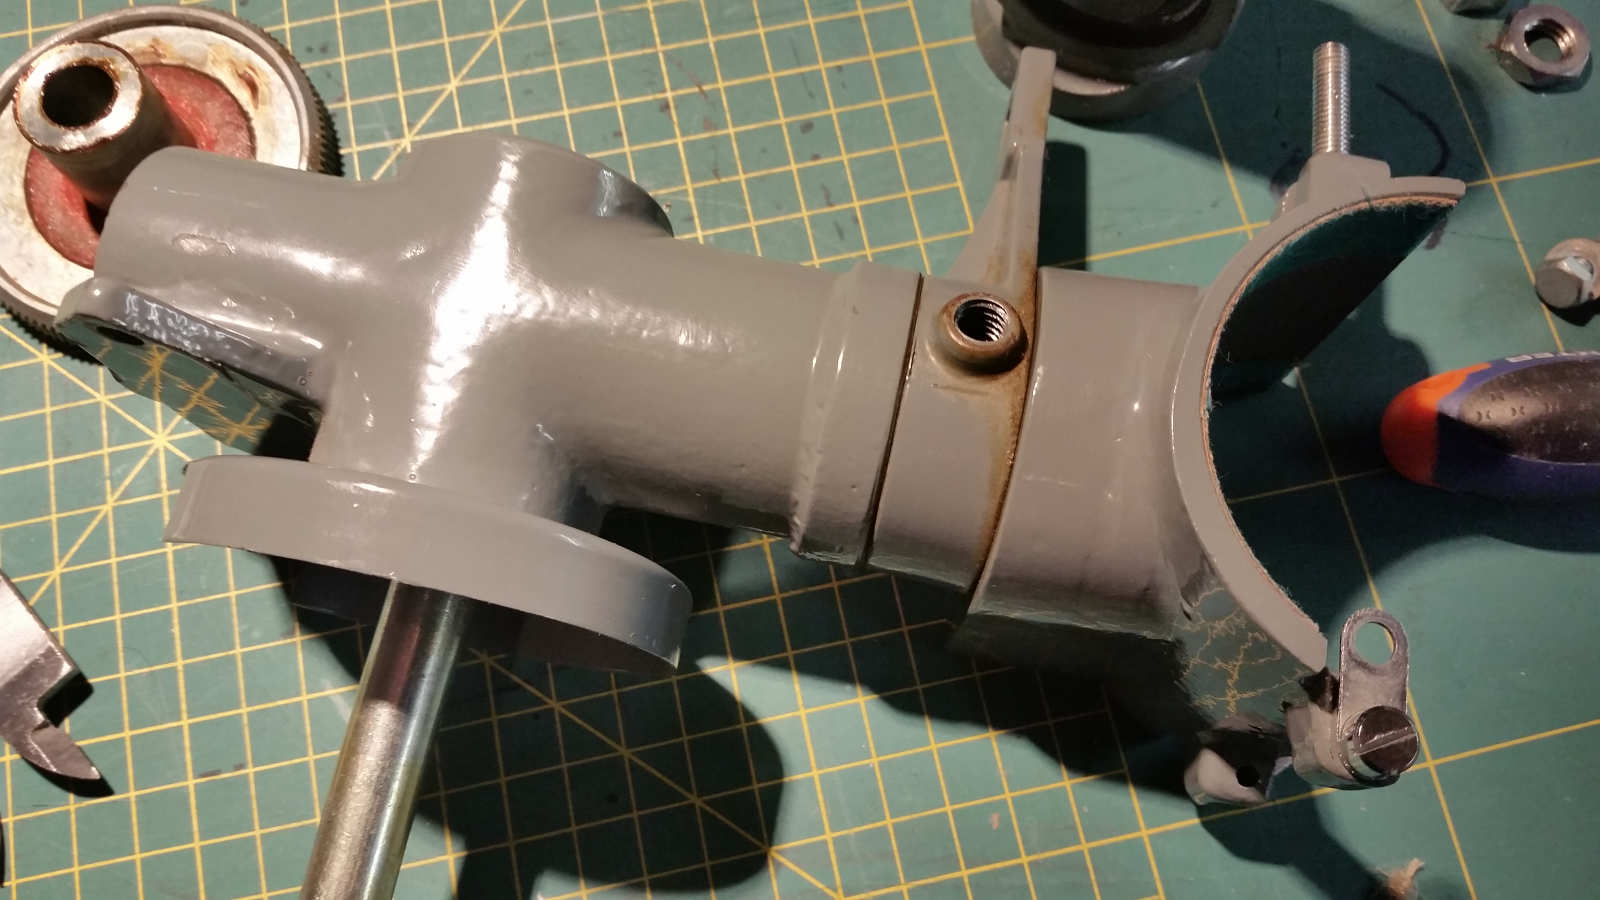
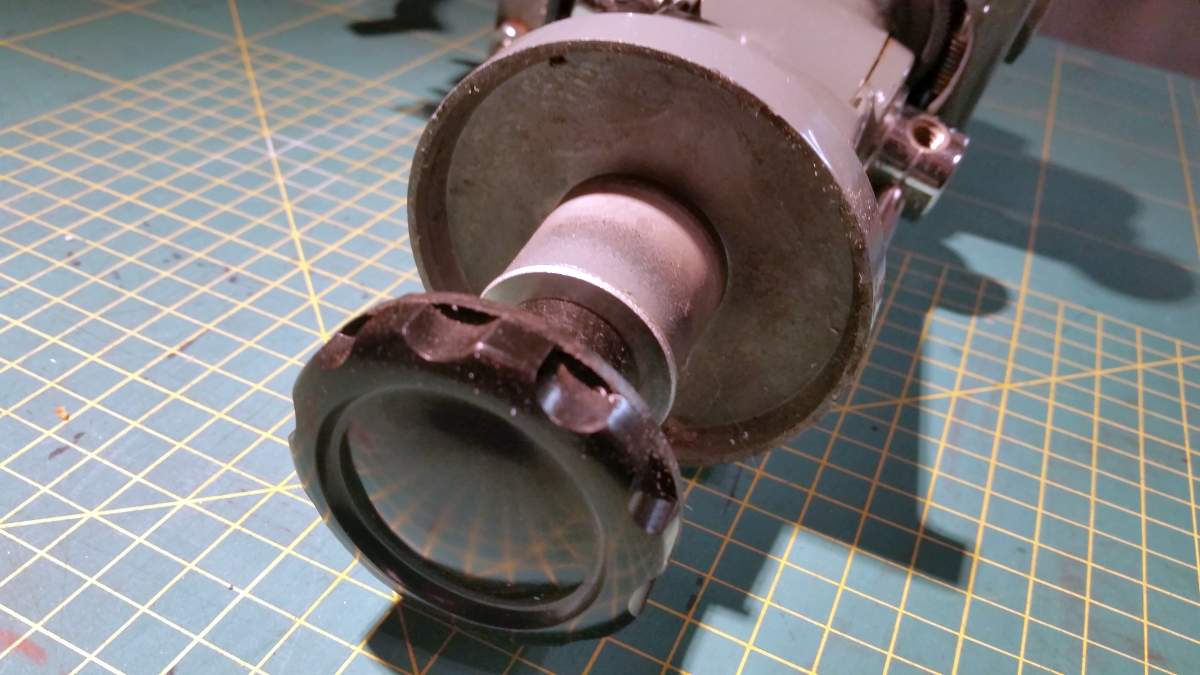
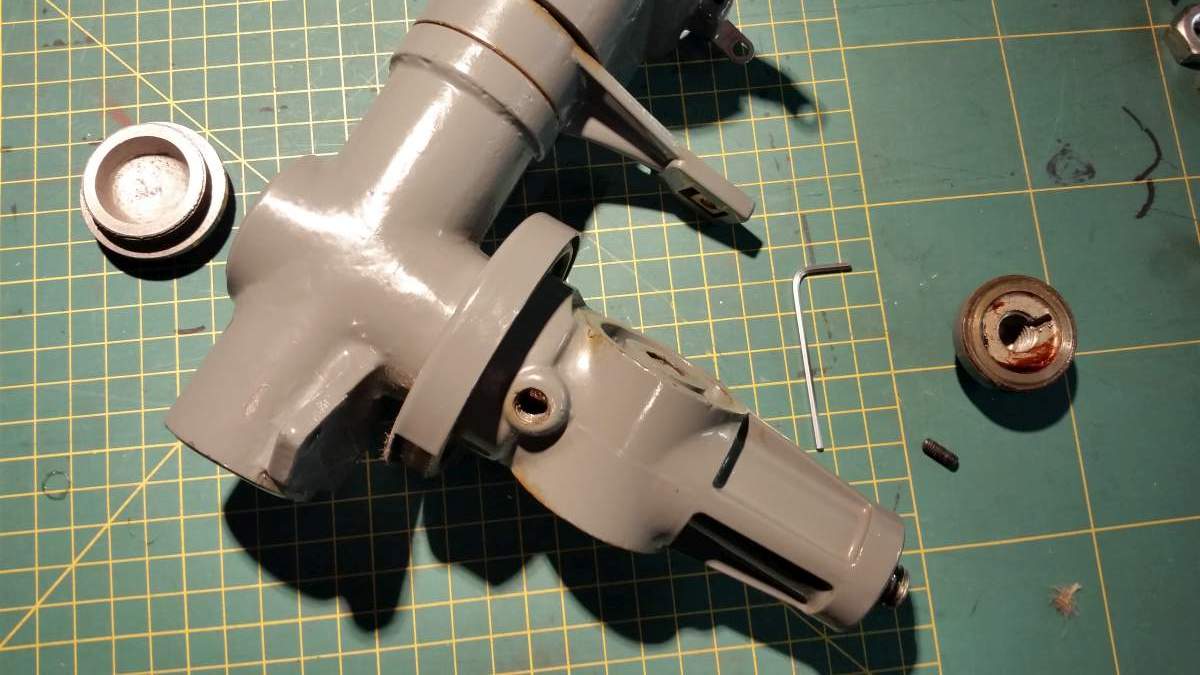
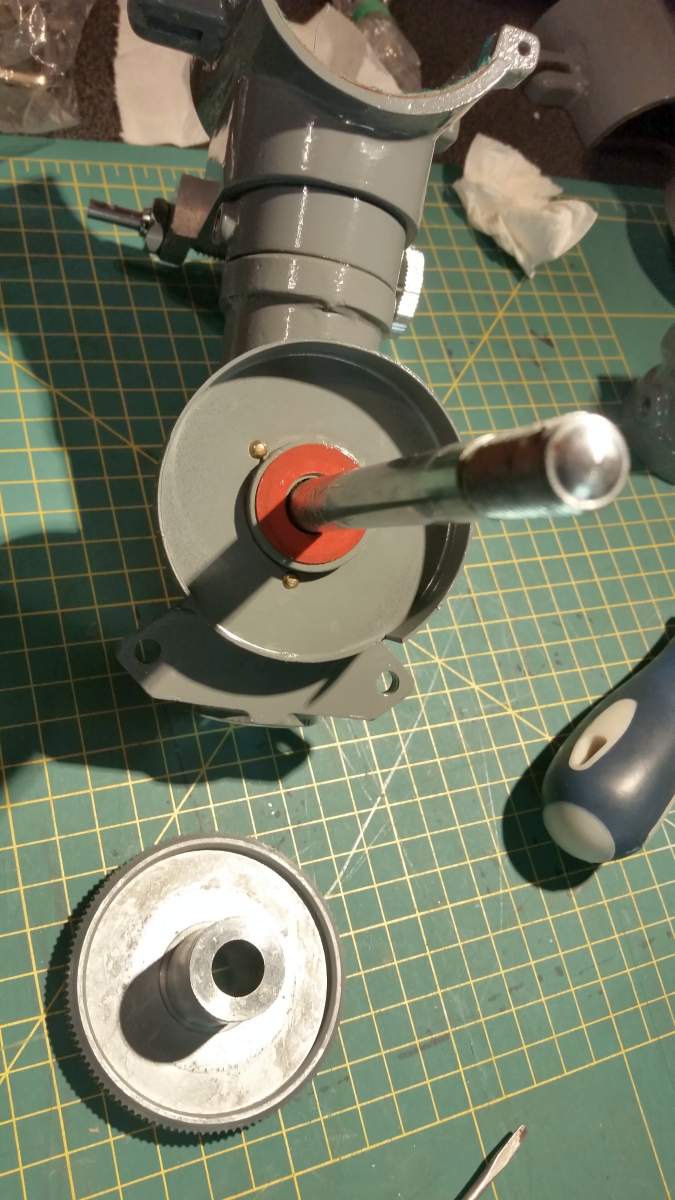
Next step: the RA axis assembly. I've removed the covers on both ends. You need to unscrew the small Allen screw to remove the bottom cover:
When you remove the bottom cover, you'll see the first red fiber washer. The next is located under the RA body:
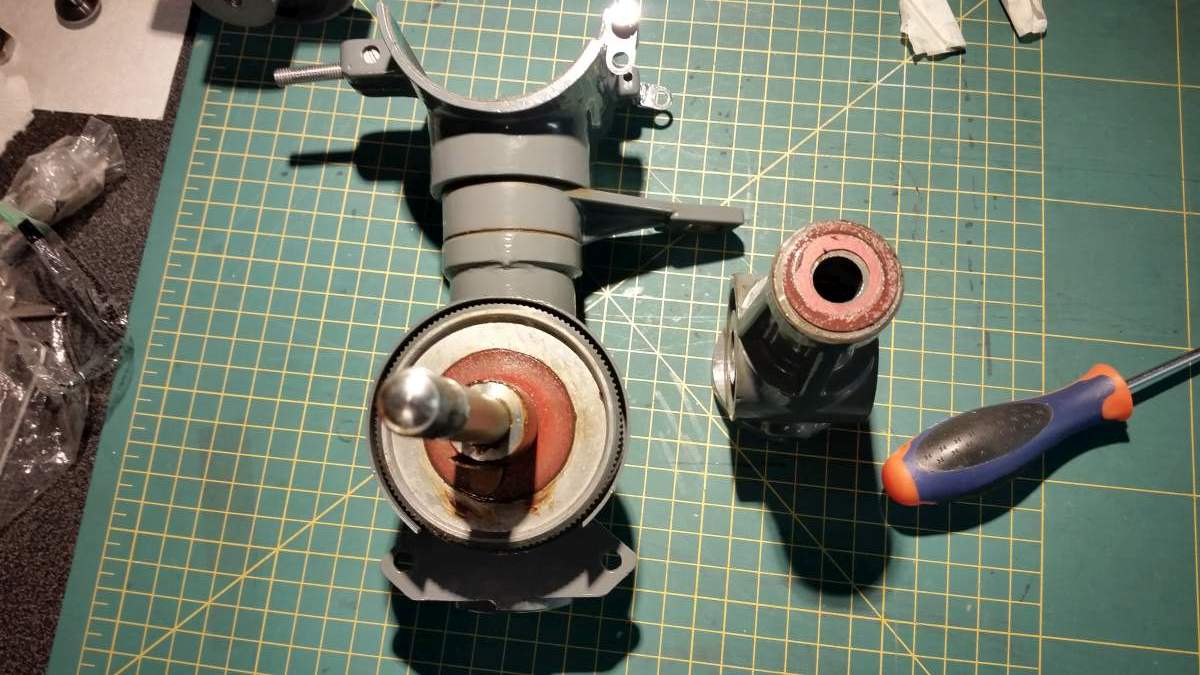
The last, third washer lies under the RA worm gear:
Do not lose the small brass brake, which will probably remain stuck to the RA bushing with grease:
Edited by LukaszLu, 28 January 2021 - 07:09 PM.
Surveyor 1
Posted 28 January 2021 - 07:04 PM
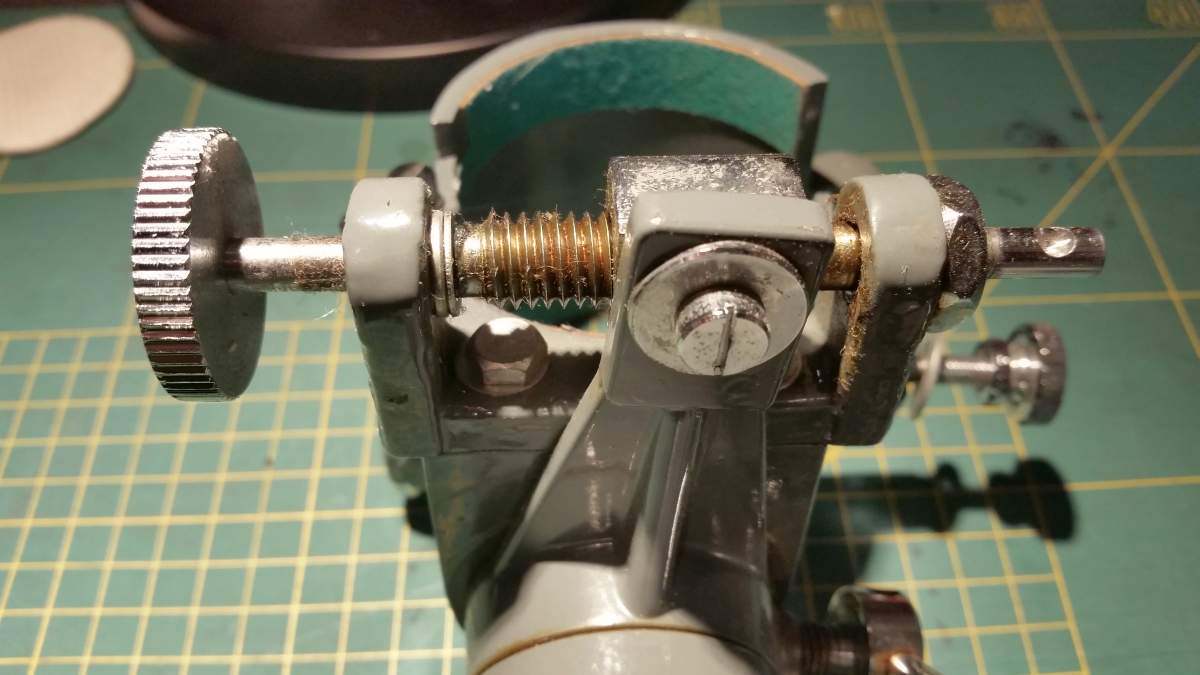
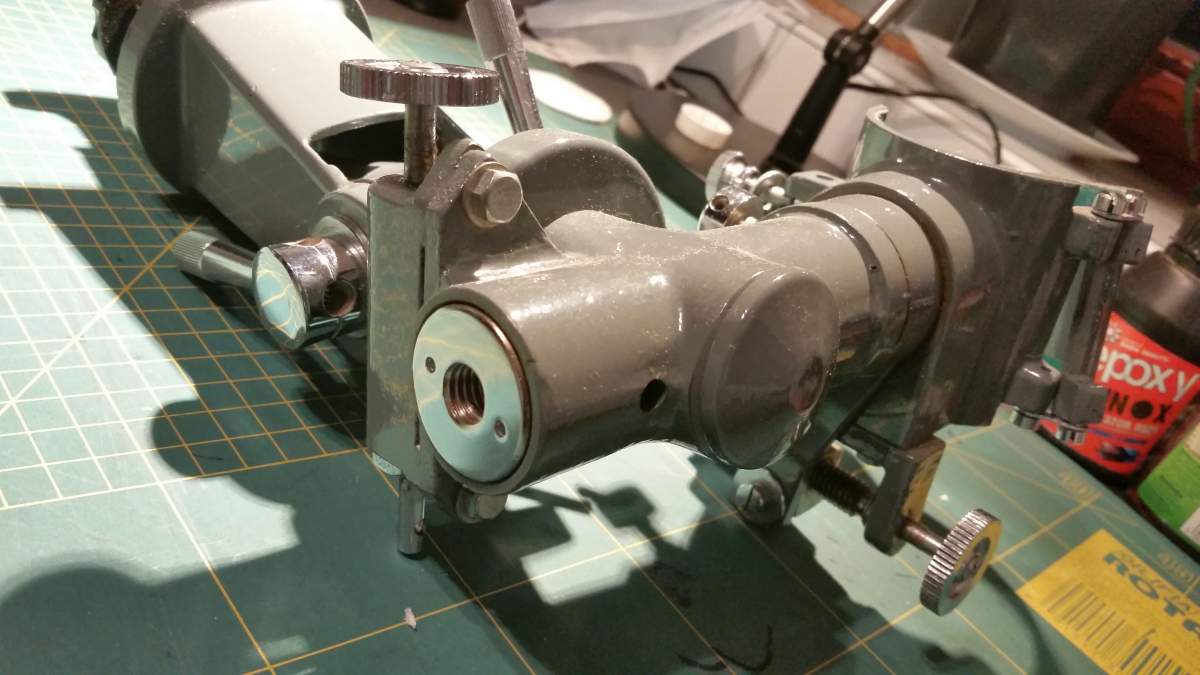
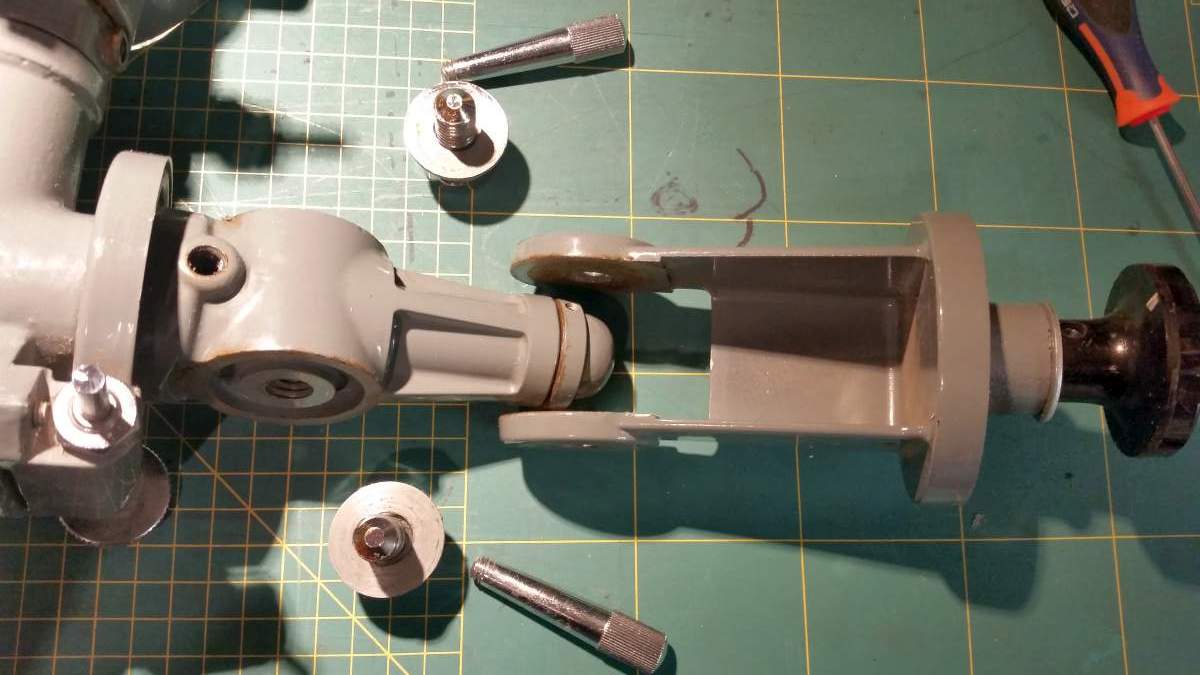
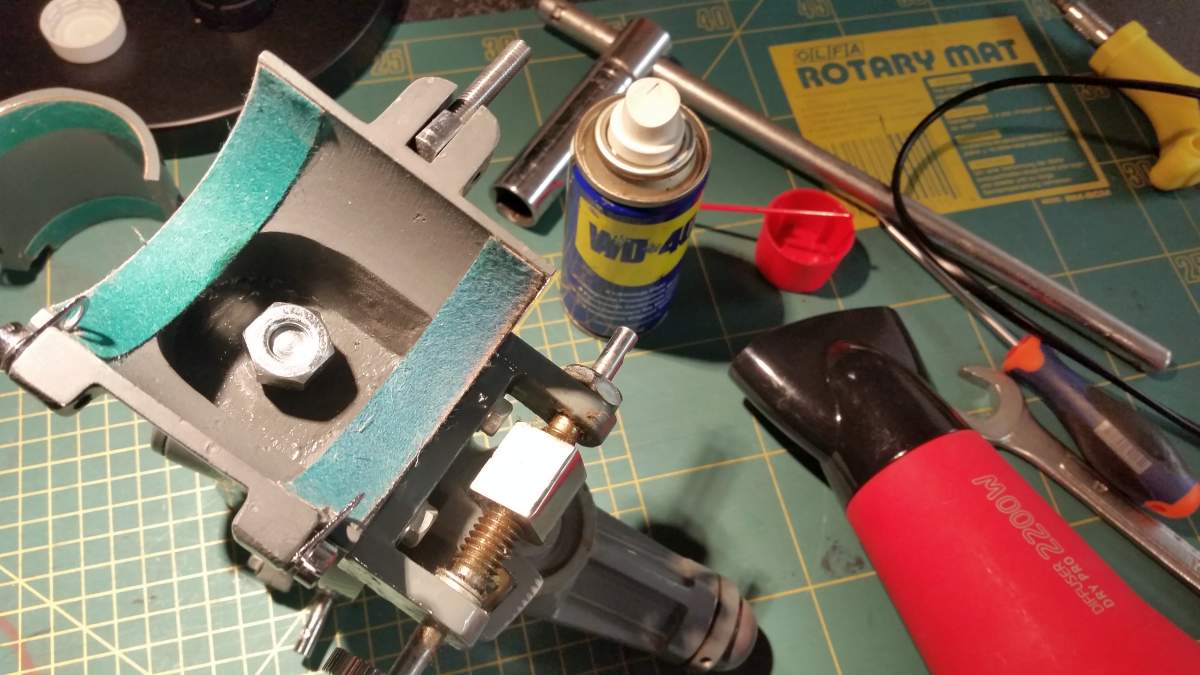
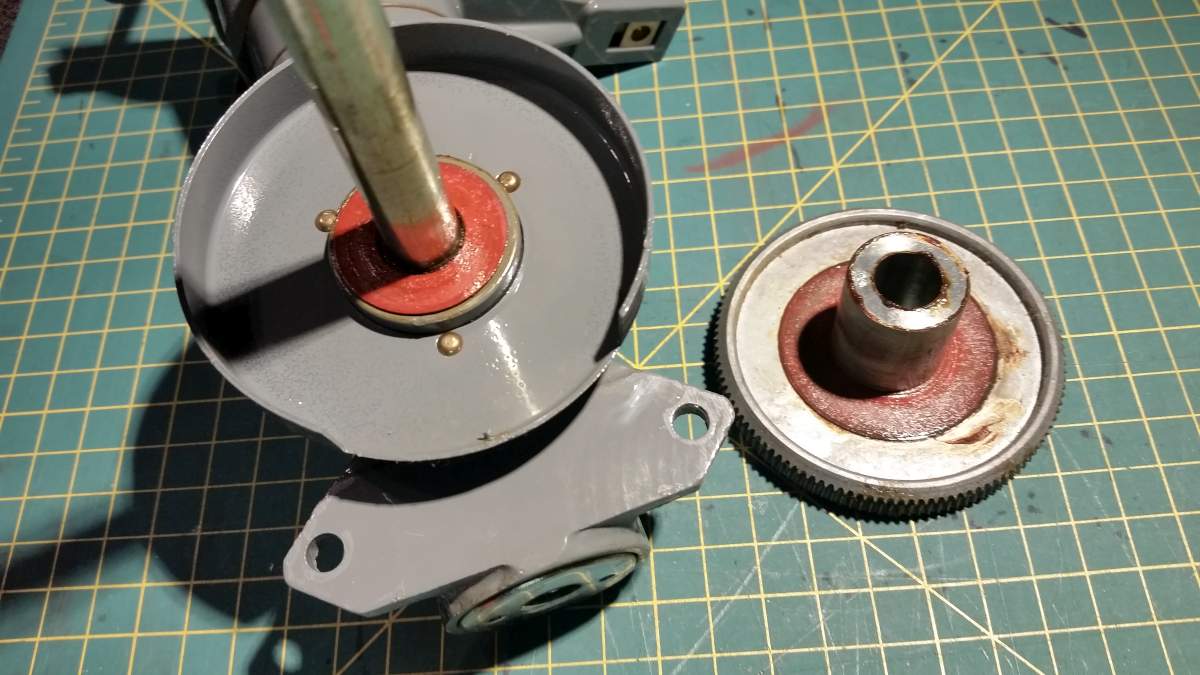
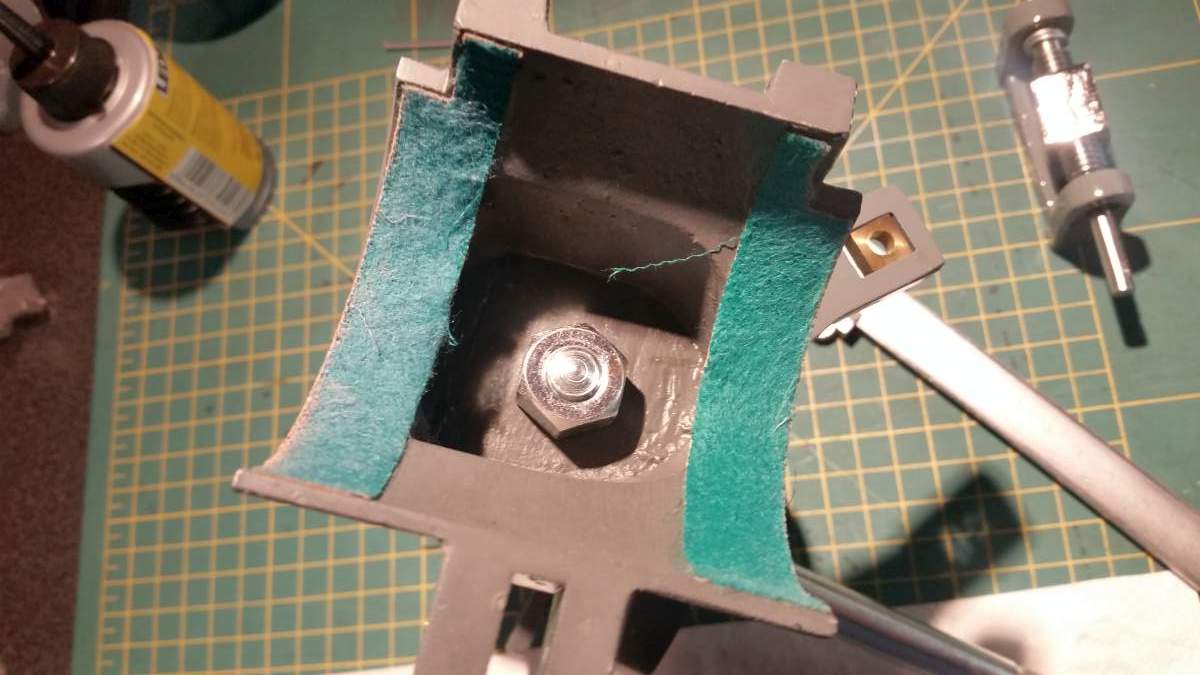
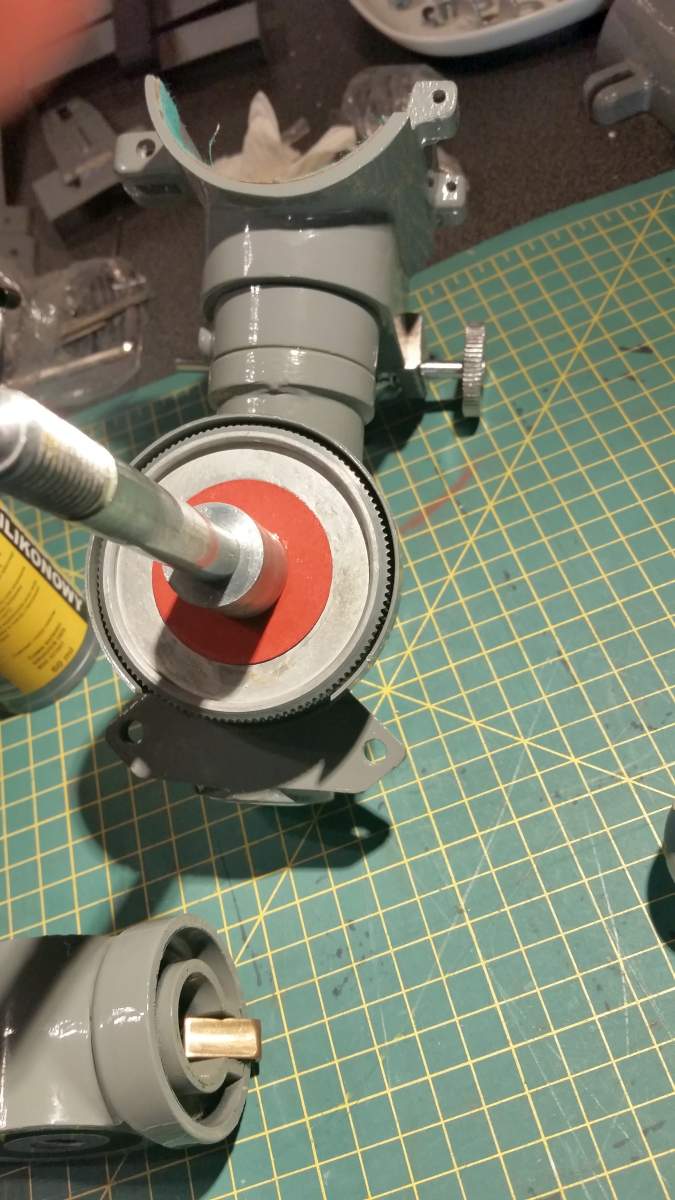
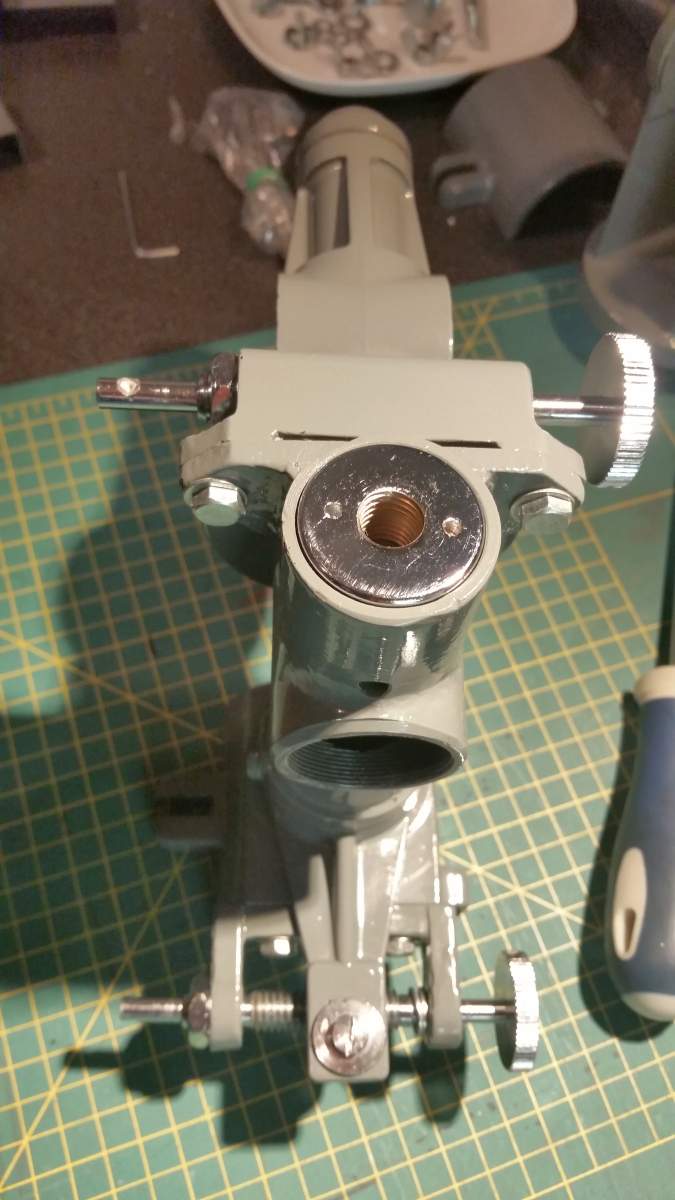
That's all! It's time for dec axis assembly. I've removed the nut that can be seen inside the cradle.
Here I ran into a serious problem - the nut was so seized that it did not want to move in any way. I flooded it with WD-40 lubricant and warmed it with a hair dryer. After these treatments, I was able to unscrew it:
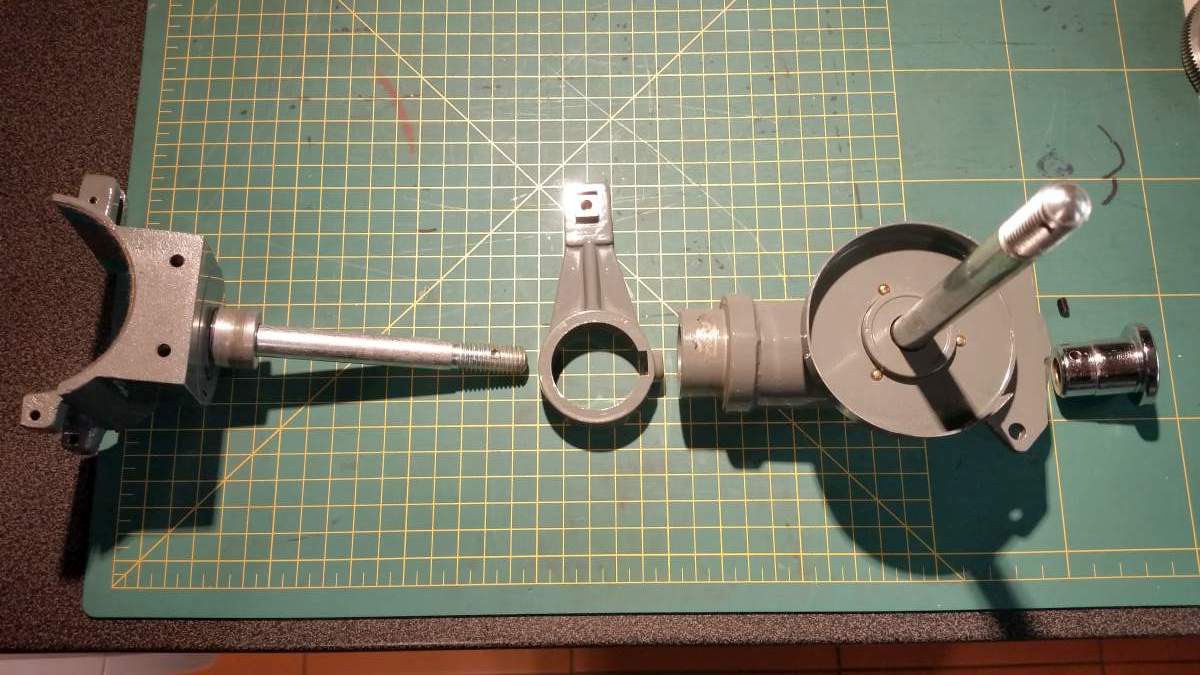
After removing the nut, the cradle and the dec tangent arm cannot be removed however, and rotate with the rod extending the entire length of the mount. The same goes for the counterweight rod seat on the other side - it rotates with the rest of elements.
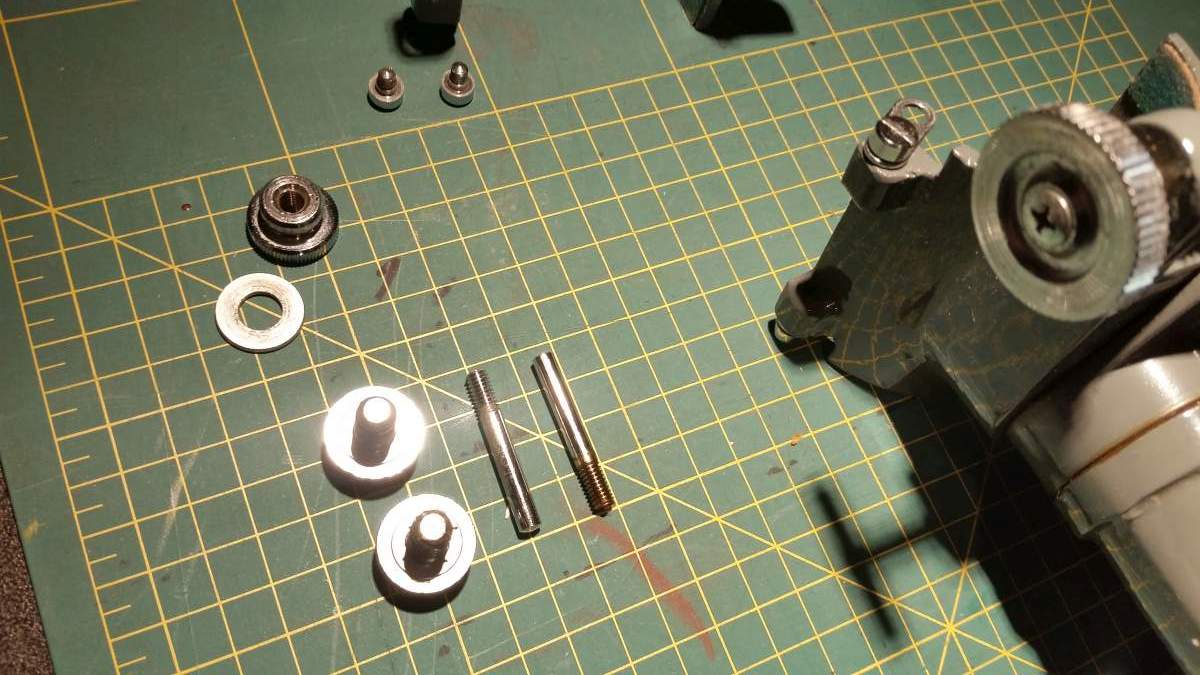
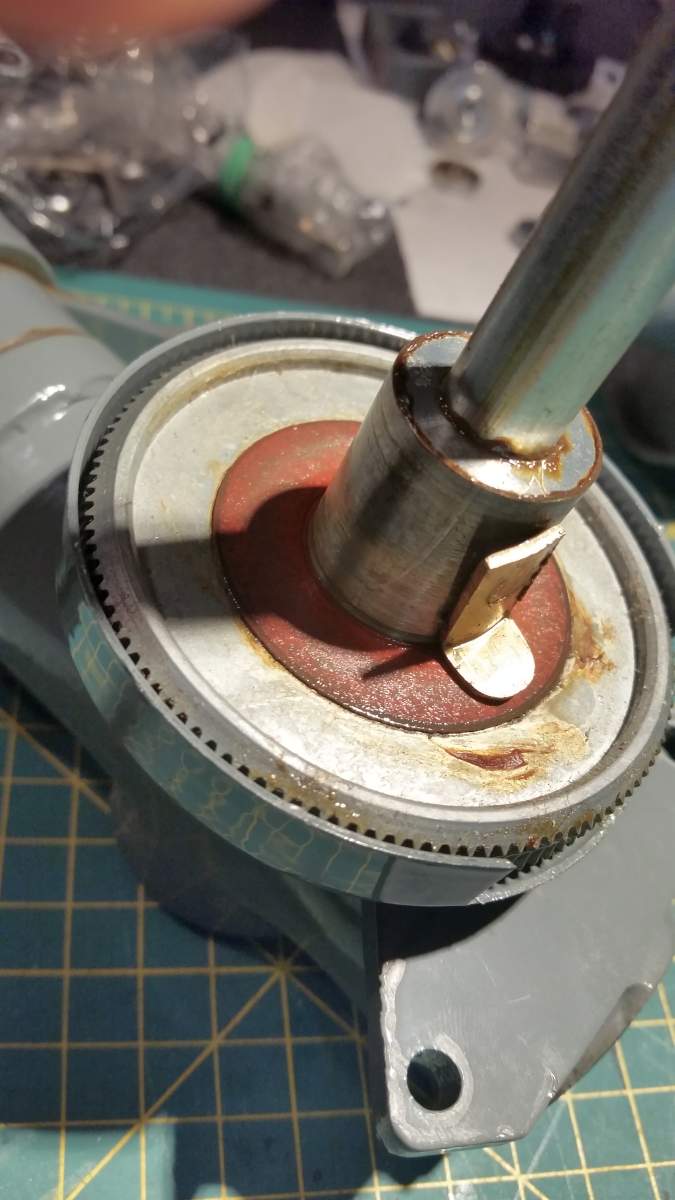
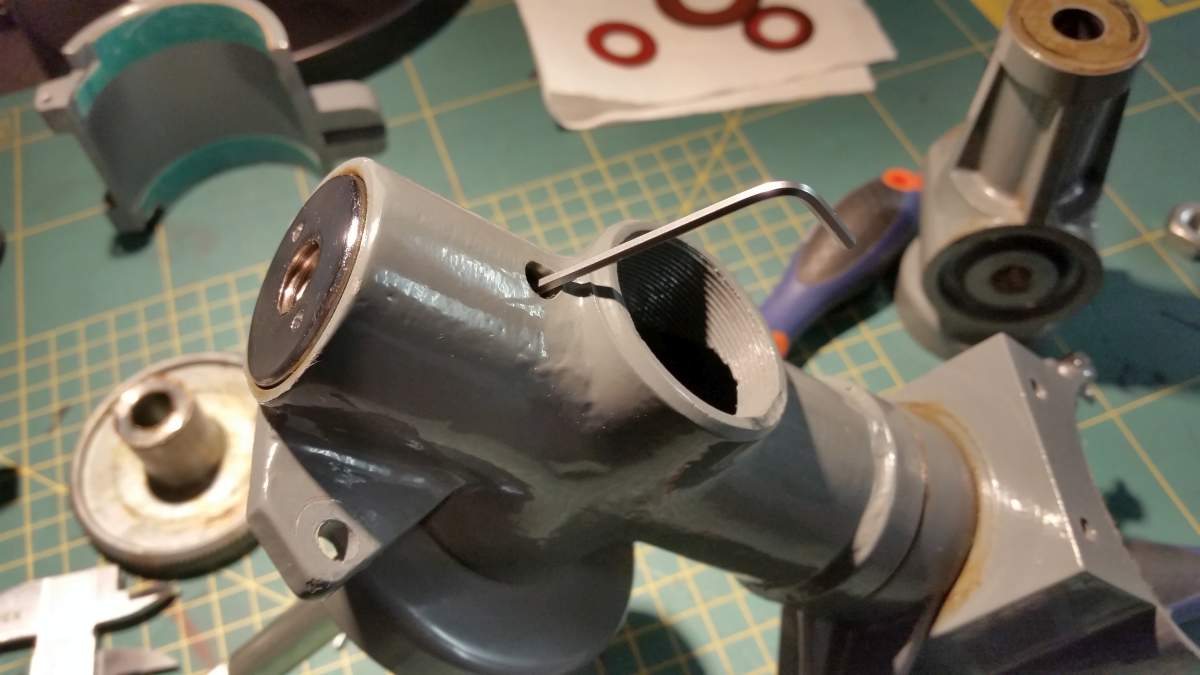
What you need to do is to find a small hole through which the second Allen screw can be accessed. After unscrewing it, it is possible to unscrew the counterweight seat, next remove the body with RA axis rod and the tangent arm (don't lose your second brass brake and the square brass block at this point!).

Edited by LukaszLu, 28 January 2021 - 07:21 PM.
Surveyor 1
Posted 28 January 2021 - 07:13 PM
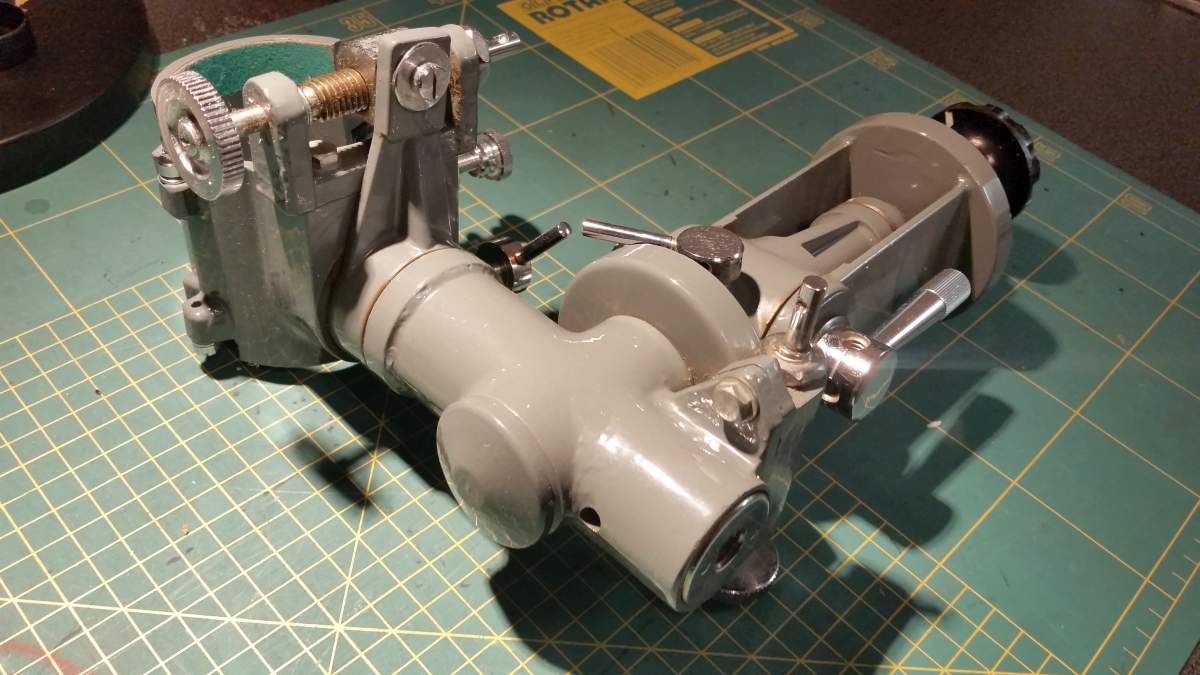
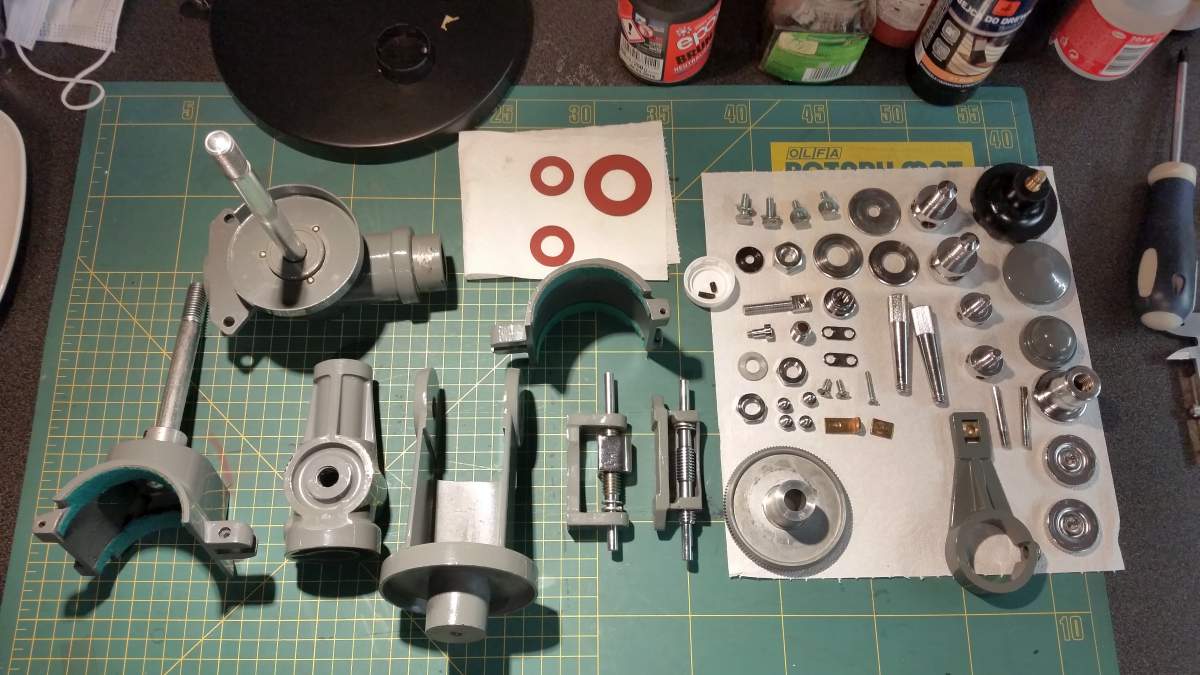
And that's it! I don't think you need to disassemble anything more to clean and regrease the mount, except slow motion worms. Finally, you should get such a toys set for a Classic Telescopes lovers. Cleaned and regrease ready...
Soon I'll publish the next part: reassembling...
Edited by LukaszLu, 28 January 2021 - 07:19 PM.
Surveyor 1
Posted 29 January 2021 - 02:17 AM
fantastic. thanks. the top nut on my eikow mount inside the clamshell was also seized. i was not able to turn it but got it loose so the declination adjustment worked at least.
what does the second allen key do? i have looked through the little hole and have not seen anything.
what did you use to undo the counterweight seat? i was thinking a camera lens tool.
Edited by semlin, 29 January 2021 - 02:18 AM.
Surveyor 1
Posted 29 January 2021 - 05:46 AM
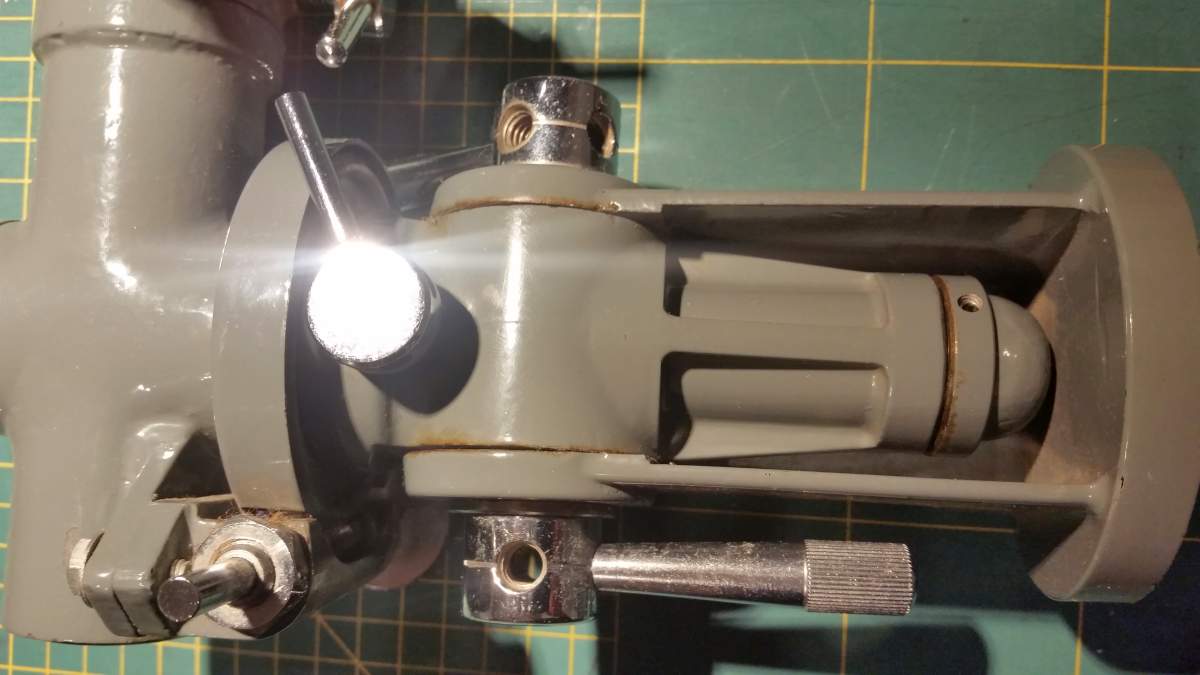
No!!! Don't force it! This is what the second Allen screw does - it holds counterweight seat and the rod together! It may not be clearly visible under the layer of grease, but as you turn the seat you will see this spot through the hole in the casting. When screwing it back on, remember that the hex key must hit a small hole on the surface of the rod.
Edited by LukaszLu, 29 January 2021 - 05:49 AM.
Surveyor 1
Posted 30 January 2021 - 12:11 PM
Time for reassembling. The dec assembly first. After lubricating all contacting and rotating surfaces we place an tangent arm and a casting on the rod and then we screw on the counterweight seat. As mentioned above the Allen key must hit a small hole on the surface of the rod, you should watch it carefully with a flashlight through the hole in the casting body, turning the rod and the seat to find the matching point :

When placing the tangent arm, don't forget about brass brake and the square brass block:
Edited by LukaszLu, 30 January 2021 - 12:12 PM.
Surveyor 1
Posted 30 January 2021 - 12:41 PM
You can now put a nut on the end of the bar visible in the cradle, but do not tighten it until you put on the slow motion worm and attach the tangent arm:
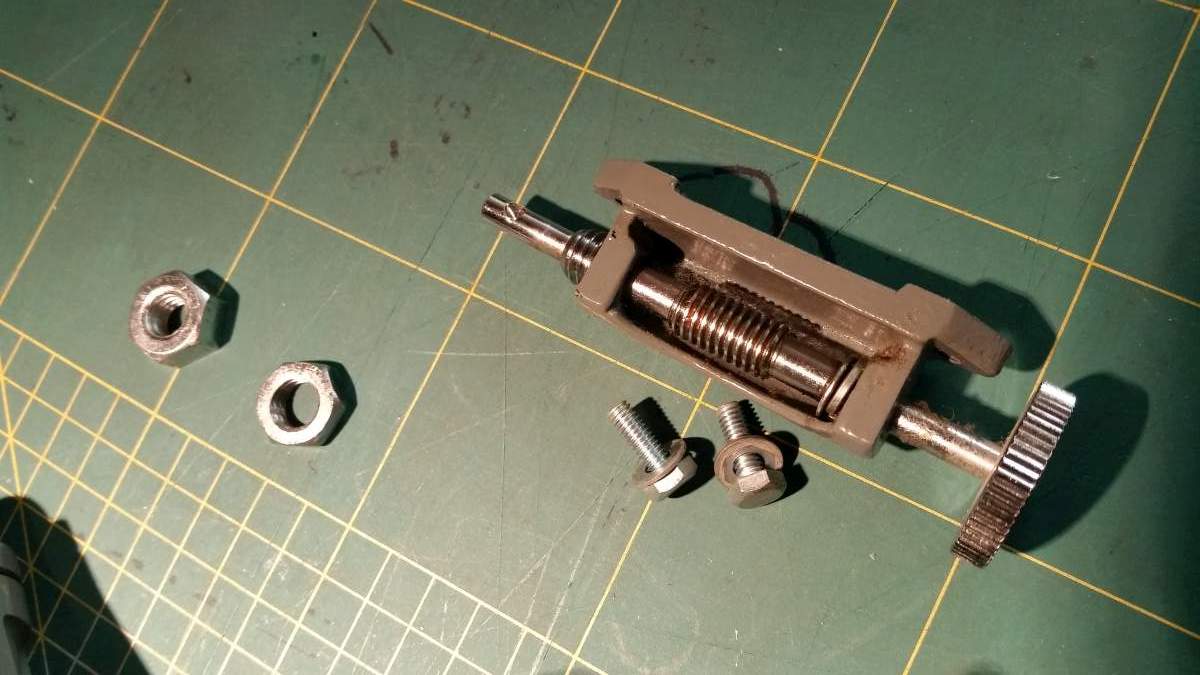
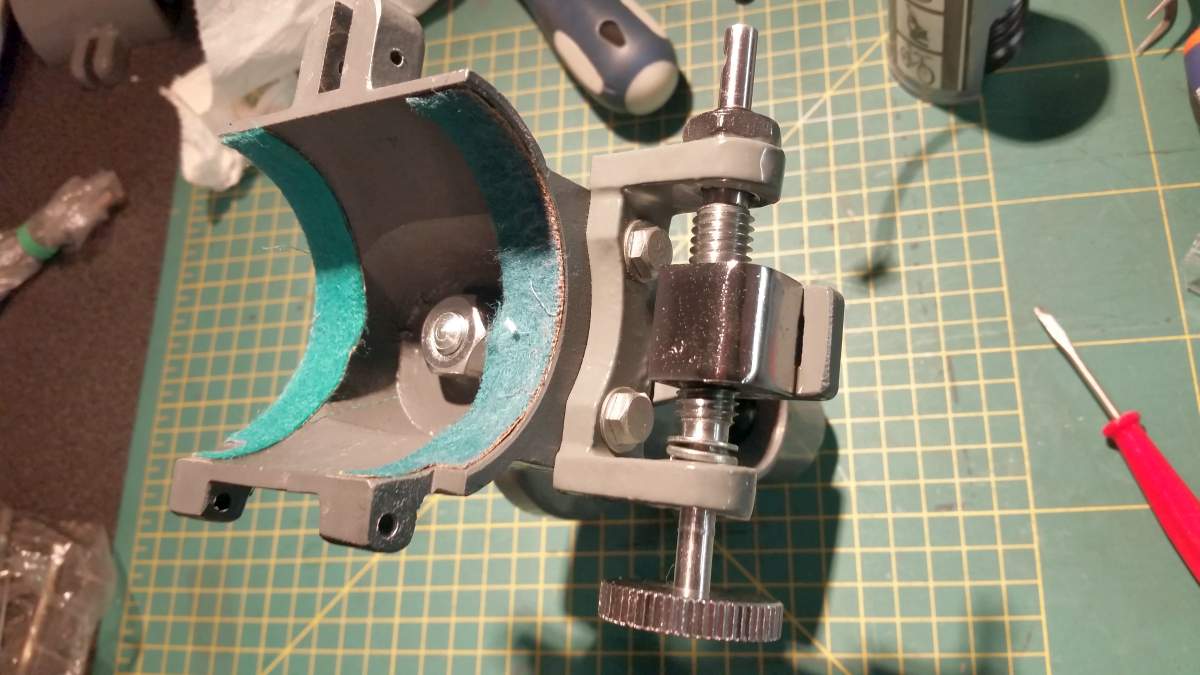
While removing the slow motion worm mounting was possible without disassembling it, you will have to disassemble it now - even if you managed to clean it. Anyway, I didn't manage to put it on without disassembling it. To remove the worm, remove the knob at the end of the shaft and unscrew the threaded nut on the other side of the shaft.
If you are unable to remove the knob from the shaft, move it with a 'swaying' motion for a while. If the nut on the other side is blocked, you can use pliers by grasping the nut at the very beginning, where the thread has a smaller diameter and does not yet reach the thread in the hole.
Last step: move the tangent arm over the slow motion worm and connect them with a screw. I greased their contact point because the surfaces move relative to each other when the gear is moved.
And that's it - the whole dec assembly is ready! You can now tighten the screw in the cradle. Check how it works!
Edited by LukaszLu, 30 January 2021 - 12:44 PM.
Surveyor 1
Posted 30 January 2021 - 01:23 PM
Lukasc, I have good memories rejuvenating an identical looking Quelle Revue 60/910mm some 6 years ago. Pretty straightforward procedure. Very much like with your Kenko TA-910. Sold the Revue but hanging on to a 1963 Quelle Apollo 60/910mm in woodbox. Guess I like the name better. Reminds me of that night when I watched Armstrong set foot on the moon.
Surveyor 1
Posted 30 January 2021 - 02:16 PM
Hi! This is of course the same telescope, although the wooden and cardboard box versions may differ - I'm not sure. The mount seems to be very simple and reliable compared to our Royal-Astro's. The very small amount of fiber washers is noteworthy and leaves most of the surface to the natural friction between metal and metal. After cleaning and greasing, it becomes clear that this mount owes its very smooth and quiet operation to the fact that there are no rough red washers here, making noise during friction. Great construction.
The second thing I noticed is the optics - did you also have almost no anti-reflection layers? In my case, the lens looks as if there were no color layers on the first element and only a faint trace of the yellow layer is visible in the reflections of the image from the second. I expect rather dark image in such a case - very strange...
Surveyor 1
Posted 30 January 2021 - 02:28 PM
The second part: RA assembly. First you need to grease the red washer that goes under the RA worm wheel:
Then put the worm wheel onto the rod, grease and place the big red washer:
The last red washer goes under the cap at the end of RA body casting:
Before you put on the casting body, place the brass RA brake in the socket at the base of the casting. When screwing the cap, remember that the Allen screw must hit the recess in the rod, similar to the dec axis.
Edited by LukaszLu, 30 January 2021 - 07:51 PM.
Surveyor 1
Posted 30 January 2021 - 02:30 PM
Screwing the slow motion worm housing is easy this time because the screw holes are easily accessible:

Surveyor 1
Posted 30 January 2021 - 04:03 PM
Hi! This is of course the same telescope, although the wooden and cardboard box versions may differ - I'm not sure. The mount seems to be very simple and reliable compared to our Royal-Astro's. The very small amount of fiber washers is noteworthy and leaves most of the surface to the natural friction between metal and metal. After cleaning and greasing, it becomes clear that this mount owes its very smooth and quiet operation to the fact that there are no rough red washers here, making noise during friction. Great construction.
The second thing I noticed is the optics - did you also have almost no anti-reflection layers? In my case, the lens looks as if there were no color layers on the first element and only a faint trace of the yellow layer is visible in the reflections of the image from the second. I expect rather dark image in such a case - very strange...
No anti reflection coatings on my Apollo objective lens, yet there are two baffles in the tubing. None existent in our R74's which I think is a shame. My Apollo throws great, contrasty images. I also like to use it for sunspot observations. On clear days it shows the granulation pretty well.
Surveyor 1
Posted 30 January 2021 - 05:46 PM
It seems that this is a factory feature because there are no signs of coatings at all. If they had been there originally, they would have stayed at least at the edges of the lenses.
I have a similar situation in the Vixen SkyScope 60L 60/900 refractor, even though it comes from the 80's or even the 90's. It looks like the anti-reflective layer is also only on the second lens. The difference in brightness of the image compared to the Towa 60/700 refractor, for example, is striking, much greater than what you'd expect from the difference in focal length.
Fortunately, these are typically planetary and lunar telescopes, but I must say that the low brightness of the Vixen becomes troublesome when the Moon is low above the horizon - near the new moon, etc.


 Cloudy Nights LLC Cloudy Nights Sponsor: Astronomics |

