Calling for Pics - Underside of mount
Started by
JamesE
, Nov 01 2007 04:19 PM
13 replies to this topic
#1

Posted 01 November 2007 - 04:19 PM
Hi All,
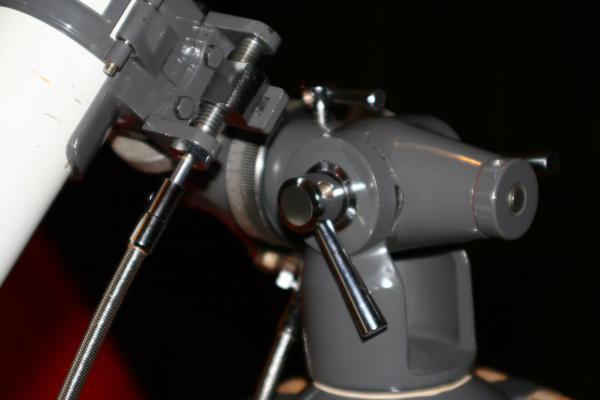
I would like to ask any members to take a look at the attached pic, and if you have the exact mount, could you please take a picture of the underside of your mount so I can see the locking mechanism.
I am thinking that mine has been tampered with and I would like to get it back to par.
If you need to see more pics go to this thread.
Mayflower Link
Thanks all.
James
#2

Posted 01 November 2007 - 05:15 PM
James....It looks to me from your other thread that there is a locking set screw on the large shiny knurled screw head. My old Manon(Mayflower) had this also. The tiny set screw has a conical point. Once the proper torque is achieved with a coin(quarter) or whatever tool works, then lock the setscrew down tight. This is made this way so that this equatorial can be set up for altazimuth use also. I don't believe anything has been tampered with unless the tiny setscrew is missing.  ;)Mike
#3

Posted 01 November 2007 - 07:31 PM
James,
Try these ...
http://www.pbase.com.../image/74217401
http://www.pbase.com.../image/88264801
http://www.pbase.com.../image/88264805
http://www.pbase.com.../image/88264802
http://www.pbase.com.../image/88264807
http://www.pbase.com.../image/74217403
-JWW:
Try these ...
http://www.pbase.com.../image/74217401
http://www.pbase.com.../image/88264801
http://www.pbase.com.../image/88264805
http://www.pbase.com.../image/88264802
http://www.pbase.com.../image/88264807
http://www.pbase.com.../image/74217403
-JWW:
#4

Posted 01 November 2007 - 08:52 PM
JWW,
Some excellent images and some outstanding scopes! The underside of your Mayflower mount is identical to the under side of my Tasco 60mm f/15 mount, but the legs are not. The legs are identical to my Mayflower 60mm f/15 legs yet your scope is identical to my D:76.2mm F:910mm Selsi and another D:76.2mm F:910mm Lafayette ota I have. The scopes I named above came to me with their original equipment in tact in their original cases, which tells me there was a great deal of mixing of mounts, legs, and tubes by the importers, or actually the Japanese distributors who supplied the importers. Nothing new (information wise) actually but it does help to confirm what we have long suspected about import of classics Japanese telescopes. Brand name means little because it was a mix and match proposition between Japanese manufacturers and Japanese distributors i.e., This is what we offer to you in the USA, do you have the volume to handle it? If you do we can also offer substitutes to your liking.
Some excellent images and some outstanding scopes! The underside of your Mayflower mount is identical to the under side of my Tasco 60mm f/15 mount, but the legs are not. The legs are identical to my Mayflower 60mm f/15 legs yet your scope is identical to my D:76.2mm F:910mm Selsi and another D:76.2mm F:910mm Lafayette ota I have. The scopes I named above came to me with their original equipment in tact in their original cases, which tells me there was a great deal of mixing of mounts, legs, and tubes by the importers, or actually the Japanese distributors who supplied the importers. Nothing new (information wise) actually but it does help to confirm what we have long suspected about import of classics Japanese telescopes. Brand name means little because it was a mix and match proposition between Japanese manufacturers and Japanese distributors i.e., This is what we offer to you in the USA, do you have the volume to handle it? If you do we can also offer substitutes to your liking.
#5

Posted 01 November 2007 - 09:01 PM
James,
Can you provide us a better close up shot of the underside of your mount? I can't tell much detail from your underside pic in the other thread nor this one.
Can you provide us a better close up shot of the underside of your mount? I can't tell much detail from your underside pic in the other thread nor this one.
#6

Posted 01 November 2007 - 09:32 PM
Duh,
I just realized what James meant by underside of mount. If need be, I will take addition pictures.
-JWW:
I just realized what James meant by underside of mount. If need be, I will take addition pictures.
-JWW:
#7

Posted 02 November 2007 - 12:28 AM
I concur with Don, holy smokes those are great scopes.
Man, I feel like such a noob. I am SO new to both astronomy and gear. This scope is my very first scope EVER and I just purchased it just 2 weeks ago. So I apologize up front if I am pushing the limits on the questions. I just want to know my gear. So if I am crossing the line let me know. In the mean time.....
JWW - I don't think I need to see more pics cause your locking mech is on the side, and I don't have that. (Though I will take your whole scope off your hands if you like, *smile*)
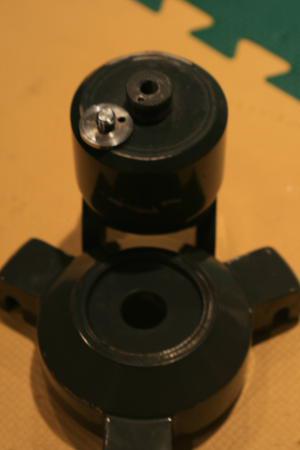
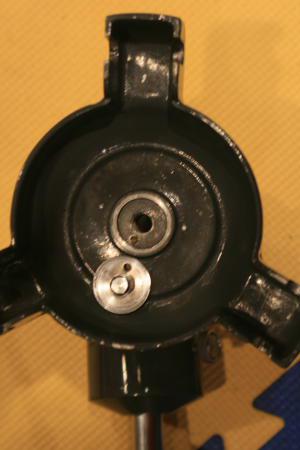
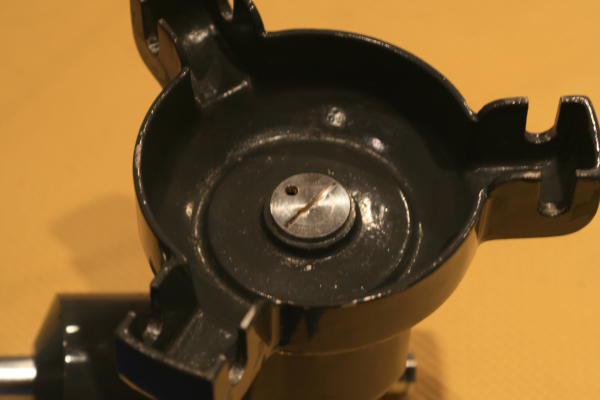
Don - By a bizarre twist of fate my scope fell and I bent a piece and I have to take it apart so here are detailed pics of the mount disassembled.
Mike - I have what you describe but as per the pics there is a secondary hole for the set screw right in the base and when I set the screw so that it is in both the screw head and the mount, the the screw and the mount move together and the mount turns quite freely. Does that sound correct? If so, should the mount move that freely.
Thanks again all,
James
#11

Posted 02 November 2007 - 03:56 PM
James....First remove the tiny setscrew. Tighten the large screw down as tight as possible. At this point the upright "fork" assembly should not move in azimuth or very very difficultly. Now look into the setscrew hole and see if you can spot the "seat" hole under the large screw. If not slowly back off the large screw till you begin to see it in the setscrew cavity. This may be difficult because getting light into the hole to see can be difficult. You can use a piece of wire instead to feel your way to this desired point. Then reinstall the setscrew snugly into place. The "fork" assembly should now be snug enough it will not rotate. Now you can set your polar axis tilt and proceed to use your RA and Dec axis' without the above large screw and setscrew assembly moving. Now it's possible there was a fiber washer under the large screw surface to take up any vertical play if you don't have enough "in" thread travel. Only you can determine if this is needed...probably not though. Good luck. ;)Mike
#12

Posted 02 November 2007 - 11:16 PM
Hi Mike,
Thanks for the reply. Much appreciated. I think you win the Grand Pooh-Bah award for this one.


I actually did everything you wrote prior to me asking for help and my fork still spun freely. Hence my questions about alterations.
Which brings me to your last statement about a fiber washer? I DO NOT have a fiber washer. So with everything that I have tried, and you have said, I think that is my problem.
I suspect I know what you are talking about cause there are 2 red fiber washers in other locations on my mount. So any thoughts on a suitable washer replacement???
Thanks Mike,
James
Thanks for the reply. Much appreciated. I think you win the Grand Pooh-Bah award for this one.
I actually did everything you wrote prior to me asking for help and my fork still spun freely. Hence my questions about alterations.
Which brings me to your last statement about a fiber washer? I DO NOT have a fiber washer. So with everything that I have tried, and you have said, I think that is my problem.
I suspect I know what you are talking about cause there are 2 red fiber washers in other locations on my mount. So any thoughts on a suitable washer replacement???
Thanks Mike,
James
#13

Posted 03 November 2007 - 08:13 PM
James,
It doesn't have to be a fiber washer. A Nylon washer will also work. Should push come to shove a metal washer with grease on both sides will work too.
It doesn't have to be a fiber washer. A Nylon washer will also work. Should push come to shove a metal washer with grease on both sides will work too.
#14

Posted 05 November 2007 - 01:29 PM
Hey Don,
Ok, I think I will look for a nylon washer. And I suspect over the years as I get more into it, I will find the exact piece from all the gear I collect. *smile*.
So thanks again Mike, JWW and Don for your help. I don't have anything else needed to be answered on this post. Again, I would buy you a coffee (or Tea, or Beer) for your help, if I could.
Cheers,
James


