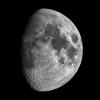
Wow, Tom. That last green capture is something... that camera and scope really show forth. It is difficult to get better at 9.25". Besides, your processing is good. Do you use any barlow or eyepiece projection, or is it direct focus? As for green resolution... I have here an old spanish magazine with a color spot diagram study of several telescope designs. Curiously enough, Schmidt-Cassegrain design shows green/blue MTF lines fit together and ABOVE the red lines, which show lower. So, at a theoretical level, green has better lines and reaches better resolution. I agree with you contrast is not the same as resolution. I will always switch to higher resolution over better contrast as long as seeing permits. Digital processing gives us the chance to push up contrast, whereas better resolution is harder to acheive if you do not get it right at the spot. As you say, it is weather and altitude that marks the way to go. I will definitely have to test the moon under the green filter. Last time I captured, seeing was so bad that I didn't have a chance.
I envy your achievements on the moon, man.... ") Your pictures really pop-up. As a side note, I would just give you a little advice: do not push up so much the 1st wavelet layer. As you do this, some "patches" show up here and there. Go a little easier on that layer.
Your pictures really pop-up. As a side note, I would just give you a little advice: do not push up so much the 1st wavelet layer. As you do this, some "patches" show up here and there. Go a little easier on that layer.
I have another question... you guess visually drizzle will benefit you, or do you test drizzle and non drizzle outputs spearately and then take decision?
And another one... I have seen your camera and sensor combo (ASI183) only reaches 19fps when at full resolution... so I guess you are capturing at 19fps, is that right?
God bless,
Sam
Sam,
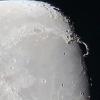
Drizzle can sometimes smooth things out by adding image scale, although I never found that it added any resolution when using the 610nm filter. I feel that at that wavelength, the system is already maxed out at F/10. With the green filter, I somewhat feel like a 1.5x drizzle processing is nice, but the difference is very subtle. As a general matter, I don't drizzle integrate all the data, because the ASI183 camera produces files that are so big, that Autostakkert cannot drizzle the entire image without crashing. So in order to drizzle, you have to either capture smaller ROIs, or use PIPP to split up the recording into several smaller videos and drizzle. This turns into a lot of work! The main reason I got the ASI183 was for the large field of view for making lunar mosaics (such as this recent post). So I usually am using the camera at full size. Each file takes about 4 hours to process in Autostakkert, and so with a typical mosaic requiring 4-6 panels, this is 16-24 hours of time just to stack the images. Then they need to be sharpened, blended together, and finished in Photoshop. Splitting the panels up into even more sub-panels greatly increases the effort and time involved, so I usually don't do it for all of the data, but only for favorite regions that I want to process independently. This is why I recently bought a 1.3x barlow to use with this camera, as critical sampling occurs at ~f/12 wth the 2.4um pixels. This way I can maximize resolution without having to drizzle, although I haven't had perfect seeing to test this with yet, although the images in this post were taken using this barlow. I don't think the barlow would have any benefit when using the 610nm filter, but it would when using green in excellent conditions.
The camera does only record at 19fps when using the full sensor. This, and the large file sizes, lead to some other technical difficulties, and may actually be the cause of the "patches" you refer to above, although I'm not exactly sure about your use of that term. Processing is always a balancing act between detail and artifact, and using a large camera adds some additional difficulties (while saving time in other respects if the goal is a large FOV!). For one thing, I can never collect as many frames as I would like, due to speed and file size. A stack of 5000 frames is already 100GB in size! The large sensor size also leads to significant issues with dynamic range, because of the huge difference in tonal value of the brightest spots in frame. The raw data indicates that when captured at a histogram of 70%, most of the image is very dark, and this requires significant adjustments in Photoshop to bring up those shadows, especially near the terminator. This may lead to some noise and artifact, and contribute to the patches you describe, rather than the sharpening. One solution to this would be to capture additional panels covering the terminator, taken at much higher exposure values, and then blend the result together. However, here again I run into problems with file sizes and time. Adding more panels is not always possible, and in fact, during my last mosaic, after my first two panels covering the terminator were recorded, the seeing deteriorated somewhat significantly. I had originally intended on revisiting some regions to take additional images, but I was running out of hard drive space in addition to declining seeing. So there are a number of challenges when trying to make high resolution images that cover large regions of the Moon, but it is a fun challenge, and I appreciate your comments!