Jump to content

  •  

CNers have asked about a donation box for Cloudy Nights over the years, so here you go. Donation is not required by any means, so please enjoy your stay.

Photo

Samsung SCC-A2333 Remote Control Project

This topic has been archived. This means that you cannot reply to this topic.
22 replies to this topic

#1 Dragon Man

Dragon Man

    Soyuz

  • *****
  • topic starter
  • Posts: 3,541
  • Joined: 07 Mar 2006

Posted 15 October 2010 - 07:14 AM

Due to the hassle of having to go out to my Telescope to change settings in my camera, which also gives the image an annoying wobble, I have made a Remote control for my Samsung SCC-A2333 Camera's OSD and now I share with you how I did it.

You don't have to use the same connectors as I do, or even mount your connectors in the same place, it's just how I did it. Feel free to copy the idea or come up with your own.

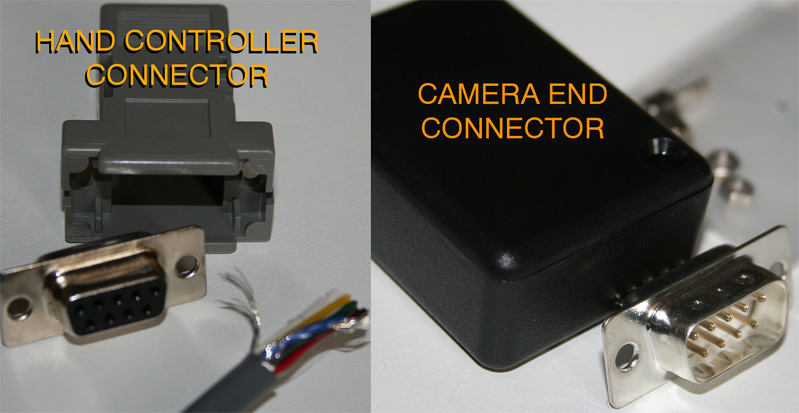
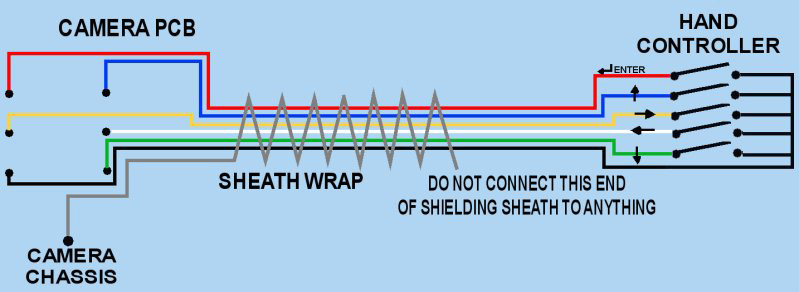
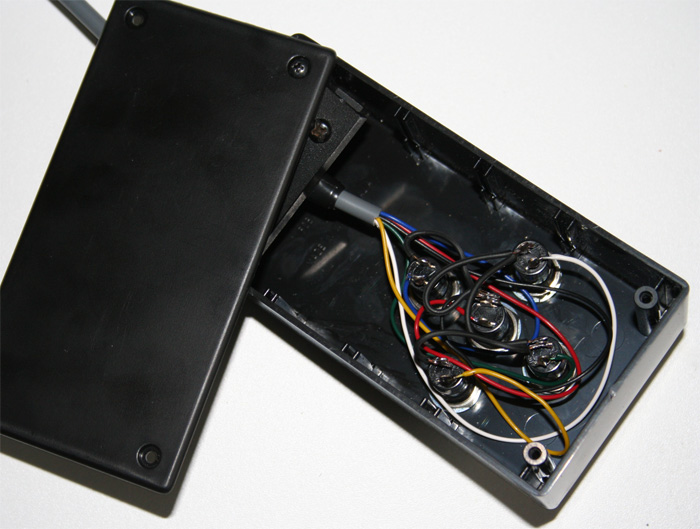
The important thing is the correct wiring!
Thanks to Martin Lyons for sorting out the wiring for me :waytogo:

OK here is the Project.

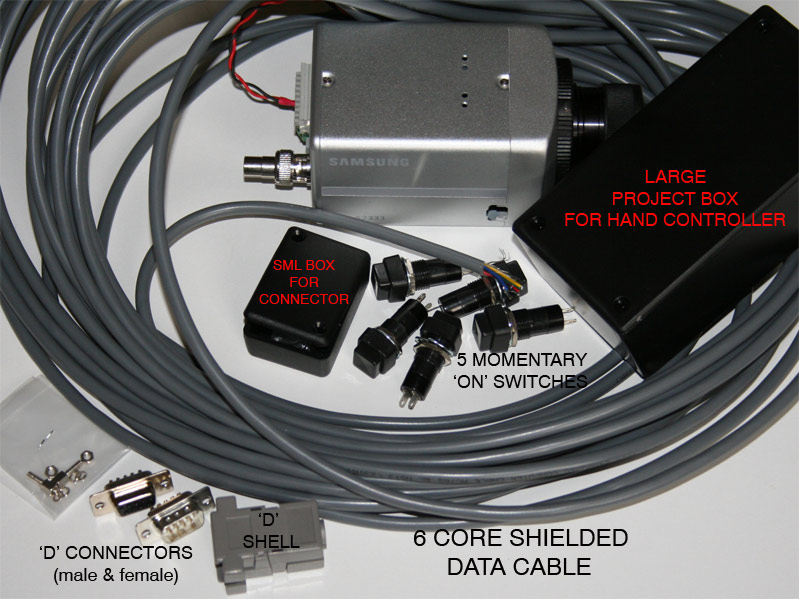
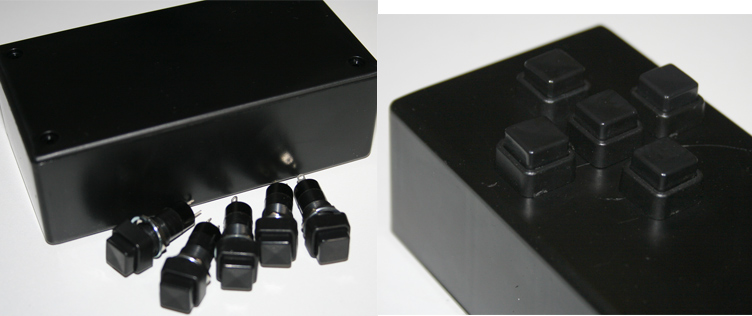
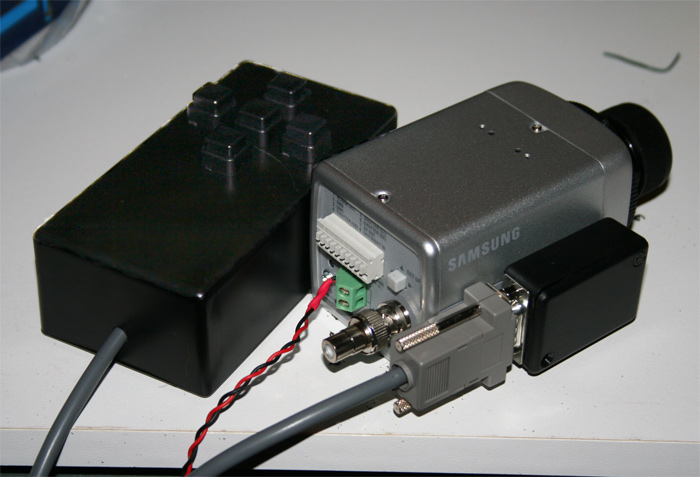
Pic 1 shows all the parts you will need (if you do it the same).
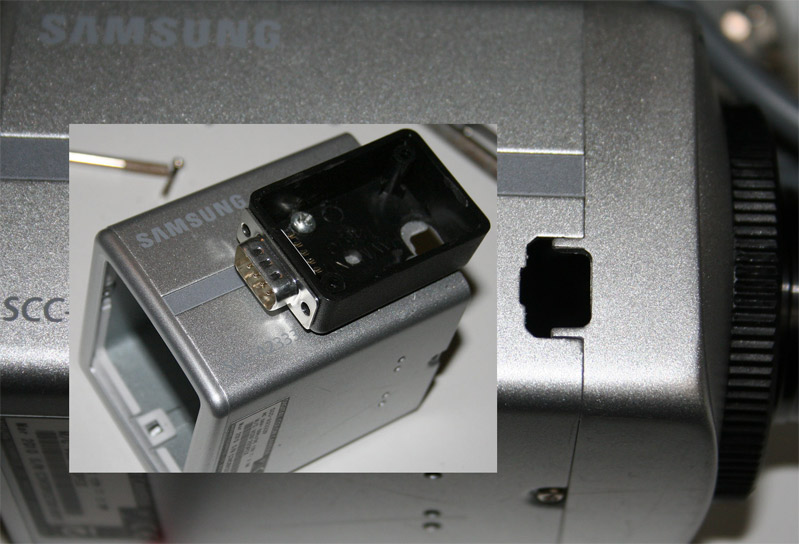
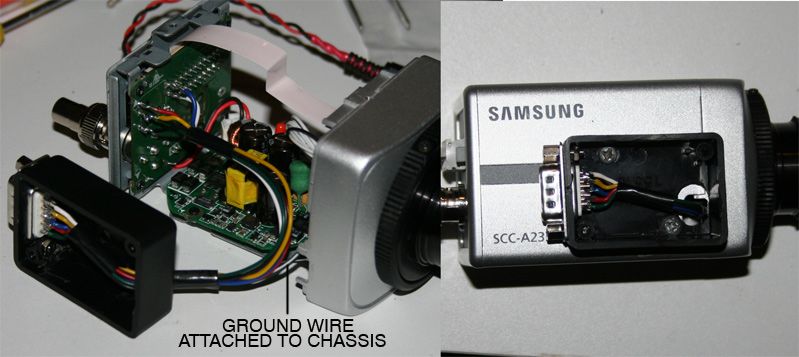
The reason I use a small box for the camera connector is so the cable connector didn't end up pointing out sideways creating its own problems. This way the cables can all flow together.
I am using 30 feet (10m) of Data Cable.

Attached Thumbnails

  • 4117126-REMOTE-PROJECT-1.jpg


#2 Dragon Man

Dragon Man

    Soyuz

  • *****
  • topic starter
  • Posts: 3,541
  • Joined: 07 Mar 2006

Posted 15 October 2010 - 07:20 AM

The connectors I chose to use are 'D' connectors (often used on computers and Skywatcher Mounts)

'D' connectors are small, neat, and can by locked with the 2 thumbscrews so the cable won't fall out.
I mounted the Camera connector into this small Project box so the 'D' connector would be facing towards the back, enabling all the camera cables to run together.

The other connector simply goes into a 'D' connector housing called a 'Shell'.

Attached Thumbnails

  • 4117131-REMOTE-PROJECT-2.jpg


#3 Dragon Man

Dragon Man

    Soyuz

  • *****
  • topic starter
  • Posts: 3,541
  • Joined: 07 Mar 2006

Posted 15 October 2010 - 07:23 AM

With the 'D' connector fitted into the small box another hole is made to match up with the hole in the Camera body (from the Lens drive cable which is removed).

Then the whole lot screwed onto the camera body.

Attached Thumbnails

  • 4117138-REMOTE-PROJECT-3.jpg


#4 Dragon Man

Dragon Man

    Soyuz

  • *****
  • topic starter
  • Posts: 3,541
  • Joined: 07 Mar 2006

Posted 15 October 2010 - 07:30 AM

Now the wiring can begin.

Remove the small connector box from the case and remove the case from the camera.

The terminals in the camera are very easy to get to, and easy to solder but BEWARE of getting the contacts too hot. You don't want to damage the switch in the camera.
Also connect the wires to the 'D' connector.
There is no specific order for the 'D' terminals, just make sure the colours match up on the other half of the 'D' connector (the cable end).

At this point you will need a 7th wire. This wire goes from the shielding in the Data Cable to the chassis of the camera. I just used a scrap piece of wire.

Attached Thumbnails

  • 4117152-REMOTE-PROJECT-4.jpg


#5 Dragon Man

Dragon Man

    Soyuz

  • *****
  • topic starter
  • Posts: 3,541
  • Joined: 07 Mar 2006

Posted 15 October 2010 - 07:35 AM

Wiring Diagram

Attached Thumbnails

  • 4117156-REMOTE-PROJECT-8.jpg


#6 Dragon Man

Dragon Man

    Soyuz

  • *****
  • topic starter
  • Posts: 3,541
  • Joined: 07 Mar 2006

Posted 15 October 2010 - 07:38 AM

Now for the other end of the project: The Hand Controller.

Buy 5 'Momentary ON' switches of your liking. You can get them in different sizes, styles, colors and even illuminated!

Mount them into the Hand Controller case in a Cross pattern.

Attached Thumbnails

  • 4117158-REMOTE-PROJECT-5.jpg


#7 Dragon Man

Dragon Man

    Soyuz

  • *****
  • topic starter
  • Posts: 3,541
  • Joined: 07 Mar 2006

Posted 15 October 2010 - 07:40 AM

Now wire up the switches to match the wiring diagram above.
Neatness isn't essential here as you can tell by looking at mine :lol:
Just remeber that 'ENTER' is the centre switch, the others are self-explanatory (left, right, up, down).

It is also worth fitting a Cable clamp to the Data cable at this point. This will stop the cable from spinning inside the box, which can twist the wires inside and pull them off the switch terminals.
It also prevents the cable from accidentally being pulled out of the box.

Attached Thumbnails

  • 4117163-REMOTE-PROJECT-6.jpg


#8 Dragon Man

Dragon Man

    Soyuz

  • *****
  • topic starter
  • Posts: 3,541
  • Joined: 07 Mar 2006

Posted 15 October 2010 - 07:46 AM

And that's the Project finished!

You can now control the settings in your SCC-A2333 from a distance.

Have Fun :waytogo:

Attached Thumbnails

  • 4117170-REMOTE-PROJECT-7.jpg


#9 Hemmi

Hemmi

    Mariner 2

  • *****
  • Posts: 283
  • Joined: 08 Sep 2010

Posted 15 October 2010 - 08:49 AM

Very nice and professional ken. good job

#10 mclewis1

mclewis1

    Thread Killer

  • *****
  • Posts: 22,071
  • Joined: 25 Feb 2006

Posted 15 October 2010 - 08:51 AM

Ken,

Very nice work. Clean, simple, with good suggestions. :waytogo:

I also really like the idea of the inexpensive "parasitic" box to mount the connector without any strain relief problems.

#11 anivision

anivision

    Sputnik

  • -----
  • Posts: 48
  • Joined: 09 May 2009

Posted 15 October 2010 - 09:27 AM

A very good idee :D

The hand controller is bigger than the camera though :grin:

Nice work ;)

#12 RickShelton

RickShelton

    Mariner 2

  • *****
  • Posts: 242
  • Joined: 20 Aug 2009

Posted 15 October 2010 - 04:33 PM

Ken said "It's for big blokes" I guess he is going to let someone else use it, lol...

Nice Work Ken_Martin_Bruce,
Rick

#13 will w

will w

    Apollo

  • *****
  • Posts: 1,287
  • Joined: 13 Aug 2006

Posted 15 October 2010 - 04:58 PM

ken,very good job on the hand control project, :waytogo: :goodjob: clr skys will w

#14 jbell

jbell

    Mariner 2

  • -----
  • Posts: 216
  • Joined: 09 Apr 2010

Posted 15 October 2010 - 05:34 PM

doesn't the 2333 have rs485 on the terminal block, and not just the control over coax -- and can use one of these ?

http://www.surveilla...om/scc-101.html

#15 RickShelton

RickShelton

    Mariner 2

  • *****
  • Posts: 242
  • Joined: 20 Aug 2009

Posted 15 October 2010 - 06:35 PM

Looks like its discontinued..

Rick

#16 Dragon Man

Dragon Man

    Soyuz

  • *****
  • topic starter
  • Posts: 3,541
  • Joined: 07 Mar 2006

Posted 15 October 2010 - 06:44 PM

doesn't the 2333 have rs485 on the terminal block, and not just the control over coax -- and can use one of these ?

http://www.surveilla...om/scc-101.html


1. Yes, you can use one of those, but the wiring job is messy and it looks amatuerish. Those little devices don't have just one cable. And it's a DIY wiring job. Strange for a commercial product.

2. That actual controller isn't made for these models (SDC-435, SCC-A2333, etc) but apparently can be made to work.

3. Availability is very limited.

4. I like mine better coz I did it myself :lol:

#17 Dragon Man

Dragon Man

    Soyuz

  • *****
  • topic starter
  • Posts: 3,541
  • Joined: 07 Mar 2006

Posted 15 October 2010 - 06:51 PM

A very good idee :D

The hand controller is bigger than the camera though :grin:

Nice work ;)


:lol: Yep.

Doesn't matter in my case as I won't be holding it in my hand. Mine sits on the desk with my electric focuser control etc. I just push the buttons.
And the electronics shop didn't have a great range of sizes either :p

#18 mega256

mega256

    Surveyor 1

  • *****
  • Posts: 1,593
  • Joined: 10 May 2007

Posted 16 October 2010 - 01:04 AM

I like yours too!

#19 Dragon Man

Dragon Man

    Soyuz

  • *****
  • topic starter
  • Posts: 3,541
  • Joined: 07 Mar 2006

Posted 16 October 2010 - 05:27 AM

I like yours too!


:waytogo: thanks Bob


The whole lot: boxes, switches, 30' cable, etc. cost me $30

#20 erick

erick

    Mariner 2

  • -----
  • Posts: 220
  • Joined: 21 Nov 2007

Posted 16 October 2010 - 05:23 PM

Looking good Ken.

Was playing with my GStar yesterday - I need one of these as well. I'll add it to my list of future jobs.

#21 Dragon Man

Dragon Man

    Soyuz

  • *****
  • topic starter
  • Posts: 3,541
  • Joined: 07 Mar 2006

Posted 16 October 2010 - 11:05 PM

Looking good Ken.

Was playing with my GStar yesterday - I need one of these as well. I'll add it to my list of future jobs.


Let me at it with my trusty Soldering Iron, Eric :drool5:

:lol:

#22 erick

erick

    Mariner 2

  • -----
  • Posts: 220
  • Joined: 21 Nov 2007

Posted 17 October 2010 - 04:13 AM

Looking good Ken.

Was playing with my GStar yesterday - I need one of these as well. I'll add it to my list of future jobs.


Let me at it with my trusty Soldering Iron, Eric :drool5:

:lol:


I got inspired and pulled the cover off! After inspection I put it quietly back on - very compact setup - looks like double-sided circuit boards. No ready access to the pushbutton switch terminals. That's OK - stops me breaking it! :grin:

#23 Dragon Man

Dragon Man

    Soyuz

  • *****
  • topic starter
  • Posts: 3,541
  • Joined: 07 Mar 2006

Posted 24 February 2011 - 01:20 AM

Chris, could this thread possibly be added to the 'Best of Q & A' please.

Thanks :waytogo:


CNers have asked about a donation box for Cloudy Nights over the years, so here you go. Donation is not required by any means, so please enjoy your stay.


Recent Topics


Cloudy Nights LLC
Cloudy Nights Sponsor: Astronomics