Just starting a new thread for Quantix camera owners to discuss getting their camera running.

QUANTIX HELP.........
Started by
sullij1
, Jun 03 2011 11:07 PM
712 replies to this topic
#2

gnabgib
-

-
- Posts: 735
- Joined: 05 Jun 2005
Viking 1
Posted 04 June 2011 - 08:41 PM
sullij1;
Just saw your posting on the "old" thread I started and I agree that those of us who purchased these cameras should work together to get the most out of them! My wife is also an astronomer and when she saw the ccd sensor her jaw dropped in amazement. Some comment about CCD "acreage" spewed forth!!! I agree with your comments regarding first impression of these cameras. I noticed there is no mechanical shutter BUT upon further investigation discovered
that all the electronics are there to operate a Uniblitz or simliar shutter which is the type used by Photometrics!
So count me in on the cooperation aspect and lets see how far we go!!
Kevin
#3
sullij1
-

-
topic starter
- Posts: 1,606
- Joined: 08 Nov 2008
Surveyor 1
Posted 04 June 2011 - 09:36 PM
Looking forward to seeing what ideas surface to get these cameras more portable. I have found some potential solutions for the getting the laptop in the loop. There was a previous post about PCI equiped docking stations. That was a good suggestion for those that have laptops that will dock. Looks to be the most economical. The PCI box conversions are as much and in some cases more than the docking stations with the PCI ports. This cam was the perfect oppertunity for those of us who can't lay out 7 or 8K for astro commercial versions. Thank you for giving us this oppertunity. Even if it takes another 500 or thou to get the thing portable and configured, that is still a 10th of the cost of commercial versions. I know I am willing to wrestle with the situation for a while.
Thanks again.
Thanks again.
#4
kw6562
-
-

- Posts: 989
- Joined: 25 Jun 2008
Authoritative Ignoramus
Posted 04 June 2011 - 11:02 PM
Sounds good - mine will be here Monday. I'm resurrecting an older desktop machine with PCI slots and I plan to run a 30 ft. cable to my pier. That will be a total of three computers to run my setup - my main laptop that interfaces to the mount, the cameras, and the filter wheel; a second laptop that runs PHD for guiding and the focuser and a focus position indicator; and the desktop for this camera. It should be fun...
I agree about the price - I always have rough plans in mind to upgrade my equipment, but if this works I won't think about cameras anymore, "just" mounts and optics.
I'll be happy to help in any way I can. As I mentioned in the other thread I have a friend at work who designs cameras and there are several others as well, so I should be able to get some questions answered.
Can't wait to get started! --Keith
#5
macona
-
-

- Posts: 391
- Joined: 18 May 2011
Ranger 4
Posted 05 June 2011 - 12:44 AM
I think mine should be here monday as well. Not sure since the tracking number they gave me is bad.
A friend gave me a 1Ghz C7 Via based mini-itx motherboard. I was going to put a test system together this weekend to try but I cant find any SATA data or power cables. Grr...
I doubt it will have enough power to do much but it's worth a try.
A friend gave me a 1Ghz C7 Via based mini-itx motherboard. I was going to put a test system together this weekend to try but I cant find any SATA data or power cables. Grr...
I doubt it will have enough power to do much but it's worth a try.
#6
macona
-
-
- Posts: 391
- Joined: 18 May 2011
Ranger 4
Posted 05 June 2011 - 01:31 AM
From looking though the Quantix manual it looks like the shutter is probably a VS35 model.
http://www.uniblitz....housing=S1
http://www.uniblitz....housing=S1
#7
gnabgib
-
-
- Posts: 735
- Joined: 05 Jun 2005
Viking 1
Posted 05 June 2011 - 03:07 PM
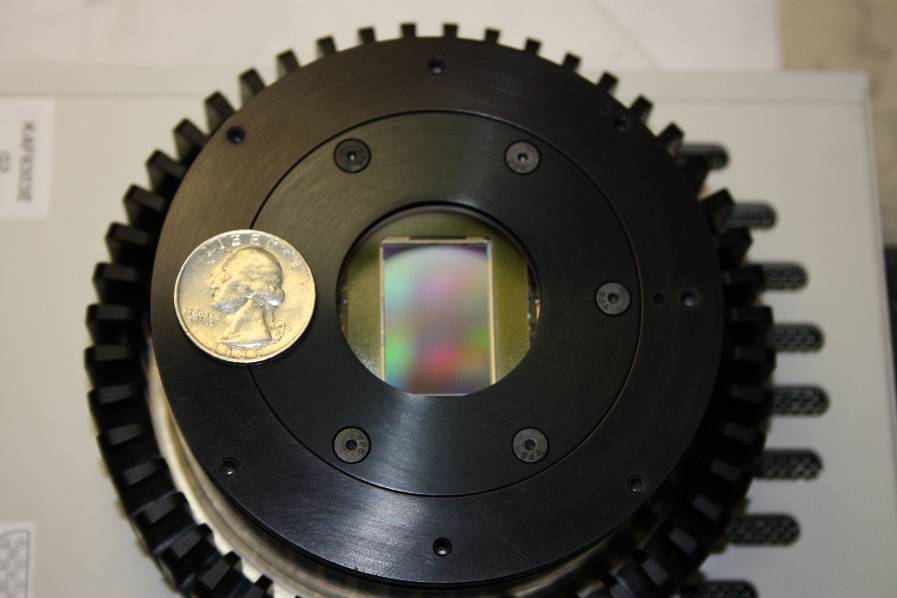
Thought I would post a few picts so here goes! In this shot I had removed the "lens mount" that came with the camera.
Attached Thumbnails
#8
gnabgib
-
-
- Posts: 735
- Joined: 05 Jun 2005
Viking 1
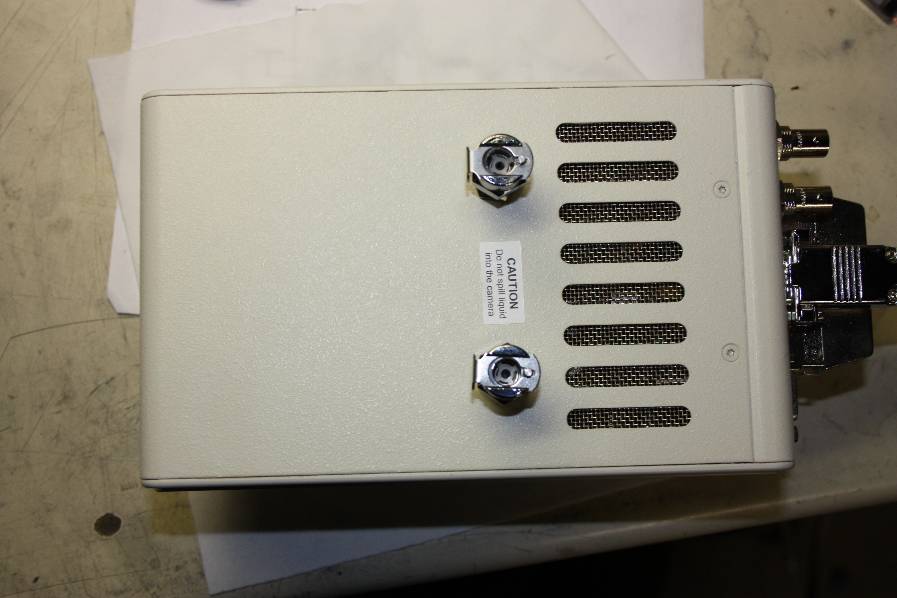
Posted 05 June 2011 - 03:08 PM
Camera backside
Attached Thumbnails
#9
gnabgib
-
-
- Posts: 735
- Joined: 05 Jun 2005
Viking 1
Posted 05 June 2011 - 03:09 PM
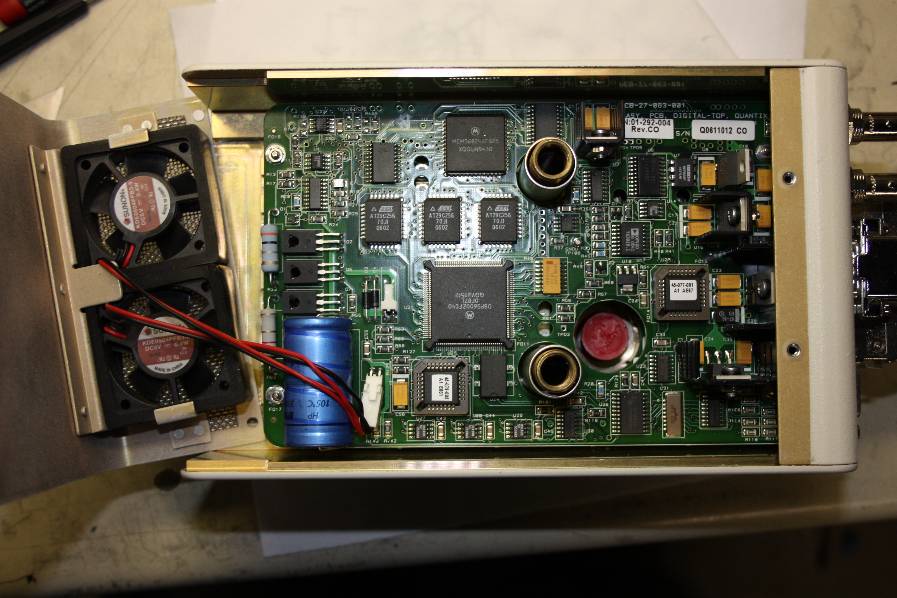
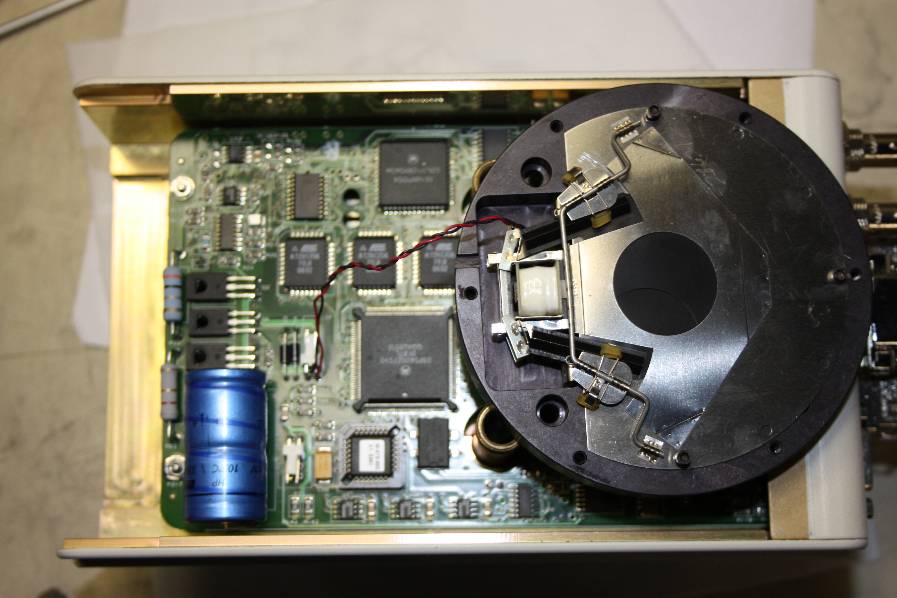
Back cover removed (Yeah! Nothing is sacred to me!)
Attached Thumbnails
#10
gnabgib
-
-
- Posts: 735
- Joined: 05 Jun 2005
Viking 1
Posted 05 June 2011 - 03:12 PM
I figured out the "extra" connector was the shutter connection so I tested it out using a 25mm uniblitz shutter I had. Everything worked well! So this proves we can add a shutter and have it work under the software control.
Attached Thumbnails
#11
gnabgib
-
-
- Posts: 735
- Joined: 05 Jun 2005
Viking 1
Posted 05 June 2011 - 03:13 PM
By the way, The shutter circuit starts with a 24VDC pulse then holds at 4VDC.
Kevin
Kevin
#12
macona
-
-
- Posts: 391
- Joined: 18 May 2011
Ranger 4
Posted 05 June 2011 - 08:48 PM
Is the VS25 the right one for it? Kind of looks like it. But I think it might eclipse the sensor on the edges. In the manual it looks like there is a additional, larger diameter housing.
I have one as well. Came out of a LASIK system.
If all else fails I can make up a bunch of shutter housings on my cnc mill.
I have one as well. Came out of a LASIK system.
If all else fails I can make up a bunch of shutter housings on my cnc mill.
#13
sullij1
-
-
topic starter
- Posts: 1,606
- Joined: 08 Nov 2008
Surveyor 1
Posted 05 June 2011 - 10:31 PM
Questions?
Is the shutter necessary? The same thing can be accomplished covering the scope objective, right? The idea of the shutter is for taking darks, correct? Please forgive my noobness but what am I missing?
Really not trying to be adversarial, just questioning the necessity of the shutter. The offer to machine is generous and respected.
#14
macona
-
-
- Posts: 391
- Joined: 18 May 2011
Ranger 4
Posted 05 June 2011 - 10:50 PM
Not completely necessary. It speeds things up to be able to take a dark field right after the shot. Also continuing to expose while doing a readout can cause some issues on a full frame sensor like what's in these cameras.
One possibly solution would be to use a filter wheel with a opaque filler and move to that position when you read out. I have a feeling the shutters are pretty spendy.
One possibly solution would be to use a filter wheel with a opaque filler and move to that position when you read out. I have a feeling the shutters are pretty spendy.
#17
sullij1
-
-
topic starter
- Posts: 1,606
- Joined: 08 Nov 2008
Surveyor 1
Posted 05 June 2011 - 11:50 PM
Just to be accurate; I acquired the dark image in the RS Image program that came with the cam (good software, lots of options). Moved the image to Photoshop, ran up the exposure until defects started to show and stopped. Saved the image as a 512k tiff, and reopened the tiff in nebulosity. Nebulosity is unforgiving and shows all the detail, good or bad. I then used the JPG “save as appears” option in Nebulosity’s file menu. This showed me what I wanted to know about the chip. I think nothing that darks, flats and a lil hot pixel removal can’t deal with. Please correct me if I am wrong.
#18
gnabgib
-
-
- Posts: 735
- Joined: 05 Jun 2005
Viking 1
Posted 05 June 2011 - 11:59 PM
Is the VS25 the right one for it? Kind of looks like it. But I think it might eclipse the sensor on the edges. In the manual it looks like there is a additional, larger diameter housing.
You are correct that this camera needs a vs35 shutter. I just happened to have a vs25 so I used it to test the shutter circuit. The idea of using a filter wheel has merit but some sort of motor controller will need to be designed. The shutters ARE pricey new! Perhaps a surplus source can be found?
Kevin
#19
sullij1
-
-
topic starter
- Posts: 1,606
- Joined: 08 Nov 2008
Surveyor 1
Posted 06 June 2011 - 12:03 AM
Not completely necessary. It speeds things up to be able to take a dark field right after the shot. Also continuing to expose while doing a readout can cause some issues on a full frame sensor like what's in these cameras.
One possibly solution would be to use a filter wheel with a opaque filler and move to that position when you read out. I have a feeling the shutters are pretty spendy.
From my experience with the RS Image software, it appears to work as Maxim DL and Nebulosity does with my starshoot, you command the cam to do a 180 sec exposure via the software and it exposes for 180 seconds and turns off (goes into non image stand by) waiting for another exposure command. Sequential frames can also be taken with specifide pauses in between. Isin't this routine somewhat of a eletronic shutter? Again please correct me if I am wrong. I also thought of a filter blank but the way the software commands the cam it seems like a shutter will not be necessary.
Sorry if it seems as if I am trying to cheap out but my budget "is" limited. Also if the software is providing the necessary utility functions, we are good to go, right?
#20
sullij1
-
-
topic starter
- Posts: 1,606
- Joined: 08 Nov 2008
Surveyor 1
Posted 06 June 2011 - 12:34 AM
If my last post helps the shutter issue, I have another question. When I removed the threaded lens that came with the unit and tried to screw in my 2 inch camera adapter (normally screws in the canon bayonet adapter) that will connect to a wheel or slide, I found that the cam snout is too large. My 2 inch threaded camera adapter is to small and another adapter will be necessary to reduce the Quantix snout to accomodate the 2 inch scope/filter adapter. Has anyone found a solution to this yet? 
#21
macona
-
-
- Posts: 391
- Joined: 18 May 2011
Ranger 4
Posted 06 June 2011 - 12:54 AM
Not completely necessary. It speeds things up to be able to take a dark field right after the shot. Also continuing to expose while doing a readout can cause some issues on a full frame sensor like what's in these cameras.
One possibly solution would be to use a filter wheel with a opaque filler and move to that position when you read out. I have a feeling the shutters are pretty spendy.
From my experience with the RS Image software, it appears to work as Maxim DL and Nebulosity does with my starshoot, you command the cam to do a 180 sec exposure via the software and it exposes for 180 seconds and turns off (goes into non image stand by) waiting for another exposure command. Sequential frames can also be taken with specifide pauses in between. Isin't this routine somewhat of a eletronic shutter? Again please correct me if I am wrong. I also thought of a filter blank but the way the software commands the cam it seems like a shutter will not be necessary.
Sorry if it seems as if I am trying to cheap out but my budget "is" limited. Also if the software is providing the necessary utility functions, we are good to go, right?
There are several different kinds of sensors. The ones in these camera are full frame sensor. Ideally the way you work them is you open the shutter, expose, close the shutter, and readout. CCD's read out one line at a time shifting the charge over to the next as you read out. If you do this without a shutter light is still charging the pixels and will add add charge to a pixel charge that might have seen very little light. Though this might have very little effect on our use since we are dealing with very little light to begin with. Interline CCDs have a small portion of each pixel dedicated to storing the charge so they are unaffected by light on the sensor during readout. Frame transfer CCDs have double the silicon that transfers the charge and is protected by an aluminized layer.
It ought to be not too hard to build a driver. Use a small stepper to run the wheel, a sensor to home, and a small stepper driver board. This will give step and direction control to the filter wheel. Then use something like a Teensy board (http://www.pjrc.com/teensy/) running arduino to translate ascom commands through serial or USB. I hate to use steppers but its the simplest thing here and since there is virtually no load there shouldnt be any issues.
Now the only problem using a blanked off section of a filter wheel is that you would be passing through other filters before you get back to black. But again with low light this may not be a problem. But if you are imaging more luminous objects it might be.
So, another option is to use something like a rotary solenoid to move the shutter into position between the filter wheel and the sensor. For that matter you could even do it with something like a rc servo.
#22
macona
-
-
- Posts: 391
- Joined: 18 May 2011
Ranger 4
Posted 06 June 2011 - 01:08 AM
If my last post helps the shutter issue, I have another question. When I removed the threaded lens that came with the unit and tried to screw in my 2 inch camera adapter (normally screws in the canon bayonet adapter) that will connect to a wheel or slide, I found that the cam snout is too large. My 2 inch threaded camera adapter is to small and another adapter will be necessary to reduce the Quantix snout to accomodate the 2 inch scope/filter adapter. Has anyone found a solution to this yet?
Hopefully I will get mint tomorrow and I can come up with a couple solutions. One may be to machine a standard 42mm camera lens mount. Though my Monarch does not have metric threading so I would probably have to set it up on my CNC lathe.
Another option is to bore out the plate on the lathe to accept a Canon EOS to Nikon adapter and epoxy or screw it in place. I would have to figure out something for the locking mechanism.
#23
gatsbyiv
-
-

-

- Posts: 1,322
- Joined: 29 Mar 2009
Apollo
Posted 06 June 2011 - 09:06 AM
If my last post helps the shutter issue, I have another question. When I removed the threaded lens that came with the unit and tried to screw in my 2 inch camera adapter (normally screws in the canon bayonet adapter) that will connect to a wheel or slide, I found that the cam snout is too large. My 2 inch threaded camera adapter is to small and another adapter will be necessary to reduce the Quantix snout to accomodate the 2 inch scope/filter adapter. Has anyone found a solution to this yet?
Hopefully I will get mint tomorrow and I can come up with a couple solutions. One may be to machine a standard 42mm camera lens mount. Though my Monarch does not have metric threading so I would probably have to set it up on my CNC lathe.
Another option is to bore out the plate on the lathe to accept a Canon EOS to Nikon adapter and epoxy or screw it in place. I would have to figure out something for the locking mechanism.
I thought these were supposed to be standard Nikon F mounts? Can we not just use a Nikon T-ring?
#24
sullij1
-
-
topic starter
- Posts: 1,606
- Joined: 08 Nov 2008
Surveyor 1
Posted 06 June 2011 - 10:55 AM
As you can see by gnabgib’s pics the window is near flush with the mounting plate. No where did the seller say this was a c mount camera. I looked at the c mount configuration and it appears the c mount configuration is the one that has the shutter assembly installed. We do not have this camera. It appears the ones we purchased were used in a different configuration/application. So no c-mount and no shutter (buyer beware!!!!!). I will look again when I get home but I doubt you could screw an adapter in the current plate, have it carry the weight and not break the crystal you see in gnabgib’s pics.
#25
gnabgib
-
-
- Posts: 735
- Joined: 05 Jun 2005
Viking 1
Posted 06 June 2011 - 01:36 PM
DON'T PANIC!!
Great words to live by!! Yes it seems the cameras are a somewhat ""custom" adaption of a commercial unit BUT they are only missing the front shutter housing! Everything else about them is standard. The front housing for the ccd sensor is VERY robust and can support the entire camera using either of the two sets of mounting holes! I have two ideas to help us all get started toward mounting these cameras on our telescopes.
1) Machine a new mounting plate that has the standard "t" thread in the center and bolts to the front using the same screws that originally attached the lens unit that came with our cameras. This is relatively easy and would get us up and running quickly. I am a mechanical engineer who is also a machinist so I could do this for the cloudynights members who bought one of these cameras. I just am "out of the shop" until next week so I could not make these plates until then.
2) In the longer run I want to have a shutter so I propose we try to find a source of surplus shutters that will work with these cameras. Once a source is found a housing to mount them on the camera can be designed and fabricated.
I personally do not have very "deep pockets" so this camera represents an opportunity to acquire a piece of equipment I could otherwise never afford! I am willing to put a little effort into making it work with my observing gear.
My .02 worth. Anyone else with ideas "lets hear them"!
Kevin
CNers have asked about a donation box for Cloudy Nights over the years, so here you go. Donation is not required by any means, so please enjoy your stay.

Recent Topics
-

-
 Sun in White Light 4/10/24 Massive Sunspot Group
J A VOLK - Today, 03:56 PM
Solar Observing and Imaging
-

-