
QUANTIX HELP.........
Started by
sullij1
, Jun 03 2011 11:07 PM
712 replies to this topic
#126

gnabgib
-

-
- Posts: 735
- Joined: 05 Jun 2005
Viking 1
Posted 13 June 2011 - 12:37 PM
Quantix card installed in dock

#127
gnabgib
-
-
- Posts: 735
- Joined: 05 Jun 2005
Viking 1
Posted 13 June 2011 - 12:39 PM
MY dock's specs. Make sure of your own laptops spec as there are quite a few versions of docking stations available for our different laptops!
Attached Thumbnails

#128
macona
-
-

- Posts: 391
- Joined: 18 May 2011
Ranger 4
Posted 13 June 2011 - 02:25 PM
The docking station may be the way to go price wise. A t30 laptop sells for something like $150 on ebay. I do have a Dell PIII lappie at home. I think I saw the docking station for it on craiglist for about $40. That ought to do it and the screen on the dell is real nice and high res.
#129
shurik
-
-
- Posts: 284
- Joined: 07 Oct 2007
Mariner 2
Posted 13 June 2011 - 10:35 PM
I think Dock station/resurrected laptop will be the way to go , but I also found this
http://www.arstech.c...--ssi2_pci.html
they customer support s***ks (they want money if you wish to discuss this product or anything on the phone), but it could be the way to go too...need comp geek to look at these components if it makes sense..
http://www.arstech.c...--ssi2_pci.html
they customer support s***ks (they want money if you wish to discuss this product or anything on the phone), but it could be the way to go too...need comp geek to look at these components if it makes sense..
#130
macona
-
-
- Posts: 391
- Joined: 18 May 2011
Ranger 4
Posted 13 June 2011 - 10:47 PM
I forgot all about the arstech cards. I have a couple of the ISA versions at work from the last film. Dont know what they were trying to do with them.
The PCI ought to work, but I think they will be pretty darn slow. For the price of that I can pick up a Thinkpad T43 and docking station.
I got the Ilex shutter in today. Very nice and compact. But will not trigger off the internal connector. I think the high voltage pulse decays too fast for it to open. Odd since the Uniblitz specs a 70v pulse and hold at 5v.
But I can make it work, I believe. I can use the internal shutter driver to trigger a small circuit that will drive the Ilex shutter. The shutter has two micro switches inside it that activate when the shutter opens. It seems the shutter needs at least 24v to open and ~5v to hold. I can use the switches to change the voltage level once it is open. I will need a 24v source to operate it, I can get that though a DC/DC converter.
The hole pattern is very odd. I will have to transfer and measure.
#131
shurik
-
-
- Posts: 284
- Joined: 07 Oct 2007
Mariner 2
Posted 13 June 2011 - 11:10 PM
"The PCI ought to work, but I think they will be pretty darn slow."
Why is that ? , I thought USB2.0 should be plenty , we are not doing any fast frame high resolution video transfer... am I missing it ?
Why is that ? , I thought USB2.0 should be plenty , we are not doing any fast frame high resolution video transfer... am I missing it ?
#132
kw6562
-
-

- Posts: 989
- Joined: 25 Jun 2008
Authoritative Ignoramus
Posted 13 June 2011 - 11:15 PM
Finished most of the shutter install tonight, still need to tweak a couple of things and it needs a light shield - but it works...Kevin, in response to your question the shutter operates directly from the camera, no interface circuit needed. When I get a chance I'll supply some dimensions, sorry its kind of late right now...
So here it is with the solenoid and linkage mounted on the flange:
So here it is with the solenoid and linkage mounted on the flange:
Attached Thumbnails

#133
kw6562
-
-
- Posts: 989
- Joined: 25 Jun 2008
Authoritative Ignoramus
Posted 13 June 2011 - 11:16 PM
And here it is on the camera.
Attached Thumbnails

#134
kw6562
-
-
- Posts: 989
- Joined: 25 Jun 2008
Authoritative Ignoramus
Posted 13 June 2011 - 11:29 PM
And with the shutter open. Note that I had to sacrifice one of the screws for the solenoid, but I think three should be adequate. To be honest this is kind of a hack, although it does seem to work well. Normally I would plan things out better, but this was one of those "design-as-you-go" projects. If I were going to do this right, I would design a new flange that could accommodate the shutter without too much modification. But I can't wait to start using it!
Also tried out a 10m SCSI cable that I ordered through E-bay, no problems. Got lazy and decided not to incorporate a filter slide as I originally intended; bought a manual wheel and a 2" LRGB set instead. So a little bit more work and it should be ready to go. Clear skies --Keith
Also tried out a 10m SCSI cable that I ordered through E-bay, no problems. Got lazy and decided not to incorporate a filter slide as I originally intended; bought a manual wheel and a 2" LRGB set instead. So a little bit more work and it should be ready to go. Clear skies --Keith
Attached Thumbnails

#135
macona
-
-
- Posts: 391
- Joined: 18 May 2011
Ranger 4
Posted 14 June 2011 - 12:14 AM
Changing from one interface to another will develop latency. If the card needs direct memory access it will slow down. USB2 is 480Megabit/sec or 60Megabytes/sec, though I have never seen past 40. PCI is at the very least double that and often quadruple that.
That card is more money than I am willing to risk for a maybe. By the time you have the card+power supply+enclosure you are double an old laptop and on par with a mini-itx.
That card is more money than I am willing to risk for a maybe. By the time you have the card+power supply+enclosure you are double an old laptop and on par with a mini-itx.
#136
gnabgib
-
-
- Posts: 735
- Joined: 05 Jun 2005
Viking 1
Posted 14 June 2011 - 05:32 PM
I forgot all about the arstech cards. I have a couple of the ISA versions at work from the last film. Dont know what they were trying to do with them.
The PCI ought to work, but I think they will be pretty darn slow. For the price of that I can pick up a Thinkpad T43 and docking station.
I got the Ilex shutter in today. Very nice and compact. But will not trigger off the internal connector. I think the high voltage pulse decays too fast for it to open. Odd since the Uniblitz specs a 70v pulse and hold at 5v.
But I can make it work, I believe. I can use the internal shutter driver to trigger a small circuit that will drive the Ilex shutter. The shutter has two micro switches inside it that activate when the shutter opens. It seems the shutter needs at least 24v to open and ~5v to hold. I can use the switches to change the voltage level once it is open. I will need a 24v source to operate it, I can get that though a DC/DC converter.
The hole pattern is very odd. I will have to transfer and measure.
Macona;
I have been playing with one of the Ilex shutters. I have installed a 7805 voltage regulator across one of the mico switches to provide the 5vdc "hold" voltage. I also put a 22mfd tant cap across the coil to smooth out the transition. In the camera I have a 5vdc relay switched by the shutter circuit (to "pulse" is to short to harm relay) to control the Ilex shutter. If you look at the large resistor next to the big cap (technical I know) it has 24vdc coming straight from power supply. (pins 11 and 12 on connector) This operates shutter quite well! The shutter use about 50 milliamps current to hold open and about 200 milliamps at 24v to fire. I just ordered one of the "other" shutters to see how well it might work. The seller on EBAY has "quite a few" available. By the way if you do not reduce the voltage the shutter trigger coil gets pretty hot after only a few minutes. At 5v hold it never warms up.
.02 worth
Kevin
#137
macona
-
-
- Posts: 391
- Joined: 18 May 2011
Ranger 4
Posted 14 June 2011 - 07:21 PM
I am finding that the shutter opens much better with a 48v pulse, its kind of sluggish at 24v. I have found a little 5 to 12v input dc/dc power supply that is small enough to install in the shutter itself. It has a -24/24v output. Putting 330uf caps across the rails gives enough of a kick to open the shutter. Then 5v will hold it open.
#138
macona
-
-
- Posts: 391
- Joined: 18 May 2011
Ranger 4
Posted 14 June 2011 - 07:58 PM
Oh yeah, be sure to put a diode across the coil as well. Otherwise the back emf from the solenoid can kill the cap and you sure dont want that pulse getting back in to the camera circuitry.
#139
macona
-
-
- Posts: 391
- Joined: 18 May 2011
Ranger 4
Posted 15 June 2011 - 12:56 PM
I sent a message to Craig over at Stark Labs about getting PVCAM support in Nebulosity. He says he needs a loaner camera to program with. So I put a bid on one of the lower res quantix cameras on ebay.
#140
macona
-
-
- Posts: 391
- Joined: 18 May 2011
Ranger 4
Posted 15 June 2011 - 10:55 PM
I ordered a little 3 watt DC/DC converter. It gives me 24, 48,and 72volts out with 5v in. Small enough to fit in the empty space of the shutter housing. I will use this to charge a capacitor which will give the initial drive pulse, then like Kevin, I will use 5 v to hold it open triggered with one of the microswitches. I plan on tapping off the 5v line feeding the fan. Basically make a Y splitter with the same molex connectors. I have a bunch left over from building my laser cutter. This will allow me to not modify the circuit board. The dc/dc converter is about $15.
Just got back from picking up a Thinkpad T43 off Craigslist. 1.86Ghz, 1G ram, 80G hard drive, bluetooth, wifi, 1400x1050 screen, $120. A dock is about $25 shipped off ebay.
Just got back from picking up a Thinkpad T43 off Craigslist. 1.86Ghz, 1G ram, 80G hard drive, bluetooth, wifi, 1400x1050 screen, $120. A dock is about $25 shipped off ebay.
#141
kw6562
-
-
- Posts: 989
- Joined: 25 Jun 2008
Authoritative Ignoramus
Posted 16 June 2011 - 10:52 PM
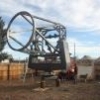
I mounted the camera with shutter and filter wheel onto my main setup tonight. It was a frustrating start, as I was having issues with my guide camera and also with the Quantix - but the problems have been resolved and I am breathing easier. The main problem with the Quantix seems to be related to this ancient PC that I'm using - I had to disconnect the network to talk to the camera, but I didn't have to remove the network card itself. Weird. But now all seems okay, and I was also able to get the guider working (totally unrelated to the Quantix). Its partly cloudy and a full moon so I'm not trying anything too aggressive, just wanted to see if everything could be balanced and especially wanted to find out if the Moonlite focuser could handle the filter wheel and camera. So far so good, I was able to balance it and guiding looks good (except when clouds come in) and the focuser seems to be able to handle the load. Trying a few minutes of Ha of the Crescent but I don't expect too much for this trial run. This is what the setup looks like with the camera mounted. --Keith
Attached Thumbnails

#142
macona
-
-
- Posts: 391
- Joined: 18 May 2011
Ranger 4
Posted 16 June 2011 - 11:41 PM
Looks good. My Moonlight focuser shipped today. The owner seems like a real nice guy. I just got the manual version. I might modify it later for powered focus, I have a very nice micromo swiss made motor that would be perfect.
Are you using computer controlled focus?
Are you using computer controlled focus?
#143
kw6562
-
-
- Posts: 989
- Joined: 25 Jun 2008
Authoritative Ignoramus
Posted 17 June 2011 - 12:08 AM
Yes, I have a DC motor and Shoestring FCUSB. I also built a position indicator for it with a dial indicator and an Arduino for a USB interface. And you're right, they are very helpful (and the anodized finish is really nice). --Keith
#144
kw6562
-
-
- Posts: 989
- Joined: 25 Jun 2008
Authoritative Ignoramus
Posted 17 June 2011 - 01:04 AM
This is 12X100s at gain=3 Ha. I'm learning a bit about processing the files - for one thing, I'm using ImageJ to break the tifs into individual files and maintain them as 16-bit. Poor night due to clouds and moon, and I probably wasn't focused well, also no flats taken. But its a start...--Keith
Attached Thumbnails

#145
macona
-
-
- Posts: 391
- Joined: 18 May 2011
Ranger 4
Posted 17 June 2011 - 12:09 PM
What are you using for a color wheel?
#146
kw6562
-
-
- Posts: 989
- Joined: 25 Jun 2008
Authoritative Ignoramus
Posted 17 June 2011 - 08:14 PM
Orion manual 4 x 2" and LRGB filters. Right now I have a Ha in place of the red. --Keith
#147
macona
-
-
- Posts: 391
- Joined: 18 May 2011
Ranger 4
Posted 17 June 2011 - 08:19 PM
Looks like I am buying one of the Optec IFW sets with the LRGB filter sets.
The seller with the Ilex shutters has posted more:
http://cgi.ebay.com/...=STRK:MEWAX:VRI
The seller with the Ilex shutters has posted more:
http://cgi.ebay.com/...=STRK:MEWAX:VRI
#148
sullij1
-

-
topic starter
- Posts: 1,606
- Joined: 08 Nov 2008
Surveyor 1
Posted 17 June 2011 - 10:33 PM
IMPRESSED, Good work Keith, I too was thinking about a safety catch for the cam. "Smart" don't want that thing hitting the ground. Been working on circuit tests and talking to engineers at the co I work at (we build science stuff). Will post some data later ( working on it ). I am working on a solution similar to yours for the Ilex shutter ( linear actuater that works at 6 volts, no circuit mods). BTW did the actuater ( shutter selinoid ) work as planned with the software?
#149
kw6562
-
-
- Posts: 989
- Joined: 25 Jun 2008
Authoritative Ignoramus
Posted 18 June 2011 - 08:58 AM
Thanks Sullij - Yeah, I was kind of paranoid about the camera/filter wheel slipping out of the focuser and hitting the ground, so I put a safety chain on one of the 1/4-20 mounting holes on the camera body and connected it to the carrying handle on the SCT. That's the only place in the optical train that is not a threaded connection. I've never had a problem with it but I didn't want to take chances.
I lucked out with the shutter - the solenoid is 24V and holds at 4V so it didn't require any interface circuit. The camera driver circuit can supply enough current to operate it and there is a protection diode across the connector so I only had to hook it up. My big issues, as you may recall from my earlier posts, were mechanical - there were several modifications needed to get the shutter to fit in the flange and operate correctly. But it works well and the software runs it without problems.
I hope no one minds me doing this, but I want to caution everyone who might open up the camera to take precautions regarding ESD (electrostatic discharge). The CCD and many of the other components in the camera are very sensitive to static and even though it is summertime and usually humid one should be careful. The CCD is a Class 0 device which means that the damage threshold is <250V, which is not very high and some pins, such as the reset gate, are a lot lower. At least wear a grounded wrist strap, and use a grounded dissipative mat if possible. If you use a soldering iron make sure that the tip is grounded. For the shutter pins I'm sure there isn't a problem, but when working on a device that contains sensitive components it is "best practice" to act as if everything is at the lowest class in the device.
Sorry, when working on flight components we are positively religious about ESD mitigation so I felt the need to pontificate...
--Keith
#150
sullij1
-
-
topic starter
- Posts: 1,606
- Joined: 08 Nov 2008
Surveyor 1
Posted 18 June 2011 - 10:12 PM
Thanks Sullij - Yeah, I was kind of paranoid about the camera/filter wheel slipping out of the focuser and hitting the ground, so I put a safety chain on one of the 1/4-20 mounting holes on the camera body and connected it to the carrying handle on the SCT. That's the only place in the optical train that is not a threaded connection. I've never had a problem with it but I didn't want to take chances.
I lucked out with the shutter - the solenoid is 24V and holds at 4V so it didn't require any interface circuit. The camera driver circuit can supply enough current to operate it and there is a protection diode across the connector so I only had to hook it up. My big issues, as you may recall from my earlier posts, were mechanical - there were several modifications needed to get the shutter to fit in the flange and operate correctly. But it works well and the software runs it without problems.
I hope no one minds me doing this, but I want to caution everyone who might open up the camera to take precautions regarding ESD (electrostatic discharge). The CCD and many of the other components in the camera are very sensitive to static and even though it is summertime and usually humid one should be careful. The CCD is a Class 0 device which means that the damage threshold is <250V, which is not very high and some pins, such as the reset gate, are a lot lower. At least wear a grounded wrist strap, and use a grounded dissipative mat if possible. If you use a soldering iron make sure that the tip is grounded. For the shutter pins I'm sure there isn't a problem, but when working on a device that contains sensitive components it is "best practice" to act as if everything is at the lowest class in the device.
Sorry, when working on flight components we are positively religious about ESD mitigation so I felt the need to pontificate...
--Keith
Keith can you show us a pic of how you have the black and red leads connected on the camera circuit board. I must not be connecting my shutter to the right connections.

CNers have asked about a donation box for Cloudy Nights over the years, so here you go. Donation is not required by any means, so please enjoy your stay.

Recent Topics
-
 Fire in the sky
piaras - May 10 2024 09:49 PM
DSLR, Mirrorless & General-Purpose Digital Camera DSO Imaging
-

-
-

-

-

-

-

-

-
 We have had conversations about how much cloud cover, but what chance of rain?
DanMiller - May 10 2024 08:10 PM
Beginning Deep Sky Imaging


