Jump to content

  •  

CNers have asked about a donation box for Cloudy Nights over the years, so here you go. Donation is not required by any means, so please enjoy your stay.

Photo

Building a 24' Dome

This topic has been archived. This means that you cannot reply to this topic.
160 replies to this topic

#1 Tom Clark

Tom Clark

    Viking 1

  • *****
  • topic starter
  • Posts: 779
  • Joined: 14 Nov 2007

Posted 23 September 2012 - 08:59 AM

"Astronomers who enjoy observing or imaging all share one need in common - dark skies! Of course you can try to enjoy astronomy from nearly anywhere, but the one thing that will enhance your results more than anything is the best skies from which to observe.

After nearly 30 years in this hobby, we have learned a lot. Equipment comes and goes. Our first telescope has morphed itself into the 20th. Many sets of eyepieces have graced our eyepiece boxes over the years. However, the ultimate question is still not answered. Where is the best place to observe from?"

The search for a new astronomy home was started in a post on CN in June of 2010.

By the following year we had discovered our new home, purchased the property, and started the big job of moving our home and observatory to New Mexico, under some of the best skies in the country, where you can expect 300 clear nights a year, unbelievable transparency, , decent temperatures, and great seeing. A second thread on CN talked about our findings of locating the new home.

We had lived for 40 years in Florida, but sold our place at the Chiefland Astronomy Village in February of 2012, and by March the move west started.

We now are living at The New Mexico Astronomy Village, a brand new place just starting out. Already five astronomy families have purchased land, and before long more astronomers will be moving here and building their own observatories. There is already one 24x24' roll off next to us, with more planned before long.

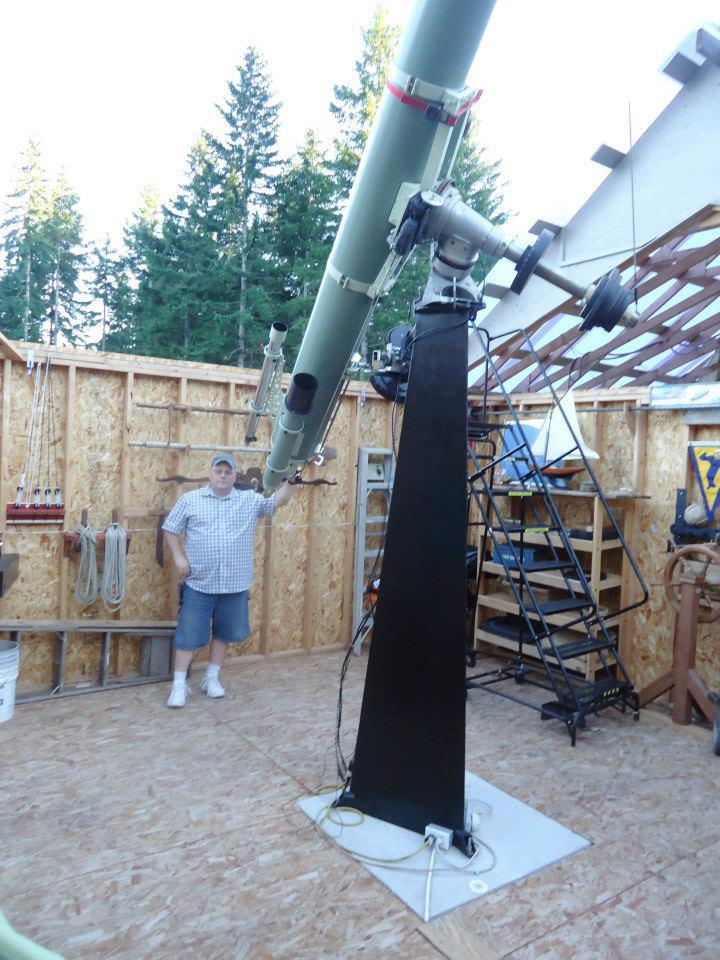
After getting the basics finished, there is now time to start the build of our new home for our 42" driven Dobsonian, affectionally known as the Beast - mainly because it weighs 1600 pounds, and when struggling to build it it earned that name. Lots of photos will be posted on a page on my web site as construction continues, so if you want to learn how to build a fiberglassed wooden dome, you might want to check it out now and then. Jeannie and I expect to have the Beast back in operation in a couple of months, and are quite excited to have the big scope working under skies that are far superior to where it was for the last 10 years.

As an added benefit Mike Lockwood has the mirror in his shop for a refiguring and recoating job while the new home is being completed. We can't wait for first light, and to be able to invite friends over to share the views.

Tom Clark

Attached Thumbnails

  • 5435774-1.jpg


#2 Starman27

Starman27

    Cosmos

  • *****
  • Posts: 9,528
  • Joined: 29 Jan 2006

Posted 23 September 2012 - 09:08 AM

Can't wait to see the evolution of your new obswerving site and observatory. All the best on your build.

#3 roscoe

roscoe

    curmudgeon

  • *****
  • Posts: 12,403
  • Joined: 04 Feb 2009

Posted 23 September 2012 - 01:50 PM

How did you make the ribs? Are they strips glue-laminated to a curved form, or a series of overlapping arcs glued together? Or, do you have a really big steam box?
Russ

#4 Tom Clark

Tom Clark

    Viking 1

  • *****
  • topic starter
  • Posts: 779
  • Joined: 14 Nov 2007

Posted 23 September 2012 - 03:35 PM

I band saw 3/4" plywood on the desired radius and then laminate them together with glue and a nail gun. It sounds harder than it is. Even for a 24' Dome 33 sheets of ply were cut up in 4 easy days.

Attached Thumbnails

  • 5436492-1.jpg


#5 Mirzam

Mirzam

    Fly Me to the Moon

  • *****
  • Posts: 5,055
  • Joined: 01 Apr 2008

Posted 23 September 2012 - 05:14 PM

Easy is a relative term. :jawdrop: :crutch:

JimC

#6 stkoepke

stkoepke

    Messenger

  • *****
  • Posts: 479
  • Joined: 11 Jan 2008

Posted 24 September 2012 - 01:59 AM

:like:

#7 seryddwr

seryddwr

    Innocent Bystander

  • *****
  • Posts: 3,966
  • Joined: 19 Feb 2010

Posted 24 September 2012 - 01:17 PM

Oooh! Oooh! When you're done, can I come and visit. (I live in southern NM)

#8 Tom Clark

Tom Clark

    Viking 1

  • *****
  • topic starter
  • Posts: 779
  • Joined: 14 Nov 2007

Posted 24 September 2012 - 02:26 PM

Hey Greg,

If you live in southern NM you can come over and help us build the dome. We will need all the help we can get when we reassemble this dome on top of the walls before adding the sheeting. We just finished cutting all 30 ribs to fit this morning.

So where do you live?

Tom

Attached Thumbnails

  • 5438297-2.jpg


#9 gravitino

gravitino

    Mariner 2

  • *****
  • Posts: 257
  • Joined: 28 Apr 2009

Posted 24 September 2012 - 04:03 PM

Looking good, Tom. Are you following a plan for the layout of the ribs, shutter, etc? I'm particularly wondering about: (1) number of ribs (2) attachment angles etc, and (3) shape of the gores that will cover the ribs.

I've always considered a ROR the ideal observatory solution, but a little better wind protection for a large Dob (I've just finished my 22") has made me start considering a large dome, which seems to be what I'm seeing here. :-)

Clear skies,
-- Shane

#10 Tom Clark

Tom Clark

    Viking 1

  • *****
  • topic starter
  • Posts: 779
  • Joined: 14 Nov 2007

Posted 24 September 2012 - 05:19 PM

Shane, the plan is simple. The ribs have to be 24" apart at the bottom. As you know, wall studs are normally 16" on center, but since the ribs are closer at the top, the building department OKs the plans for 24" base.

My plan was first designed 12 years ago when I built the Fl observatory. This time I used the same plans for the NM building department, but am making a few minor changes. Since the mirror is 42", and I wanted at least 10" clearance either side so we don't have to move the dome so often, this opening is bigger. Also, the roll back shutter is less open to damage from high winds while observing, we went with that. In the past, too many observings sessions were cut short because the wind picked up to dangerous levels.

Every rib points to the center of the building. I have a nail sticking up in the center, and used a plum bob to mark the location of where the ribs hit the main arches.

As to roll-off vs dome, what protection do you get when the eyepiece is 14' high and the walls are 6' high??? Wind does not shake the scope in a dome. A dome is much warmer than observing outside (ROR), and there is never any dew in a dome. After 10 years of observing inside, I could never go back outside in the weather again. Well, we do use our travel scopes at star parties, but that is another matter.

Note in this photo how all the ribs point to the center…

Attached Thumbnails

  • 5438583-1.jpg


#11 DeanS

DeanS

    Aurora

  • *****
  • Posts: 4,856
  • Joined: 12 Jul 2005

Posted 24 September 2012 - 06:18 PM

Tom, looks like your shop has never been moved! Congrats on the new set up.

Dean

#12 dobsoscope

dobsoscope

    Viking 1

  • *****
  • Posts: 543
  • Joined: 24 May 2006

Posted 25 September 2012 - 05:35 AM

What method did you choose to fix the ribs up at the top?Do you use hinges or do you cut the timber at an angle and screw it to the semicircular hoops?

Would you consider skinning in aluminium sheeting? That would last 'forever',, more or less.

#13 Tom Clark

Tom Clark

    Viking 1

  • *****
  • topic starter
  • Posts: 779
  • Joined: 14 Nov 2007

Posted 25 September 2012 - 12:59 PM

The ribs are attached at both ends by the metal brackets that are common in construction. I drew the plans in 2001, but then they had to go a structural engineer, who added all the final little footnotes. The brackets are called LS-30. Since the FL observatory went through four hurricanes, I guess they are strong enough.

A friend skinned his dome in aluminum. It always leaks due to the caulking getting old and cracking. I used 1/4" exterior grade plywood, and then fiberglassed it. 12 years later it is still like new and doesn't leak, so will use the plywood again.

Attached Thumbnails

  • 5439938-3.jpg


#14 Tom Clark

Tom Clark

    Viking 1

  • *****
  • topic starter
  • Posts: 779
  • Joined: 14 Nov 2007

Posted 30 September 2012 - 03:32 PM

Now that the dome parts have been fit together, and all the ribs cut to the proper length and angles, the dome was taken apart and the pieces put back into the garage. Now the concrete pad is open so the walls can be built. On the bottom pressure treated 2x6s were cut to the proper radius, and then the wall top ring assembled so it can fit onto the top of the wall after the studs mounted. After the walls are finished and the wheels mounted, the dome will be reassembled again, this time on top of the walls.

Attached Thumbnails

  • 5448770-1.jpg


#15 crazyqban

crazyqban

    Mercury-Atlas

  • *****
  • Posts: 2,723
  • Joined: 16 Dec 2008

Posted 03 October 2012 - 12:35 AM

Wow Tom, that is coming along great. I enjoyed viewing through "The Beast" on a couple of ocassions at Chiefland and can only imagine how great it will perform out in New Mexico. No doubt that a Mike Lockwood refiguring job will make and already excellent scope even better. Congrats, hopefully one day I can pay you a visit in your new digs. Clear skies.

#16 rwiederrich

rwiederrich

    Goldfinger

  • *****
  • Posts: 13,638
  • Joined: 17 Nov 2005

Posted 03 October 2012 - 11:09 AM

Now that the dome parts have been fit together, and all the ribs cut to the proper length and angles, the dome was taken apart and the pieces put back into the garage. Now the concrete pad is open so the walls can be built. On the bottom pressure treated 2x6s were cut to the proper radius, and then the wall top ring assembled so it can fit onto the top of the wall after the studs mounted. After the walls are finished and the wheels mounted, the dome will be reassembled again, this time on top of the walls.


One: I'm assuming you have a killer band saw...second: I'm assuimng you have pleanty of help to assemble, disassemble, and remove to the shop the dome...thirdly: I'm sontinueing to assume you have lots of treated lumber to cut up for the footers if you used 2x6's.

I'm impressed what sheer desire and will can do...plus a wife happily content with her suroundings and your absence.

I'm overly impressed... :bow: :bow: :bow: :bow: :bow: :bow:

#17 rigel123

rigel123

    ISS

  • ****-
  • Posts: 25,135
  • Joined: 29 Jun 2009

Posted 03 October 2012 - 02:24 PM

:jawdrop: :jawdrop: :jawdrop: :jawdrop: :jawdrop:

#18 DeanS

DeanS

    Aurora

  • *****
  • Posts: 4,856
  • Joined: 12 Jul 2005

Posted 03 October 2012 - 02:53 PM

Aren't you suppose to build the dome around the scope? :)

Sort of like a ship in a bottle.

#19 Tom Clark

Tom Clark

    Viking 1

  • *****
  • topic starter
  • Posts: 779
  • Joined: 14 Nov 2007

Posted 03 October 2012 - 08:00 PM

Aren't you suppose to build the dome around the scope? :)

Sort of like a ship in a bottle.


Hey Dean,

You have been to Chiefland and seen the Beast. If that thing was inside the dome during construction, there would be no room to work and build the dome. Besides, chain hoists have to be attached to the dome ceiling to lift the tube assembly up so the rocker box can be slid under it.

All our old friends are welcome to come visit and observe with us when the project is finished…

Attached Thumbnails

  • 5454186-1.jpg


#20 DeanS

DeanS

    Aurora

  • *****
  • Posts: 4,856
  • Joined: 12 Jul 2005

Posted 03 October 2012 - 08:36 PM

I would like to take you up on that someday Tom.

Thanks!

#21 nytecam

nytecam

    Hubble

  • *****
  • In Memoriam
  • Posts: 12,692
  • Joined: 20 Aug 2005

Posted 04 October 2012 - 02:28 AM

Nice work Tom :bow:

Aren't you suppose to build the dome around the scope? :)Sort of like a ship in a bottle.

Yeh - anyone done a Dob-in-a-Dome where the Dob is physically attached and supported by the dome eg top end of the Dob pivots on the shutter for 'altitude' and rotation of dome for 'azimuth' :question: Now that would be neat but may need a fancy viewing platform - also attached to the dome - a sort of updated Leviathan of Parsonstown from the 1850 :grin:

Attached Thumbnails

  • 5454547-0WilliamParsonsBigTelescope.jpg


#22 Tom Clark

Tom Clark

    Viking 1

  • *****
  • topic starter
  • Posts: 779
  • Joined: 14 Nov 2007

Posted 09 October 2012 - 07:36 AM

On the last dome I used 1/4 x3 x3" angle iron rolled into a circle and welded together. It rode on 10 steel "V"-grooved wheels. The observatory quickly acquired the name "The Thunder Dome" because of the sound it made when rotating.

This time I am using 2" wide 6" diameter wheels rolling on a flat aluminum plate. It should be a bit quieter. The casters have a weight bearing capacity of 750 pounds each.

Attached Thumbnails

  • 5461738-1.jpg


#23 David Pavlich

David Pavlich

    Transmographied

  • *****
  • Posts: 41,695
  • Joined: 18 May 2005

Posted 09 October 2012 - 09:34 AM

Really cool execution, Tom!!

David

#24 Tom Clark

Tom Clark

    Viking 1

  • *****
  • topic starter
  • Posts: 779
  • Joined: 14 Nov 2007

Posted 11 October 2012 - 09:25 AM

Yesterday the base ring for the dome was reassembled on top of the walls. The inside of the ring has an aluminum strip around it, and the base of the ring has a 3.5" wide aluminum strip to provide a smooth tract for the wheels to ride on. Another two 8" diameter wheels will be used to drive the dome in rotation.

Attached Thumbnails

  • 5465109-1.jpg


#25 Tom Clark

Tom Clark

    Viking 1

  • *****
  • topic starter
  • Posts: 779
  • Joined: 14 Nov 2007

Posted 11 October 2012 - 09:43 AM

All of the hold downs were welded from 1.5" angle iron, and ball bearings are attached to ride on the inner ring. This keeps the dome from sliding around as it rotates.

Saturday morning - if it is not too windy - will be the big day for reassembling the dome parts in place. Wish us luck, as there will be a lot of ladder work involved.

I realize not many of you will be running out and building a 24' dome in your back yard next week, but all of these ideas would be very good for using on smaller domes of 12' and up. Any smaller observatory would be a real easy project after building this monster.

A commercial dome of this size runs over $50K, and the projected cost of this project is a more far more affordable at under $10K, including the motors to rotate the dome and open and close the shutters. Of course all of the details are not worked out yet, but that just makes the building exciting.

Attached Thumbnails

  • 5465130-3.jpg


CNers have asked about a donation box for Cloudy Nights over the years, so here you go. Donation is not required by any means, so please enjoy your stay.


Recent Topics


Cloudy Nights LLC
Cloudy Nights Sponsor: Astronomics