Jump to content

  •  

CNers have asked about a donation box for Cloudy Nights over the years, so here you go. Donation is not required by any means, so please enjoy your stay.

Photo

C90 $3 DIY Focuser & 1.25" & Eypiece Adapter

This topic has been archived. This means that you cannot reply to this topic.
9 replies to this topic

#1 ssmith

ssmith

    Apollo

  • *****
  • topic starter
  • Posts: 1,200
  • Joined: 28 Jun 2012

Posted 16 October 2012 - 07:40 PM

Recently I purchased a used orange tube C90 Astro Model telescope - something that I have always wanted.

Optically it is a fine little telescope but like many users I found that trying to get perfect focus using the barrel fousing ring could be a bit frustrating due to the relatively coarse adjustment and the almost unavoidable vibration caused by having to grasp the tube to focus.

I searched the web looking for an in-line helical focuser that could be added at the eyepiece or at the visual back but discovered that the costs for the focuser and the required adapters would approach or exceed what I paid for the telescope itself.

Deciding to try to come up with a simple DIY solution I set off to Home Depot to see what I could find.

What I came up with is decribed below and is the cheapest and simplest solution since it utilizes the supplied 0.965 diagonal. As an added bonus it allows the use of 1.25" eyepieces which are prefered over the supplied 0.965" eyepieces.

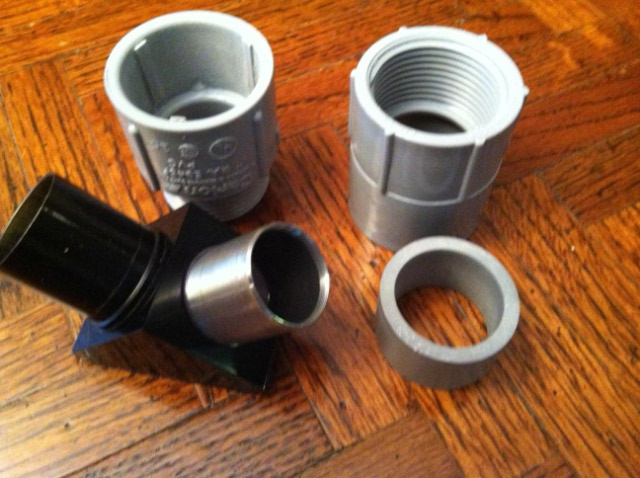
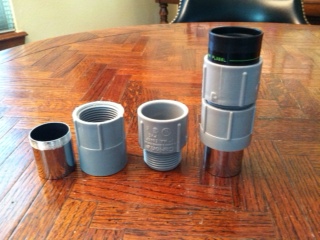
The adapter is made from:

Carlon 1" PVC Terminal Adapter - one Male & one Female @ 50 cents ea.

A piece of 1 inch PVC conduit approx 3/4 " long

I didn't want to purchase an 8 ft length of conduit (Minimum size sold) so I just bought a 45 degree elbow piece for a buck and cut the 3/4" straight piece from it.

The diagonal that came with my scope has a split tube on the eyepiece side and uses friction (not a setscrew) to hold the eyepiece in place. I dont know if this was standard over the production life of the scope but if you have a diagonal with a setscrew on the eyepiece end then you will have to make some modifications to attach the lower part of the coupling to the diagonal.

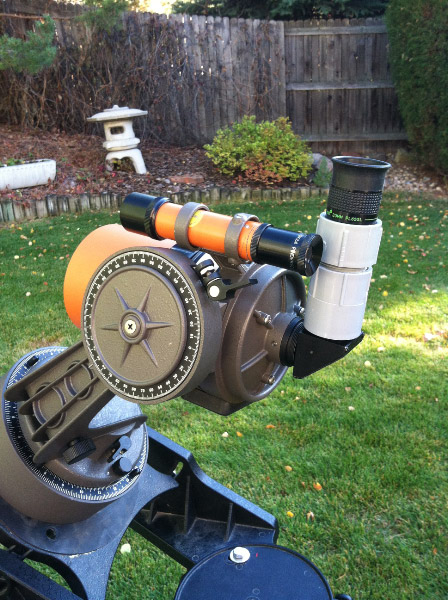
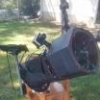
The finished product is shown in the attached photo.
Construction details are outlined in the next post.

Steve
Castle Rock, CO

Attached Thumbnails

  • 5473996-C90 DIY Focuser.jpg


#2 ssmith

ssmith

    Apollo

  • *****
  • topic starter
  • Posts: 1,200
  • Joined: 28 Jun 2012

Posted 16 October 2012 - 07:46 PM

The only real work involved is to get a snug fit of the diagonal to the lower (female coupling) and the eyepiece to the upper (Male) coupling.

On the lower coupling the inside diameter of the short piece of PVC is just slightly smaller than the OD of the diagonal so sand the inside of the PVC until you can slide the eyepice barrel of the diagonal into the PVC while maintaining a snug fit. Once the sanding is complete the PVC can be slipped into the lower coupling.

I found the fit of the pieces to be tight and did not glue the PVC to the coupling but the PVC can be glued to the coupling if desired.

On the upper coupling a 1.25" eyepiece will fit inside the coupling with about 1/32" of clearance all-around.

I cut 3 narrow shim strips from a sheet of 1/32" styrene(can be purchased at a hobby or craft store) that I had
lying around and epoxied them to the inside of the upper coupling to center the eyepice in the opening as shown
in the picture. Roughen the inside of the coupling and the styrene with some sandpaper to ensure a good bonding surface for the epoxy. If you cant find styrene, the shims can be made from most any material - wood or even super-glue toughened cardboard if desired.

Once the epoxy has cured test fit your eyepiece. In all likelyhood the eypiece wont fit so take a piece of sandpaper or even better, an emery board, and gently sand the shims down until you get the desired fit of the eypiece into the coupling.

If you prefer a more mechanical type of connection of the diagonal or eyepiece to the couplings, the couplings can easily be drilled and tapped to accept setcrew(s) of your choice.

Screw the pieces together and attach the diagonal and you are ready to go.

The focusing provided by the threaded coupling can be made very smooth by working the pieces back and forth and cleaning any extraneous plastic from the mold lines using a hobby knife. I am able to get very precise and slop-free focusing and had no trouble in getting a precise focus and splitting Epsilon Lyrae, something I had difficulty with using just the barrel focuser.

The only problem I have found with this arrangement is that the extended length of the coupling can interfere with the use of the spotter scope which requires you to rotate the eypiece out of the way. Also it is best to use smaller/lighter eypieces due to the length of the assembly.

Enjoy

Steve
Castle Rock, CO

Attached Thumbnails

  • 5474003-DIY Focuser Parts.jpg


#3 glennnnnnn

glennnnnnn

    Mariner 2

  • *****
  • Posts: 263
  • Joined: 20 Oct 2009

Posted 17 October 2012 - 06:30 AM

Excellent hunting at Home Depot: the plumbing department there is a vast resource! Now you have a customized, upgraded and improved C90. Brilliant!
Instead of fussing with the 3 shims, you could drill and tap 3 holes for set screws. 1/4-20 is a very useful thread that works well in plastic and wood, in addition to aluminum. If you use 3 pan-head machine screws you can finger-tighten your lens by just twisting one of them.

#4 ssmith

ssmith

    Apollo

  • *****
  • topic starter
  • Posts: 1,200
  • Joined: 28 Jun 2012

Posted 17 October 2012 - 07:45 AM

Thanks Glenn

I think that I will add one setscrew at the eyepiece since with the friction fit set high enough to securely hold the eyepiece it makes it difficult to change eyepieces without jarring the scope off-target. I think that having the shims are still a good idea since it keeps the eyepiece nicely centered and with 3 setscrews it would just be too fiddly and clutter up the focuser and make it more prone to snagging on clothing etc.

Steve

#5 Geo.

Geo.

    Vendor - Nexstar Parts

  • *****
  • Vendors
  • Posts: 5,711
  • Joined: 01 Oct 2008

Posted 17 October 2012 - 10:13 AM

And nylon screws in 10-24 and 1/4-20 are readily available. I'd go with two short fixed screws for centering and one adjustable for securing the EP.

Pretty sure the friction diagonals came early on and were replaced with the set screw type in the later '70s. Thanks for sharing.

#6 JasonBurry

JasonBurry

    Ranger 4

  • -----
  • Posts: 387
  • Joined: 27 Apr 2012

Posted 17 October 2012 - 10:29 AM

Nice! I may adapt your idea to convert my .9" focuser on my little 4.5" newt to 1.25.... I've been balking at the $30 it would cost for a cheap rack'n'pinion arrangement, and I'm used to helical focusers from my dob...

Cool!

J

#7 glennnnnnn

glennnnnnn

    Mariner 2

  • *****
  • Posts: 263
  • Joined: 20 Oct 2009

Posted 17 October 2012 - 05:30 PM

ssmith- I think you're right about the other 2 strips, but you could always drill and thread them to fasten each down securely. I really hate it when those little important parts decide to wiggle-waggle or fall off in the dark!!!

#8 ssmith

ssmith

    Apollo

  • *****
  • topic starter
  • Posts: 1,200
  • Joined: 28 Jun 2012

Posted 17 October 2012 - 06:44 PM

The shims are glued in-place so nothing will get lost or loose. The set screw will be used to provide the fail safe clamping force.

Steve

#9 ssmith

ssmith

    Apollo

  • *****
  • topic starter
  • Posts: 1,200
  • Joined: 28 Jun 2012

Posted 28 October 2012 - 01:38 PM

I was so happy with the way the focuser worked with the C90 that I wanted to find a way to make it compatible for use with 1.25" diagonals.

All that is required is to modify the base coupler to accept an additional 1.25" eyepice barrel.

The base coupler is cut down so that the lower (smooth) socket is about 3/8" deep. I reccommend that the cut be made using a table saw or a mitre box so that the cut is square and true. The face can then be cleaned up by sanding the face with sandpaper taped down to a countertop or other flat surface.

A surplus eypiece barrel will then be glued into this 3/8" deep socket. You may be fortunate if you have an old unused eyepice laying around that you are willing to sacrifice for the barrel. Make sure the barrel has no optical componets in it and to remove them if it does. If, like me, you dont have spare eyepiece parts laying around you can purchase 1.25" barrels from "The Surplus Shed" (www.surplusshed.com) for $4.50 each.

Prior to gluing in the barrel I glued 3 alignment tabs in the lower socket with epoxy to keep the barrel centered in the socket as described previously in the construction of the C90 adapter. Once the tabs are dry, lightly sand them down to accept the barrel and to get the alignment of the barrel to the coupler straight and true. The barrel is glued into the coupler using JB Weld. Epoxy could be used but when gluing metal pieces I perfer to use JB Weld. Spread a thin layer of JB Weld on the upper 3/8" of the metal barrel (where the screw threads are) which will be inserted into the coupler and likewise spread some in the socket. Then insert the barrel and twist back & forth a few times to eliminate any voids and then wipe off any adhesive that has squished out of the joint and on to the barrel. The curing time is about 8 hrs so you have plenty of time to get things aligned the way you want them before setting it aside to dry.

The upper eyepiece end of the focuser is constructed idnebtical to the C90 focuser described above.

I tried the completed focuser on my C90 using a 1.25" diagonal but the optical length of the assembly was just too long to give pleasing results. It does however work very well with with my C8 and I am sure with refractors with rack & pinion focusers that beg for a supplemental fine focusing arrangement.

Steve
Castle Rock, CO

Attached Thumbnails

  • 5493190-Focuser 2.JPG


#10 johntrob

johntrob

    Ranger 4

  • *****
  • Posts: 377
  • Joined: 14 Mar 2011

Posted 26 November 2012 - 09:41 PM

Thanks again from another, multiple C90 user. I will try this and give you a shout back.

Thanks,

John


CNers have asked about a donation box for Cloudy Nights over the years, so here you go. Donation is not required by any means, so please enjoy your stay.


Recent Topics


Cloudy Nights LLC
Cloudy Nights Sponsor: Astronomics