Jump to content

  •  

CNers have asked about a donation box for Cloudy Nights over the years, so here you go. Donation is not required by any means, so please enjoy your stay.

Photo

Another RV-6 Find!

This topic has been archived. This means that you cannot reply to this topic.
114 replies to this topic

#26 Datapanic

Datapanic

    Soyuz

  • *****
  • topic starter
  • Posts: 3,828
  • Joined: 17 Oct 2009

Posted 04 October 2012 - 02:14 AM

I think I'll leave the gearbox alone - it purrs just fine as it is and I don't think it has any tell-tail signs of problems in it (of course I could be wrong!).

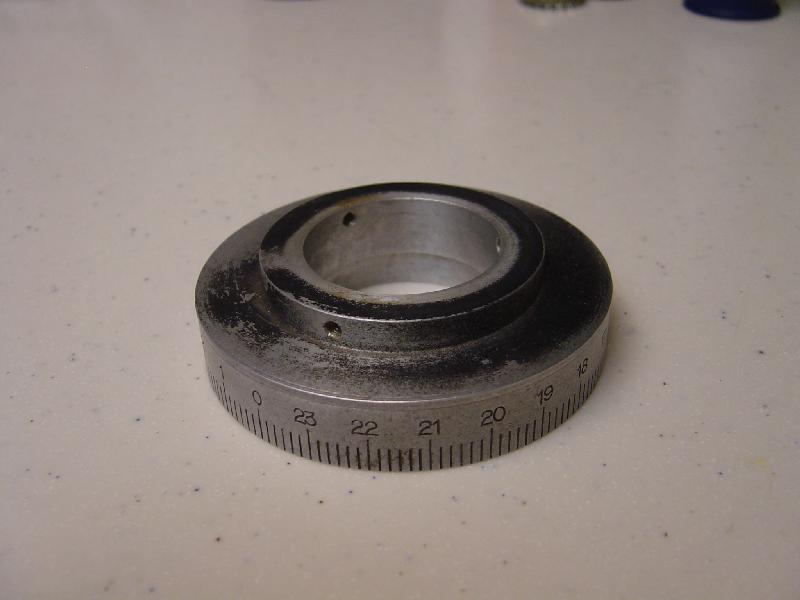
I have started to disassemble the scope, but wont be able to finish that up until this weekend. One thing I can't figure out is how to take the 2-piece RA circle apart so I can lube it up. It seems to be pressed together or something. Also, the RA and Dec shafts are in tight to their housings. I can probably clean up the shafts without removing them, but it would still be nice to take it completely apart.

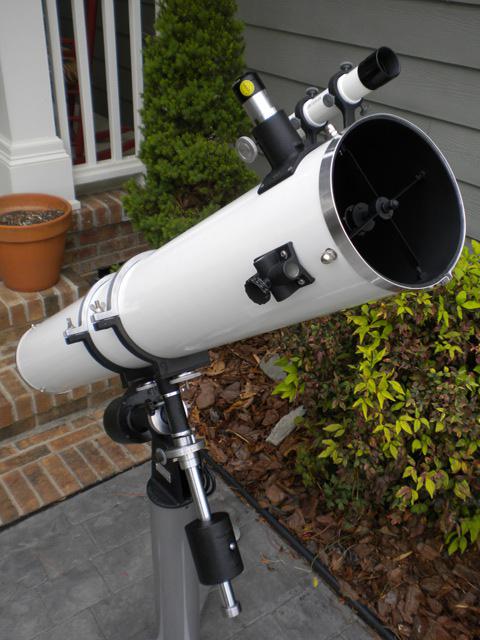
Overall, my first impression of an RV-6 is that these were crafted quite well. This is my first opportunity to see one close up!

#27 Datapanic

Datapanic

    Soyuz

  • *****
  • topic starter
  • Posts: 3,828
  • Joined: 17 Oct 2009

Posted 05 October 2012 - 03:25 PM

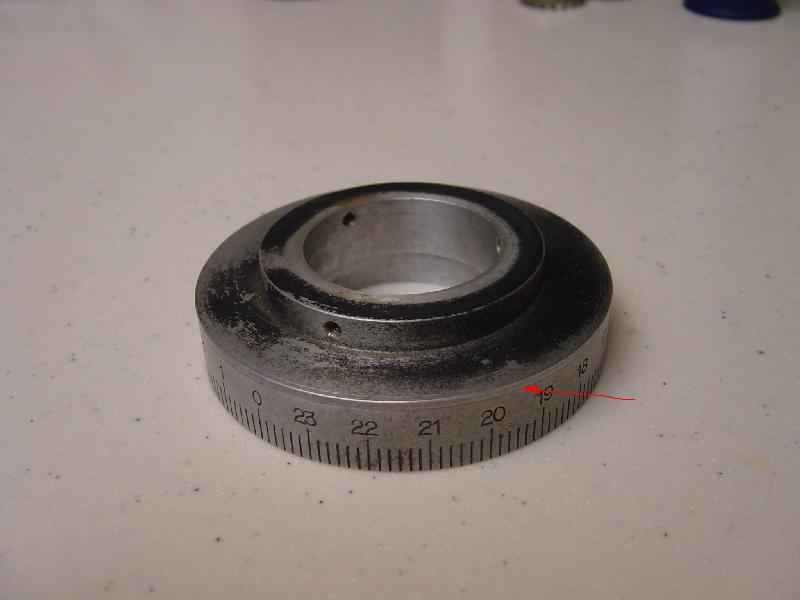
Anyone know how this thing comes apart? It needs some lube on the inside and an overall cleanup...

Attached Thumbnails

  • 5456815-RA Circle.jpg


#28 Mr Magoo

Mr Magoo

    Mercury-Atlas

  • *****
  • Posts: 2,891
  • Joined: 05 Nov 2005

Posted 12 October 2012 - 10:49 PM

I don't think they come apart. I have looked and looked at mine trying to figure out how they are made. Anyone have a clue as to how this was assembled?

#29 tim53

tim53

    James Webb Space Telescope

  • *****
  • Posts: 17,047
  • Joined: 17 Dec 2004

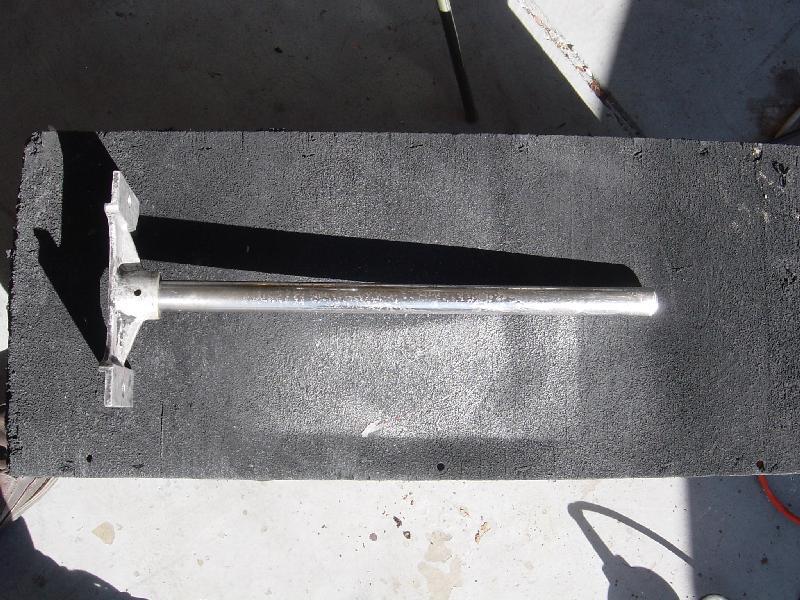
Posted 12 October 2012 - 11:41 PM

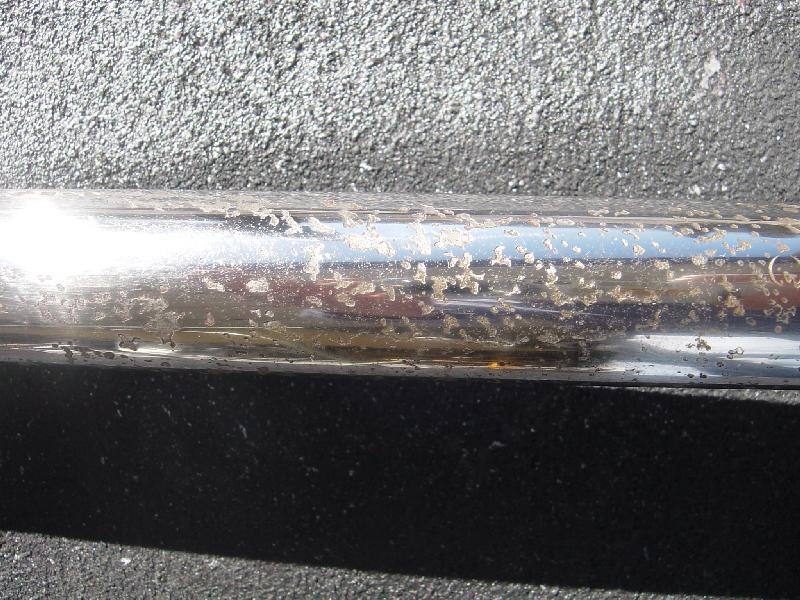
It's not machined out of a single piece of bar stock?

-Tim.

#30 clamchip

clamchip

    Hubble

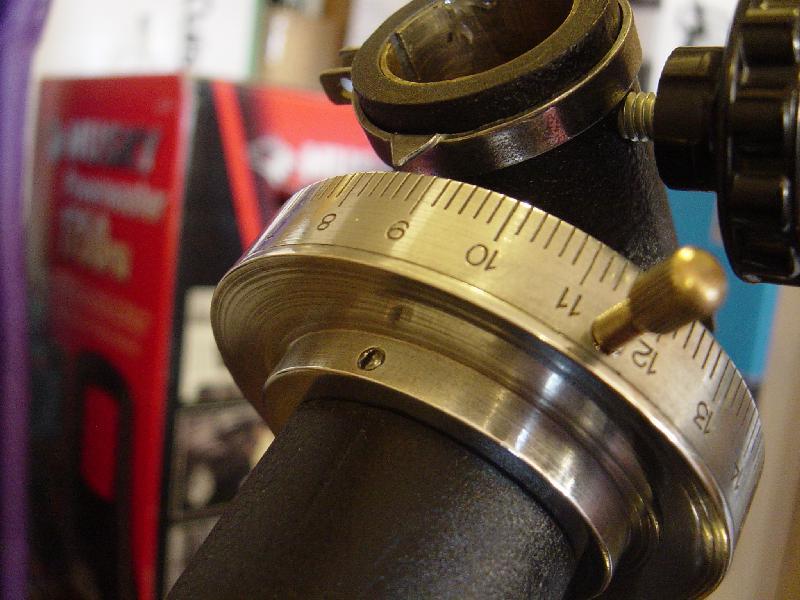
  • *****
  • Posts: 13,463
  • Joined: 09 Aug 2008

Posted 12 October 2012 - 11:57 PM

I can't remember but isn't it 2 parts with a seam right at the tip of my red arrow?
And I thought a thumb screw locked the circle to the circle hub.

Attached Thumbnails

  • 5467619-5456815-RA Circle.jpg


#31 orion61

orion61

    Vendor - Clear Edge Optical

  • *****
  • Vendors
  • Posts: 7,201
  • Joined: 20 Oct 2007

Posted 13 October 2012 - 06:15 AM

I thought the gear box would have been rusted solid at first sight
You will be surprised when done and you put it up against a C8.. Mine shows more detail, just not as bright.
Looks like the origonal owner didn't know how to collimate the optics, just twist on the seondary.

#32 Compressorguy

Compressorguy

    Vanguard

  • *****
  • Posts: 2,439
  • Joined: 14 Mar 2009

Posted 13 October 2012 - 06:35 AM

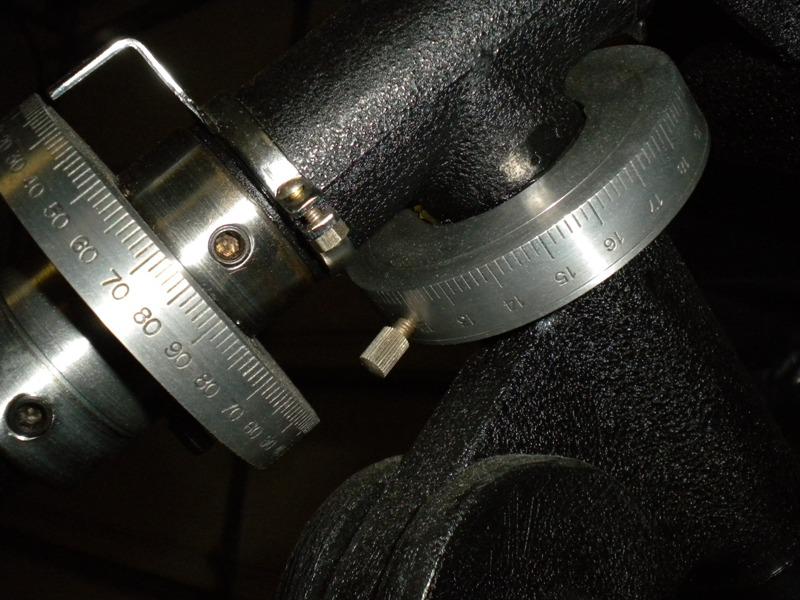
I can't remember but isn't it 2 parts with a seam right at the tip of my red arrow?
And I thought a thumb screw locked the circle to the circle hub.


Yes and yes.

I suppose the two pieces are just frozen together. Is there a hole for a set screw? If so, have you tried some WD-40, Kroil or PB Blaster in through the hole? If it is frozen really bad, you may have to heat it as well or try channel locks and apply some light twisting force to the two pieces. Of course, I would wrap it with cloth or electrical tape to protect from scratching it. Either way that scope is in great hands.

Mine has a set screw and came apart easily. I wonder if the design changed? Mine is later than yours, sn# 3995.

Attached Thumbnails

  • 5467821-DSCN4221.JPG


#33 Compressorguy

Compressorguy

    Vanguard

  • *****
  • Posts: 2,439
  • Joined: 14 Mar 2009

Posted 13 October 2012 - 07:03 AM

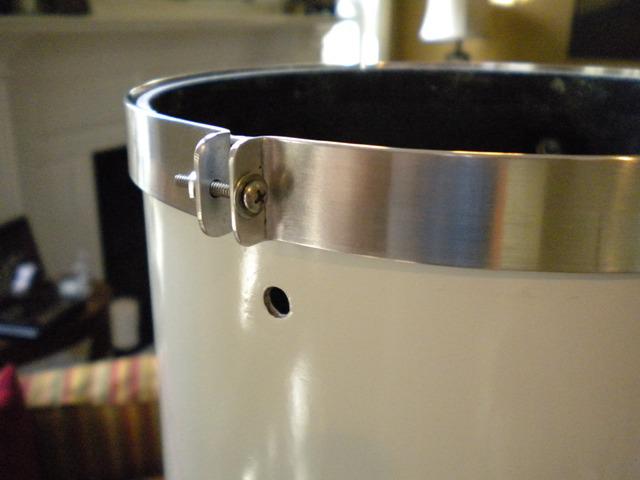
Also here's an idea for some very inexpensive tube end rings. I made these from some thin aluminum strap I bought at Lowes. Just bent and polished it up with some steel wool. Plus it's completely reversible with no damage to the scope. The underside is lined with felt to protect the finish.

Attached Thumbnails

  • 5467836-DSCN2845.JPG


#34 Compressorguy

Compressorguy

    Vanguard

  • *****
  • Posts: 2,439
  • Joined: 14 Mar 2009

Posted 13 October 2012 - 07:06 AM

And completed

Attached Thumbnails

  • 5467839-DSCN2872.JPG


#35 Mr Magoo

Mr Magoo

    Mercury-Atlas

  • *****
  • Posts: 2,891
  • Joined: 05 Nov 2005

Posted 13 October 2012 - 07:47 AM

Those are a great idea and I copied Scott's design, but with stainless. I will be completing my restoration of my RV-8 today and that is the last thing to add.

#36 Datapanic

Datapanic

    Soyuz

  • *****
  • topic starter
  • Posts: 3,828
  • Joined: 17 Oct 2009

Posted 13 October 2012 - 04:43 PM

The RA Circle does turn and it does have a set screw. I just would like to get some lube in there so it has the smooth feeling when rotating it. Right now it's metal on metal.

Haven't had much time to work on it but it is mostly apart and I have paint remover, evapo-rust and black wrinkle paint for it!

#37 Datapanic

Datapanic

    Soyuz

  • *****
  • topic starter
  • Posts: 3,828
  • Joined: 17 Oct 2009

Posted 16 December 2012 - 11:00 PM

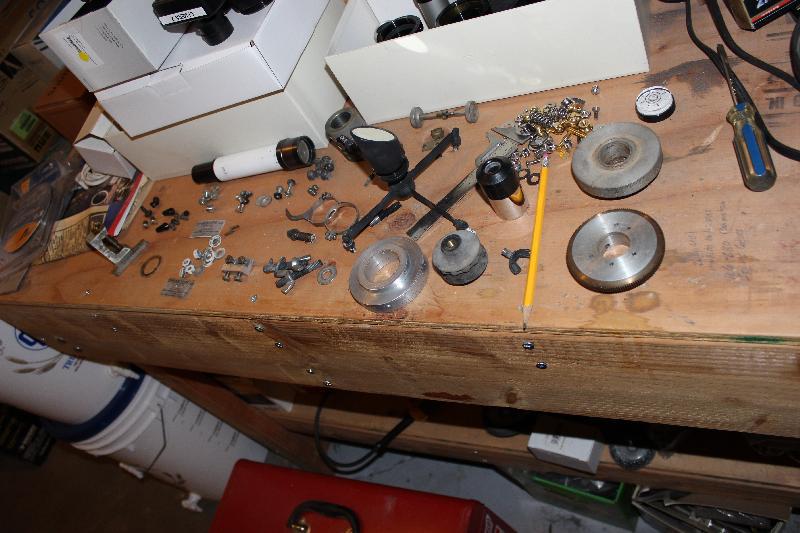
So I've been kinda slacking but really, just haven't had much time to tinker with the RV-6. There is some progress though. I have the whole thing disassembled and made an inventory of all the fasteners with their dimensions. I was kind of surprised at how many parts there are to this thing as well as the design itself - the RV-6 was really well made!

Attached Thumbnails

  • 5574944-Parts.jpg


#38 Datapanic

Datapanic

    Soyuz

  • *****
  • topic starter
  • Posts: 3,828
  • Joined: 17 Oct 2009

Posted 16 December 2012 - 11:04 PM

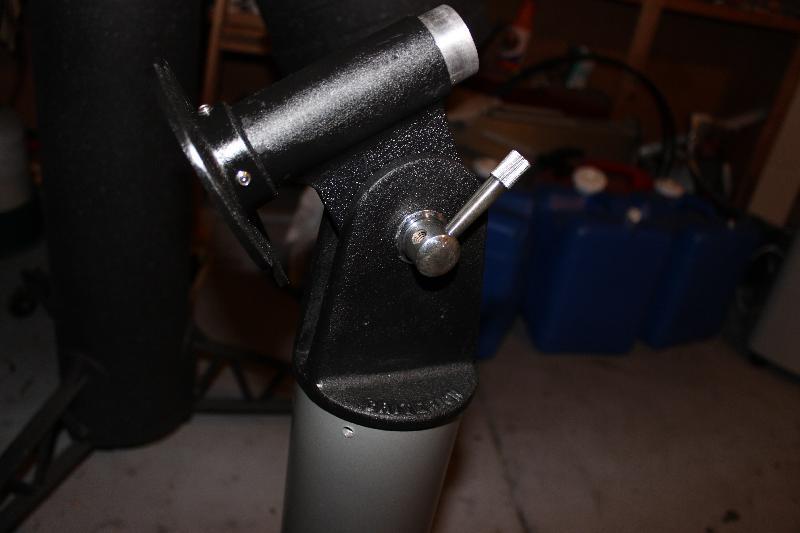
It took some serious grade paint remover to take off the old wrinkle-black paint from all the parts, and even then, not all of it came of, so the remaining paint was sanded off. Then, I applied some black primer and used Eastwood's Wrinkle Black rattle can paint. This is really good stuff, but a little tricky to use - the directions say to apply 2 thick coats about 3 minutes apart. Of course, temperature and humidity play a lot in that, but mainly, it's applying the right thickness. In the end, it came out with a fine wrinkle with a tough finish. Here's the pier cap with the RA Shaft Housing, Clock Drive Back Plate and polished latitude adjustment knob.

Attached Thumbnails

  • 5574948-Pier Cap and RA Shaft Housing.jpg


#39 Datapanic

Datapanic

    Soyuz

  • *****
  • topic starter
  • Posts: 3,828
  • Joined: 17 Oct 2009

Posted 16 December 2012 - 11:06 PM

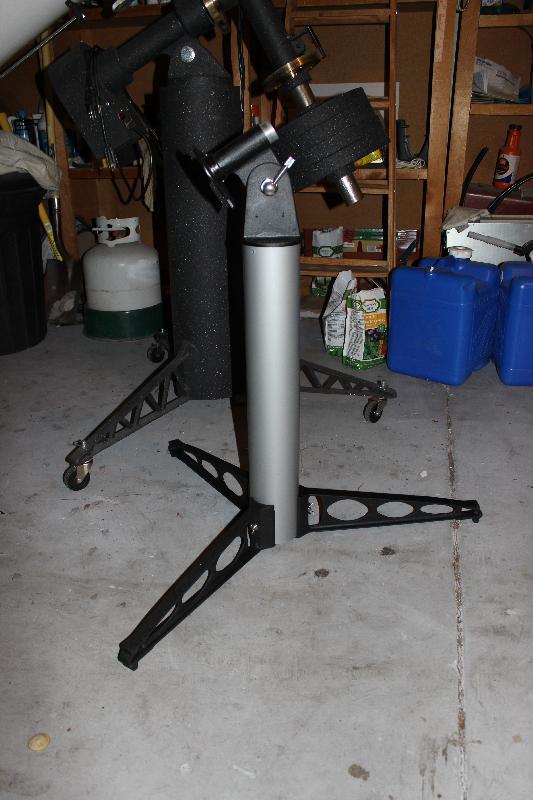
Their Pier Column was painted with Rustoleum Hammered paint, although I didn't get much of a hammered effect with it. The legs were painted with the Eastwood's Wrinkled Black.

Attached Thumbnails

  • 5574952-Stand.jpg


#40 Mr Magoo

Mr Magoo

    Mercury-Atlas

  • *****
  • Posts: 2,891
  • Joined: 05 Nov 2005

Posted 17 December 2012 - 01:02 AM

The last 2 cans of Hammered paint were the same way. Not sure if they have changed the formula or what. I had to really put it on heavy to get it to "separate" and get some hammer effect. Looking good!

#41 Datapanic

Datapanic

    Soyuz

  • *****
  • topic starter
  • Posts: 3,828
  • Joined: 17 Oct 2009

Posted 17 December 2012 - 01:14 AM

The last 2 cans of Hammered paint were the same way. Not sure if they have changed the formula or what. I had to really put it on heavy to get it to "separate" and get some hammer effect. Looking good!


I've never had good luck with Hammered paint - but the job on this pier column did come out uniform and I'm going to keep it at that. It would be nice if the manufactures would put the ideal conditions to use with their directions - temperature and humidity have a huge influence on the outcome and they only give a wide range of temperature to spray at... If they had a chart that had the temperature, humidity and coat thickness required for uniform results, wouldn't that be nice?

#42 Datapanic

Datapanic

    Soyuz

  • *****
  • topic starter
  • Posts: 3,828
  • Joined: 17 Oct 2009

Posted 23 December 2012 - 07:55 PM

Today, I finished up putting the clock drive back together and adjusting it. Originally, I was planning on blinging it up a little with new stainless steel fasteners, but it turns out the fasteners are hard to find. Most of them are not standard nor fine thread - they are somewhere in between, like #10 with 28 threads/inch. Normally, #10's are 24 or 32. I haven't been able to find a source for these odd sizes anywhere! So, I used the Dremel and cleaned them all up. I do have some fasteners that I could find replacements for on order - should be here next week or so.

The motor has been running for over 24 hours now with no issues! The original bolts holding it to the worm block will be replaced.

Attached Thumbnails

  • 5586190-Clock Drive.jpg


#43 Datapanic

Datapanic

    Soyuz

  • *****
  • topic starter
  • Posts: 3,828
  • Joined: 17 Oct 2009

Posted 23 December 2012 - 07:58 PM

The Dec Shaft was a real challenge. After removing the spray paint that was covering up the rust and removing the rust with Evapo-Rust, I refinished the the shaft by wet-sanding with progressive grades starting at 220 and ending at 1500, then polish.

Attached Thumbnails

  • 5586194-Dec Shaft Cleaned Up.jpg


#44 Datapanic

Datapanic

    Soyuz

  • *****
  • topic starter
  • Posts: 3,828
  • Joined: 17 Oct 2009

Posted 23 December 2012 - 08:00 PM

But as you can see, years out in the elements have done its damage to the shaft and there are very deep and large pits that are not going to go away without taking off a significant amount of steel.

Attached Thumbnails

  • 5586196-Dec Shaft Cleaned Up Closeup.jpg


#45 Mirzam

Mirzam

    Fly Me to the Moon

  • *****
  • Posts: 5,055
  • Joined: 01 Apr 2008

Posted 24 December 2012 - 04:58 AM

Hi Dan,

What is the purpose of the small pins that go through the clutch plate on the RV6 motor? I sheared one of mine off and need either to fix or ignore.

JimC

#46 PiSigma

PiSigma

    Mercury-Atlas

  • *****
  • Posts: 2,685
  • Joined: 14 Oct 2009

Posted 24 December 2012 - 10:15 AM

That's looking great Dan. And wow, those are some very deep pits in that shaft. I suppose to save cost Criterion used some fairly low grade steel for those shafts.

#47 Datapanic

Datapanic

    Soyuz

  • *****
  • topic starter
  • Posts: 3,828
  • Joined: 17 Oct 2009

Posted 24 December 2012 - 12:03 PM

Hi Dan,

What is the purpose of the small pins that go through the clutch plate on the RV6 motor? I sheared one of mine off and need either to fix or ignore.

JimC


I'm not sure what those pins are for. There's only 2 of them instead of 3 placed symmetrically around the clutch. I can't imagine that they are any form of a guide pin. They could serve as a way to minimize play between the clutch plates.

So far, I've been impressed by the quality machining of the mount. Having never seen an RV-6 up close before, my assumption was that they were cheap for a reason, but that doesn't seem to be the case!

#48 Datapanic

Datapanic

    Soyuz

  • *****
  • topic starter
  • Posts: 3,828
  • Joined: 17 Oct 2009

Posted 24 December 2012 - 12:11 PM

That's looking great Dan. And wow, those are some very deep pits in that shaft. I suppose to save cost Criterion used some fairly low grade steel for those shafts.


I guess. I was thinking about replacing the shaft, but so far, I haven't been able to separate the cradle from the shaft. There is a set screw on the top end, but even with that removed, the shaft isn't budging and I don't want to break or crack the cradle trying to force the shaft to move. I even tried soaking the set screw hole and the area where the shaft goes in to the cradle with liquid wrench to no avail.

It's probably better to just leave the original shaft like it is. It does function, after all!

#49 Datapanic

Datapanic

    Soyuz

  • *****
  • topic starter
  • Posts: 3,828
  • Joined: 17 Oct 2009

Posted 24 December 2012 - 07:02 PM

I think I'm going to go for the Aged But Shiny effect. The circle pointers were also pitted from rust, but they match the Dec Shaft!

The RA Circle, cleaned up well. I lightly sanded with 400 grit paper on up to 1500 to first remove the paint and then have a surface smooth enough to polish. I was not able to take the thing apart, so I made a homemade grease-gun with a tube of Silicon Lube and a small nozzle to squirt the lube in the hole where the set screw is now. The lube helps with the metal on metal noise and gives it a slight resistance when turning it.

Attached Thumbnails

  • 5587631-Setting Circle Closeup.jpg


#50 Mr Magoo

Mr Magoo

    Mercury-Atlas

  • *****
  • Posts: 2,891
  • Joined: 05 Nov 2005

Posted 24 December 2012 - 07:18 PM
I'm pretty sure what you are seeing are pits in chrome plating. Mine had that to some degree. The more you sand on it, the worse it will rust. I wax mine regularly with a silicone wax.


CNers have asked about a donation box for Cloudy Nights over the years, so here you go. Donation is not required by any means, so please enjoy your stay.


Recent Topics


Cloudy Nights LLC
Cloudy Nights Sponsor: Astronomics