Jump to content

  •  

CNers have asked about a donation box for Cloudy Nights over the years, so here you go. Donation is not required by any means, so please enjoy your stay.

Photo

self made coronograph

This topic has been archived. This means that you cannot reply to this topic.
33 replies to this topic

#1 philippe tosi

philippe tosi

    Explorer 1

  • -----
  • topic starter
  • Posts: 63
  • Joined: 25 Jan 2013

Posted 31 January 2013 - 09:28 AM

Hello, my name is Philippe TOSI, I’m a new French member on this forum, my English is not very good so sorry for mistakes…
I present you some ideas to realize a self made coronograph…
Best regards !

In a few decades, the progress brought on instruments intended for the observation of the sky was very importants.
Telescopes, glasses and sensors of images benefited from a remarkable and very fast technological breakthrough.
These instruments did not practically evolve so much its design of origin is completed.
It is about the coronograph invented by Bernard LYOT at the beginning of 1930 and finalized in the Pic du Midi observatory.
An instrument allowing to create artificially the eclipses of sun.

The analysis of the solar corona and the follow-up of protuberances becomes then possible except the total eclipses so rare …
When I discovered for the first time, in the Peak, the images which these instruments could offer, I decided that sooner or later I ‘ll have one …
Furthermore, the projection of the movie " the flames of the sun " aroused in me a real passion as for the daily follow-up of the activity of our star.
By having frequenting the most experienced amateurs on the solar photographic techniques such Jean DRAGESCO, Jean Marie ROQUES and François ROUVIERE, to which go all my thanks, my passion could be only more fascinating.
Unfortunately, the price of these instruments very quickly turned out to be an obstacle.
What's to be done otherwise minimize these high prices by building the whole instrument.
Later wall up reflections, I thus decided in 1999 (the eclipse of August 11th being for nothing there) to think about the plans of a 150 mm coronograph.
It is true that the diameter of this instrument can seem conceited with regard to the quality of pretty poor air in low valley of the Rhône …
Having already to my credit several mirrors of telescopes Newton of diameter going from 200 mm to 620 mm, of openings included between 3.5 and 6, as well as the realization completes several Schmidt, the work of these single lenses did not frighten me.
The discussions with the renowned opticians allowed me to continue…
Realizations:

A: The optics

2 lenses result from Corning or Schott, they are borosilicate BSCb 1664 or BK 7, one of the most transparent glasses.
We can also cut them in the red colored glass. (Ref Schott: RG 610 or 630 with 1.55

- The first one has one diameter ( D ) of optical 148 mm for a 15 mm thickness (BK7)
Its F/D = 15. (Choose an opening included between 15 and 20 as well as a good thickness)
Both faces were raised with a precision of the order of the micron controlled with a very precise micrometer.
The radius of curvature ( R ), very weak, is reckoned in the following way:

R = F x ( n-1 )

F = Focal to obtain n = refractive index of the borosilicate 1664 is 1.51680

R = 2250 x 0.51680 1162.8 mm

The arrow is thus of: f = D ² / 8R = 2.42 mm (coro 150 mm F/15)
At the end of polishing, a tool in crown centered on the zone 0.7 will make slow races to create a lightly asphérical lens.

- The second lens (called lens of field) is much more difficult to realize that the first one(night) because smaller and more open.
She too, must be surfaced in the micron before being cut.
His(Her,Its) diameter (65 mm) is rather important for having the biggest possible field, its opening is 2.15 (raw(gross) drilled glass BK 7)
A hole of 5 mm a summer realized by the company(society) before cutting the lens, what avoids the breakage at the end of polishing …
The work of size is rather painful, because of the very pronounced curvature and quite as the main lens, it is necessary the asphériser with a tool in crown.
* To note that we can find in the army stocks, filters for aerial photo (diameter 95 mm.)
They are filters colored glass parallel plans in the mass and of thickness 8 mm.
The red color has to correspond to filters Schott RG 610 or 630.
They more already rose there in magnificent supports.
It is excellent frontal lenses which we can realise and polish in 3 hours …
They stop well the influx of heat and the cone is subjected only to a temperature of 75 °C...

- The cone to occultor must be turned in 45 ° in a hard and reflecting material: stainless steel, ideal silver (aluminium not very good)
Its diameter must be slightly lower than the diameter of the sun obtained through the main lens, during the summery period, date when our star presents the smallest visible diameter.
- The solar disk occultor which will really hide the solar diameter. (21 mm for the coronograph of 150 mm and 14 mm for that of the 90 mm)
This one is a simple slice turned in brass sliding on the handle of the cone and held by a small ring, so as to be changed according to the seasons.
The slice is polished very slightly in the sandpaper P1200.
It is good to calibrate over 1 year the various diameters of our star and to realize env. 6 - 8 occultors whose diameter is increased by some hundredth of mm of a way to mask well the solar diameter.
- To end an achromatic doublet (called objective of transfer) the focal of which is adapted to the diameter of the resultant image (image forming on the sensor) is behind the lens of field, by moving it slightly we can make vary the diameter of the resultant image.
In the case of the coronograph of 150 mm, in my case, diameter 30 mm focal 100 mm.

- A leaky slice or a small diaphragm got back on an old microscope allow to limit the excess of light live as a parasite(cause interference); this diaphragm is placed just before the doublet.
- And then there is a key element of the coronograph: H-alpha filter.
These filters are centered on the line H-alpha at 656.29 nm.
Their bandwidth must be included between 4 and 10 Angström.
Beyond it is dangerous for eyes, on this side the coronograph does not justify itself any more.
Establishments Lot Oriel and Mlles Griot markets these filters the prices of which are approximately situated in 3000 euros H.T. (sorry…!)
The achromatic doublets are also available on it.

Important: the filter Hour-alpha must be maintained shielded from the humidity and from the dust during the periods of inactivity.
B: The tube

He can be round or squared; the simplest solution being the round tube.
The square tube must be perfectly manufactured if we want to preserve the alignment of the optical axis with all the parts which must be risen and centered on small strictly perpendicular drawers in the tube.
The used materials can be the wood, the carbon, the aluminum, the bakelised paper…

Always in one concerns of economy, we can find stocks of tubes in an unbeatable price.
These cardboard tubes are thermically neutral, of thickness 6 mm, we can thus cut, drill, tap and bring them all the treatments which we want.
Besides they are long (4 m), rather light and of variable diameters. (Between 80 and 140 mm)
It is the tubes which serve to roll up carpets... (It was necessary to think of it!)
They are available in the hypermarkets of do-it-yourself and carpets shops etc. …
They present the enormous advantage to center all the optical parts and to fix, or to move, all the elements of the coronograph with an extreme precision.
Their two extremities must be raised and perpendicular in the optical axis.
Several windows allow to reach the various elements of the coronograph.
The inside is painted in matt black and the outside can be treated with 2 or 3 coats of linseed oil + siccative then covered with a coat of resin polyester.
The set is sanded then minutely then paints with 2 coats of brilliant white paint.
- The support of the front lens is turned inaluminum or some hard wood with a mattering game not to force the lens held with 3 skates of cork at 120 °.
To think of adding one adorns light 20 cms long env. constituted by an aluminum box.
The inside is painted in matt black.
It is very practical, we have in more the lid …
One focuser of 50.8 mm is installed on a deck which can move with regard the image so as to center, or move away from the center, the sensor during important eruptions.
- For the focus, which is long to come, to F/D = 25, I recommend quite particularly a focuser with a running of 40 mm env.
If possible, the digital sensor must be preceded by an optic (filp mirror) allowing to visualize the image of a protuberance, or a whole sun, on a clear glass provided with an engraved mark.
- The part diaphragm, achromatic doublet and filter can hold in a tube 30 mm long and has to settle or come out very quickly so as to put the filter shielded from the humidity.

C: Regulations and use:

As all the instruments, the coronograph accept no carelessness.
- If the tube is very perpendicular in the optical axis, the keg can be fixed: we rely on the mechanics …
- The part lens of field / cone to occultor is maintained by PVC muff of 100mm.
- The second muff(wing) supports(bears), in its center, the fixation(binding) of the set(group) diaphragm / achromatic doublet / filter.
These 2 muffs (wings) slide inside the tube with a very small set play so as to preserve the alignment of the optical axis.
(Possibility of rectifying muffs)
A stalk thread by 5 allows to adjust the solar disk occulteur on the home of the main lens; its length is 50 mm.
The distance between solar disk occulteur / lens of field is 30 mm.

- The filter Hour-alpha normally rose with a light slope.
We can then make it turn in its location so as to obtain the maximal contrast on protuberances and minimize reflections.
If we work in 24 x 36 or in webcam, it is interesting to possess 2 achromatic doublets of focal different so as to enlarge certain protuberances or then to have the whole sun.

- The focus obtains in the following way:
It is necessary, with an ocular, to finalize on protuberances and to bring the solar disk occultor in the optimal point of neatness.

It is not very obvious because the eye rather tends to focus on protuberances, so much the show is fascinating and not on the solar disk occultor.

All the usual precautions are to be respected because the temperature of the cone quickly rises to more than 300 ° and the influx of heat can be fatal in the filter and in the eyes if the sun is not completely darkened.
Attention on gusts of wind …
Conclusion:

When the seeing is good, rather in the morning, the show is extremely beautiful and we sometimes take ourselves for these pioneers of the solar energy, installed in of dilapidated monitoring observatories in meadows of 3000 m of height.
After the construction of 5 coronographes of diameters included between 90 and 150 mm my passion of the sun is always so fascinating …
It is necessary to operate with "coronal" pure, said heavens, because the slightest mist of height is harmful to the contrast of the images.
Furthermore, the optics of the coronograph must be impeccable.
The wealth, the speed of evolution, the diversity of protuberances and spicules always surprise us …
Magnetic buckles appear, lightning and brilliant eruptions come to saturate image receivers, in brief a show in perpetual change.

Our eye gives way then on these majestic eruptions which seem to float over the day star as so many firebirds.

Philippe TOSI

font lens 150 mm

Posted Image

image of solar disk behind red front lens 95 mm (shott RG 610)

Posted Image

cone and occultor slice

Posted Image

coronograph 150 mm and 90 mm on C.14

Posted Image

here an image realised with the 150 mm one
Posted Image

#2 DAVIDG

DAVIDG

    Hubble

  • *****
  • Posts: 12,545
  • Joined: 02 Dec 2004

Posted 31 January 2013 - 09:45 AM

Hi philippe
I also made a homemade coronagraph and taught a class were we made 20 of them over a weekend. My design only required hand tools and plumbing fittings that are available at the hardware store. http://www.considine...oski/promscope/

- Dave

#3 philippe tosi

philippe tosi

    Explorer 1

  • -----
  • topic starter
  • Posts: 63
  • Joined: 25 Jan 2013

Posted 31 January 2013 - 01:14 PM

congratulations Dave !

#4 neo

neo

    Gemini

  • *****
  • Posts: 3,047
  • Joined: 12 Feb 2008

Posted 31 January 2013 - 01:59 PM

Hi Phillippe
Thanks a lot for sharing this great projects! :waytogo:
I see that a few details are different from other coronagraphs I've seen over the internet.

A couple of questions....
The two lenses (objective and field lens) are plano convex?
How do you test them for asphere? The traditional double pass autocollimation test with a flat mirror?

and...I see that you placed the diaphragm after the doublet. From what I've learned it is usually placed just after the field lens. Could this make a big difference on how the scope performs?

What do you think about this design?
http://www.astrosurf.com/rondi/coro/

#5 philippe tosi

philippe tosi

    Explorer 1

  • -----
  • topic starter
  • Posts: 63
  • Joined: 25 Jan 2013

Posted 01 February 2013 - 03:29 AM

hi Alex, yes the two lens are plano-convex.
you can test them with the négative disk (wich one have realised this lens)
you polish the negative disk to get a spherical mirror and you place the two lenses under a Fizeau control with monochromatic light. (sodium lamp) + three paper holds among which more thick one to create finges.
the deformation of the front lens is not very important, you can be satisfied by a spherical one...at F/15 or F/20
the second lens have to be aspherised, very difficult to do !
all my coronographs have been designed by a specialist wich worked with Bernard Lyot !
all the elements are optimized, also the position of diaphragm.
A good coronograph must have less lens as possible (ideal 3 or 4) +h-alpha filter 5Ã…
i dont know the Rondi's model, sorry, but i think it's also good...


#6 highfnum

highfnum

    Fly Me to the Moon

  • *****
  • Posts: 6,869
  • Joined: 06 Sep 2006

Posted 01 February 2013 - 09:51 AM

I made a coronagraph based on DAVIDG design
a few minor changes my blocking cone is covered in 24K gold to reflect IR - it stays a lot cooler

I also have ability to swap out filter quickly
I have seen proms in H-a @10A
and H-beta @5A
h_beta is far more demanding on sky conditions

this is my second best home made project ever
only second to homemade image intensifier eyepiece

phillippe - votre photo est belle!
quel type de camera

#7 philipdo

philipdo

    Viking 1

  • -----
  • Posts: 572
  • Joined: 06 Dec 2006

Posted 01 February 2013 - 12:42 PM

Salut Philippe,

tu as un équipement de rêve là. Je suis tes exploits aussi sur Astrosurf. Beau travail! I have recently refurbished a 70 mm coronagraph myself, originally built by Dany Cardoen of Puimichel, during his early days over there in southern France. I am quite pleased with the results. Of course, this scope is much more bulky than e.g. a PST or a small Lunt, but thanks to the artificial eclipse with the cone sharpness and contrast are soooo much better.

#8 philippe tosi

philippe tosi

    Explorer 1

  • -----
  • topic starter
  • Posts: 63
  • Joined: 25 Jan 2013

Posted 01 February 2013 - 12:54 PM

thank you !
the camera is basler aca 1300 with 30 img/sec, stack of 250 images process by registax 6 or (avistack 1.81) and CS5

#9 neo

neo

    Gemini

  • *****
  • Posts: 3,047
  • Joined: 12 Feb 2008

Posted 01 February 2013 - 03:02 PM

Phillipe, I was thinking about the field lens you say it needs to be aspherized and it's difficult to make. I presume it needs so becouse of the spherical aberration present with such a low f/d. How about using a thin glued (or oiled) doublet which would work, at least in theory, as a single lens without scattering to much light?

I'm still a bit confused about the diaphragm placement in your design, after the reimaging doublet. In my understanding the image of the objective (and eclipsed sun) is projected by the field lens onto the diaphragm so the only light passing through is coming from the sun's corona (well almost). Then the final doublet lens just bring the whole image into focus in the eyepiece or on sensor.
Very sorry for so many questions :o , just trying to understand a few details which are hard to find in books or over the internet.
Thanks!

P.S. A small piece of drawing would help immensely :grin:

#10 DAVIDG

DAVIDG

    Hubble

  • *****
  • Posts: 12,545
  • Joined: 02 Dec 2004

Posted 01 February 2013 - 05:08 PM

Neo,
I think there is some confusion because things are getting confused in the translation. It is not the field lens that needs to aspherized.
The main objective lens can be a singlet of f/15 to f/20. A singlet is used because it has the least amount of scattered light. For viewing proms a well made achromat will work very well it is only when you want to observe the Corona that the very least amount of scattering is needed. For the singlet the front surface is made convex and spherical in shape. You can test it by interference against a concave test plate. The rear surface of the lens is also convex but it needs to be aspherized to remove spherical aberration at the wavelength that you wish to observe in. In this case 656nm. This is done using double pass autocollimation with an optical flat and testing in monochrome light at the wavelength you wish to observe with (656nm). The rear surface requires a shallow hyberbolic figure is which applied uses a peddle shaped pitch lap. when the lens nulls like a spherical mirror there is no spherical aberration at the wavelength your testing at.
The adjustable diaphram is located at the aperture stop of the system. It is a Lyot stop and used to remove the scattered light from the system. In my design listed here http://www.considine...oski/promscope/ there is worked example of how to position the optics.

- Dave

#11 neo

neo

    Gemini

  • *****
  • Posts: 3,047
  • Joined: 12 Feb 2008

Posted 02 February 2013 - 06:20 AM

Dave, thanks for clarification!

But, after reading a few times Phillipe's posts it seams Phillipe staded clearly that in his design bouth the first two lenses are plano convex. Ok, I guess this is not so important a PCX or a DCX lens optimized at f/15 or more would probably work equally well.
But the second lens (the field lens which holds the cone) he says, it needs also to be aspherized and it's difficult to do becouse the F/D is so small, f/2.

hi Alex, yes the two lens are plano-convex.
you can test them with the négative disk (wich one have realised this lens)
you polish the negative disk to get a spherical mirror and you place the two lenses under a Fizeau control with monochromatic light. (sodium lamp) + three paper holds among which more thick one to create finges.
the deformation of the front lens is not very important, you can be satisfied by a spherical one...at F/15 or F/20
the second lens have to be aspherised, very difficult to do !
all my coronographs have been designed by a specialist wich worked with Bernard Lyot !
all the elements are optimized, also the position of diaphragm.
A good coronograph must have less lens as possible (ideal 3 or 4) +h-alpha filter 5Ã…
i dont know the Rondi's model, sorry, but i think it's also good...


and...

- The second lens (called lens of field) is much more difficult to realize that the first one(night) because smaller and more open.
She too, must be surfaced in the micron before being cut.
His(Her,Its) diameter (65 mm) is rather important for having the biggest possible field, its opening is 2.15 (raw(gross) drilled glass BK 7)
A hole of 5 mm a summer realized by the company(society) before cutting the lens, what avoids the breakage at the end of polishing …
The work of size is rather painful, because of the very pronounced curvature and quite as the main lens, it is necessary the asphériser with a tool in crown.


So I guess is just a variation (more sophisticated) of the common design using off the shelf lenses.
I'd be curious how Phillipe's design looks after running some numbers in Oslo or Zemax.

The main curiousity with the field lens is, if you aspherize it, what is the best way to test it? With a test plate, autocollimation? I presume it's not figured for infinity as the objective lens.

#12 Andy Devey

Andy Devey

    Mercury-Atlas

  • -----
  • Posts: 2,821
  • Joined: 06 May 2011

Posted 02 February 2013 - 06:41 AM

Hi Phillippe

This is an excellent piece of work and definitely a future project for me!

Very best wishes

Andy Devey

The solar explorer

#13 Spectral Joe

Spectral Joe

    Viking 1

  • *****
  • Posts: 535
  • Joined: 28 Feb 2011

Posted 02 February 2013 - 03:42 PM

I made a coronagraph based on DAVIDG design
a few minor changes my blocking cone is covered in 24K gold to reflect IR - it stays a lot cooler


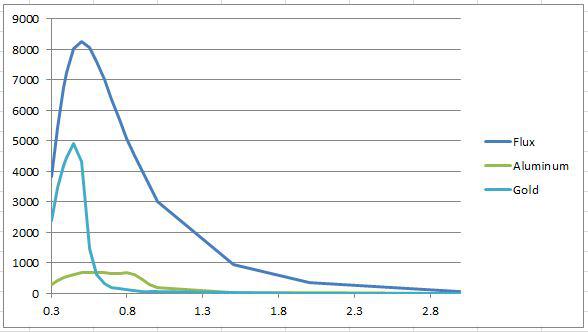
This is one of those places where perception and gut feeling collide with physical reality, and I have to say "show me". Yes, gold has a higher reflectivity in the IR, but it has a considerably lower reflectivity in the visible, where the sun (a 5780K blackbody) puts the majority of the energy that will make it through a piece of optical glass. Aluminum has a higher reflectivity in this region. Once the energy is absorbed, the cone radiates with a peak wavelength between 5 and 6 microns (depending on the temperature it gets to), both aluminum and gold have an emissivity of around .03 at those wavelengths, so gold has a disadvantage since it absorbs more in the visible and can't radiate any better than aluminum in the long IR. The graph attached shows the effect, the X axis is wavelength in microns and the Y axis is watts per square centimeter per micron. Flux is the solar flux incident and the lines for Al and Au are energy absorbed in the same units. The absolute values will vary due to area effects (they will go up as the ratio of objective area to image area) but the relative effect is shown. Integrating the total flux shows that gold has a 3.12 to 1 disadvantage in this situation. Try measuring the actual temperature and see.

Attached Thumbnails

  • 5658382-Al_Au with flux.JPG


#14 Spectral Joe

Spectral Joe

    Viking 1

  • *****
  • Posts: 535
  • Joined: 28 Feb 2011

Posted 02 February 2013 - 03:49 PM

I think David's analysis of a translation problem is accurate, since it makes no sense to aspherize a field lens. Field lenses are very poorly understood by most ATMs, they re-image pupils, not image planes, and have little to no effect on the final image. Their primary purpose is to ensure that all rays make it through the system, thus preventing vignetting. This becomes an issue whenever you have images being relayed. On the other hand, aspherizing the rear surface of a singlet objective is necessary to correct for spherical abberation.

#15 Ed Jones

Ed Jones

    Skylab

  • *****
  • Posts: 4,498
  • Joined: 06 Apr 2004

Posted 02 February 2013 - 04:03 PM

Philippe that's an awesome prominance shot! :bow:

Dave: Where do you get narrow band Ha filters? How much?

#16 DAVIDG

DAVIDG

    Hubble

  • *****
  • Posts: 12,545
  • Joined: 02 Dec 2004

Posted 02 February 2013 - 05:03 PM

Philippe that's an awesome prominance shot! :bow:

Dave: Where do you get narrow band Ha filters? How much?


Ed,
My prototype used an Andover filter with 10A bandpass. They are about $300 but Omega optics on Ebay has them from time for about 1/2 that. You just need to be sure that the filter is visual grade vs sensor grade. The sesnor grade filters will show multiple images.
If the sky is very clear and the optics scatter free you can see proms with a coronagraph with just a red eyepiece filter but that takes really clear skies. I tried a couple of 10nm (100A) bandpass filters but I couldn't see proms with them from my location. If the bandpass drops down to 1.5A you don't need a coronagraph just a scope working at F/30 and the proper energy rejection filters along with 1.5A filter. So inexpensive 60mm f/15 refractor and 2x barlow works pretty well.

- Dave

#17 highfnum

highfnum

    Fly Me to the Moon

  • *****
  • Posts: 6,869
  • Joined: 06 Sep 2006

Posted 02 February 2013 - 06:02 PM

Gold is in flsked form. Like random placed mirrors breaks up light
Test was my finger
Without ouch!
With warm to touch

#18 Spectral Joe

Spectral Joe

    Viking 1

  • *****
  • Posts: 535
  • Joined: 28 Feb 2011

Posted 02 February 2013 - 06:30 PM

Is your original cone polished aluminum, brass, copper or something else? Copper is worse than gold in the wavelength region in question. Brass is not quite as bad as copper, and of the easily available metals aluminum is the best. Try polished aluminum vs. gold, and make a measurement. I've never had a polished aluminum occulting cone get hot at F/15.

#19 Spectral Joe

Spectral Joe

    Viking 1

  • *****
  • Posts: 535
  • Joined: 28 Feb 2011

Posted 02 February 2013 - 06:36 PM

Philippe that's an awesome prominance shot! :bow:

Dave: Where do you get narrow band Ha filters? How much?


Ed,
My prototype used an Andover filter with 10A bandpass. They are about $300 but Omega optics on Ebay has them from time for about 1/2 that. You just need to be sure that the filter is visual grade vs sensor grade. The sesnor grade filters will show multiple images.
If the sky is very clear and the optics scatter free you can see proms with a coronagraph with just a red eyepiece filter but that takes really clear skies. I tried a couple of 10nm (100A) bandpass filters but I couldn't see proms with them from my location. If the bandpass drops down to 1.5A you don't need a coronagraph just a scope working at F/30 and the proper energy rejection filters along with 1.5A filter. So inexpensive 60mm f/15 refractor and 2x barlow works pretty well.

- Dave


This may be of interest: http://adsabs.harvar...PASP...45..187P
One of Lyot's earlier efforts. It illustrates Dave's point about the red filter.

#20 highfnum

highfnum

    Fly Me to the Moon

  • *****
  • Posts: 6,869
  • Joined: 06 Sep 2006

Posted 02 February 2013 - 07:13 PM

ace hardware steel screw - 11 cents
got very hot
slighty smaller then brass compression ring that
creates "moon edge"
screw takes most of the sun blasting
believe me that steel got real hot fast

any gold leaf size of a postage stamp was cheap enough

#21 highfnum

highfnum

    Fly Me to the Moon

  • *****
  • Posts: 6,869
  • Joined: 06 Sep 2006

Posted 02 February 2013 - 07:18 PM

i would not know how to make such a clean polished cone anyway
thats whats cool about Davidg atm stuff
real easy available stuff that works and easy to get
the 2 items that cost were 10A filter(200) and iris(50)

#22 philippe tosi

philippe tosi

    Explorer 1

  • -----
  • topic starter
  • Posts: 63
  • Joined: 25 Jan 2013

Posted 03 February 2013 - 05:47 AM

Hi, thank's a lot for answers
the lens wich support the cone is an aspherical lens, because i wanted less lens as possible to shoot solar corona at Pic du Midi observatory. (with 5300 A filter)
a doublet is also good.
the cone is in stainless steel (polished)
H-alpha filter was buyed at Melles GRIOT approx 3000 $ (very very expensive !) with 5 Angstroem bandpass
here an new image with the 95 mm one
regards

Posted Image
Posted Image

#23 highfnum

highfnum

    Fly Me to the Moon

  • *****
  • Posts: 6,869
  • Joined: 06 Sep 2006

Posted 03 February 2013 - 07:42 AM

Pretty as a bee nice shot
What was total cost of your coronagraph
Have you tried to see corona

#24 philippe tosi

philippe tosi

    Explorer 1

  • -----
  • topic starter
  • Posts: 63
  • Joined: 25 Jan 2013

Posted 03 February 2013 - 12:06 PM

total cost for the 95mm 800 euros (when the h-alpha filter was not very expensive approx 700 euros and 100 euros for the doublet 25/100 situed just after the filter)
total cost for the 150 mm approx 1400 euros.
i have not still see the solar corona...

#25 neo

neo

    Gemini

  • *****
  • Posts: 3,047
  • Joined: 12 Feb 2008

Posted 03 February 2013 - 04:22 PM

Phillipe, again superb images.
I start thinking more and more on building a coronagraph myself.
I've checked last night in OSLO how the singlet objective works and the PCX version as mentioned by Phillipe is great.
My specs were for a 100mm lens f/15, 10mm thick, with the convex side aspherized to -0.6.
The diagrams looked very good (to my eye :smirk: ) for 656.27 wavelenght.
I'd like to design farther the whole scope in OSLO but I'm not sure how to set an oculting cone or other options so the field lens and the diaphragm work right. So far the results were very strange sign I wasn't doing something right.
On the other hand aspherizing the field lens doesn't seem to do much. I'll try learning more :).


CNers have asked about a donation box for Cloudy Nights over the years, so here you go. Donation is not required by any means, so please enjoy your stay.


Recent Topics


Cloudy Nights LLC
Cloudy Nights Sponsor: Astronomics