Jump to content

  •  

CNers have asked about a donation box for Cloudy Nights over the years, so here you go. Donation is not required by any means, so please enjoy your stay.

Photo

Joining the Ranks...

This topic has been archived. This means that you cannot reply to this topic.
58 replies to this topic

#1 youngamateur42

youngamateur42

    Vanguard

  • *****
  • topic starter
  • Posts: 2,098
  • Joined: 21 Nov 2012

Posted 17 June 2013 - 04:44 PM

It's summer. Fresh start, time to kick back, have fun to do whatever. What does the average 14 year old do during the summer? Facebook, texting, hanging out with his buddies, etc. Nope, not me, I do something totally different from the mainstream. Acquiring a vintage telescope and restoring it to better than new condition, is what I've been up to. :jump:

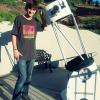
Just before school let out, I recieved a well used Criterion RV-6 Dynascope. Perfect. Just what I've been wanting. I've been getting by the past 2 years observing with my 70mm, begging for larger aperture, and this certainly was the cure! After bringing it in the house, I did a quick inspection to see what needs to be done to it. I quickly decided that I would restore the OTA first, then worry about the mount later. So I wrote up a short list of what needs to be done to it, the order, and what to buy. First off, the scope works fine, and there's no problem optically. It's cosmetically what I'm going to be doing. I decided I didn't want the scope to be restored to factory standards, rather, Built it the way I want, with a lot of the classic looks intermixed.

Attached Thumbnails

  • 5926020-RV6 DYNASCOPE.jpg


#2 youngamateur42

youngamateur42

    Vanguard

  • *****
  • topic starter
  • Posts: 2,098
  • Joined: 21 Nov 2012

Posted 17 June 2013 - 04:47 PM

1.) Needs a new paint job. Instead of choosing the semi-gloss white paint job originally made that way (I think) I chose Rustoleum Vintage White. It's a more yellow color, the same color as Cave Telescope tubes.

Attached Thumbnails

  • 5926025-IMG_3575.JPG


#3 youngamateur42

youngamateur42

    Vanguard

  • *****
  • topic starter
  • Posts: 2,098
  • Joined: 21 Nov 2012

Posted 17 June 2013 - 04:54 PM

Next was just general cleanup of the telescope bits and pieces, like the finder bracket, spider, mirror cell, etc..
The focuser was a real challenge. It was in good working order, but the screws were rusted and just needed a thorough cleaning top to bottom, inside and out. The brass was severely tarnished, and took some extra elbow grease :smash:to restore it to it's original state. To remove the tarnish, I took a medium sized bowl, and filled it with a half cup of white vinegar. Then I added the brass pieces, and filled just above the top of them with hot water. Finally a tablespoon of salt was added and let soak for 20 minutes. Following that was a light rubbing with Scotch Brite Pads under warm water, then drying. Turned out great! Sorry, don't have a picture... YET

#4 youngamateur42

youngamateur42

    Vanguard

  • *****
  • topic starter
  • Posts: 2,098
  • Joined: 21 Nov 2012

Posted 17 June 2013 - 04:59 PM

After that was pretty much just purchasing new fasteners (stainless steel). Man, that stuff is expensive! Much more than I had expected, but whatever, it turned out great so, the tube is done!! Well, for the most part. Still waiting on new nylon thumbscrews for the finder scope to come but other than that, its pretty much it on the tube. Oh yes! one more thing. I went down to the auto part store and purchased some car door trim to go on the edges of the tube, it's like a Sonotube type tube, and I want to preserve the edges from getting roughed up. Man did that make a difference in the overall appearence! Awesome looking. :grin:

#5 youngamateur42

youngamateur42

    Vanguard

  • *****
  • topic starter
  • Posts: 2,098
  • Joined: 21 Nov 2012

Posted 17 June 2013 - 05:02 PM

When the tube was drying, I disassembled the mount and pier assembly. I sanded off the old hammered finish, it had all sorts of nicks, scratches and rust spots. So I sanded it down to bare metal, look at this difference! Before:

Attached Thumbnails

  • 5926051-IMG_3569.JPG


#6 youngamateur42

youngamateur42

    Vanguard

  • *****
  • topic starter
  • Posts: 2,098
  • Joined: 21 Nov 2012

Posted 17 June 2013 - 05:02 PM

After sanding:

Attached Thumbnails

  • 5926053-IMG_3570.JPG


#7 youngamateur42

youngamateur42

    Vanguard

  • *****
  • topic starter
  • Posts: 2,098
  • Joined: 21 Nov 2012

Posted 17 June 2013 - 05:03 PM

Another interesting shot, during the middle of sanding

Attached Thumbnails

  • 5926055-IMG_3571.JPG


#8 youngamateur42

youngamateur42

    Vanguard

  • *****
  • topic starter
  • Posts: 2,098
  • Joined: 21 Nov 2012

Posted 17 June 2013 - 05:05 PM

And the finished product, complete with the aluminum tripod legs all cleaned up, very happy with the result, by the way, the paint I used was Rustoleum hammered silver. It took some getting used to, to get the texture just right, by holding the can closer or farther from the metal

Attached Thumbnails

  • 5926058-IMG_3578.JPG


#9 youngamateur42

youngamateur42

    Vanguard

  • *****
  • topic starter
  • Posts: 2,098
  • Joined: 21 Nov 2012

Posted 17 June 2013 - 05:09 PM

So now the only thing I have left to do is to clean up the mount head, make certain the motor drive is working the way it should (I know it works and tracks, but I want to make sure it isn't slipping or something). But for next couple of weeks, I'm going to relax and enjoy my hard work. Here's the final pictures:

#10 youngamateur42

youngamateur42

    Vanguard

  • *****
  • topic starter
  • Posts: 2,098
  • Joined: 21 Nov 2012

Posted 17 June 2013 - 05:28 PM

Here it is, just took these!

Attached Thumbnails

  • 5926086-IMG_3627.JPG


#11 youngamateur42

youngamateur42

    Vanguard

  • *****
  • topic starter
  • Posts: 2,098
  • Joined: 21 Nov 2012

Posted 17 June 2013 - 05:29 PM

Oh yes, I almost forgot, I installed new felt on the rings

Attached Thumbnails

  • 5926089-IMG_3625.JPG


#12 youngamateur42

youngamateur42

    Vanguard

  • *****
  • topic starter
  • Posts: 2,098
  • Joined: 21 Nov 2012

Posted 17 June 2013 - 05:31 PM

And that clean looking focuser.. Those aren't the original focuser knobs, but quite frankly, they're easier to grip and get a finer focus

Attached Thumbnails

  • 5926094-IMG_3632.JPG


#13 bob midiri

bob midiri

    Aurora

  • *****
  • Posts: 4,716
  • Joined: 17 Jun 2004

Posted 17 June 2013 - 05:31 PM

Young man you have done an awesome job!! It looks outstanding. You certainly should be proud of yourself. I wish you many years of wonderful observing through your "NEW" Classic RV6!! A big welcome to CN , and I for one can not wait to see the finished product. I have an older RV6 just waiting to be refurbished...you have given me incentive and some good ideas. Thanks for sharing. Bob

Attached Thumbnails

  • 5926095-rv6.jpg


#14 youngamateur42

youngamateur42

    Vanguard

  • *****
  • topic starter
  • Posts: 2,098
  • Joined: 21 Nov 2012

Posted 17 June 2013 - 05:32 PM

Another shot

Attached Thumbnails

  • 5926097-IMG_3626.JPG


#15 youngamateur42

youngamateur42

    Vanguard

  • *****
  • topic starter
  • Posts: 2,098
  • Joined: 21 Nov 2012

Posted 17 June 2013 - 05:34 PM

brand new hardware on the mirror cell:

Attached Thumbnails

  • 5926100-IMG_3629.JPG


#16 youngamateur42

youngamateur42

    Vanguard

  • *****
  • topic starter
  • Posts: 2,098
  • Joined: 21 Nov 2012

Posted 17 June 2013 - 05:35 PM

I'm not quite sure what the texture on the back of the mirror is, but the performance is the same. Also installed new felt pads that the mirror rests on

#17 youngamateur42

youngamateur42

    Vanguard

  • *****
  • topic starter
  • Posts: 2,098
  • Joined: 21 Nov 2012

Posted 17 June 2013 - 05:36 PM

The "buisness end" of the scope :cool:

Attached Thumbnails

  • 5926104-IMG_3628.JPG


#18 mikey cee

mikey cee

    Cosmos

  • *****
  • Posts: 9,602
  • Joined: 18 Jan 2007

Posted 17 June 2013 - 05:39 PM

Nice to hear from a Justin B. with brains and common sense. Too bad you don't live across the street from me. You've done an excellent job there with that RV. I too am not a big fan of the pure white color. When I redid one of my scopes I used ACE appliance white epoxy....kind of a bone white just like the original color was. ;) Mike

#19 chuck52

chuck52

    Mariner 2

  • *****
  • Posts: 297
  • Joined: 03 Dec 2009

Posted 17 June 2013 - 05:46 PM

As a father of "kids" 3 times your age Im very proud of what you have set out to do and accomplish! At your age, I could only dream about having a scope that size.I too wish you many years of joy,relaxation and learning while exploring the heavens! Great job and Welcome to CN!!

#20 youngamateur42

youngamateur42

    Vanguard

  • *****
  • topic starter
  • Posts: 2,098
  • Joined: 21 Nov 2012

Posted 17 June 2013 - 05:56 PM

Thanks everyone, I had posted questions throughout this restoration process and was delivered with honest, helpful answers. thank you thank you! :bow: :bow: :bow:

#21 Mirzam

Mirzam

    Fly Me to the Moon

  • *****
  • Posts: 5,055
  • Joined: 01 Apr 2008

Posted 17 June 2013 - 06:18 PM

Justin-Your RV-6 is looking good. I bought mine in 1968 and still use it. One thing, make sure your mirror clips do not hold the mirror too tightly. The mirror should actually be free to move in the cell. (Clips positioned a tiny bit above the mirror surface). Tight clips can cause astigmatism in your otherwise very nice mirror.

I also had a lot of trouble getting my secondary mirror collimated until I added a spring on the center bolt to provide tension/compression. Maybe the RV's came with springs originally, but mine did not have one. The spring goes between the secondary holder and the disk that has the tilt adjustment screws.

JimC

#22 youngamateur42

youngamateur42

    Vanguard

  • *****
  • topic starter
  • Posts: 2,098
  • Joined: 21 Nov 2012

Posted 17 June 2013 - 06:19 PM

speaking of that, I had a great collimation the other day, and as the night progressed, the collimation for the secondary slowly came undone. Good thing I have one extra spring left! thanks for the advice! :)

#23 Mike B

Mike B

    Starstruck

  • *****
  • Posts: 12,941
  • Joined: 06 Apr 2005

Posted 17 June 2013 - 06:20 PM

Yes, outstanding job! :bow: Now all that remains is be out standing, using it under the stars!

The RV-6 was my dreamscope when your age- but nothing quite like it was realized until well into my next decade... so by my middle-aged reckoning, you're waay ahead of the curve!... and in a whole buncha ways, too.
:grin:

#24 youngamateur42

youngamateur42

    Vanguard

  • *****
  • topic starter
  • Posts: 2,098
  • Joined: 21 Nov 2012

Posted 17 June 2013 - 06:24 PM

Mike,

I had first light last night... or this morning, I've been up for over 30 hours and still awake.. amazing viewing session. I saw so many new things, I have a post on it in general astronomy forum if you want to take a look

#25 Nave

Nave

    Apollo

  • -----
  • Posts: 1,449
  • Joined: 23 Feb 2010

Posted 17 June 2013 - 06:31 PM

Bravo!
Bravo!
Bravo!


CNers have asked about a donation box for Cloudy Nights over the years, so here you go. Donation is not required by any means, so please enjoy your stay.


Recent Topics


Cloudy Nights LLC
Cloudy Nights Sponsor: Astronomics