I'd love to get my 12 inch Dob out of my garage and put it in my OBS but that would take up a good chunk of real estate as it won't fit vertically
Norm
In the process of Building my Observatory.
Started by
tim57064
, Sep 28 2013 09:37 AM
554 replies to this topic
#427

tim57064
-

-
topic starter
- Posts: 1,709
- Joined: 23 Aug 2012
Surveyor 1
Posted 12 November 2013 - 10:50 AM
Norm,you say your 12" dob won't fit vertically? What is the height of your OBS?
I made my ceilings vaulted for any clearance issues and walls are 82" in height.
I made my ceilings vaulted for any clearance issues and walls are 82" in height.
#428
stmguy
-
-

- Posts: 511
- Joined: 11 Oct 2012
Viking 1
Posted 12 November 2013 - 12:45 PM
I think they are 68" , I wanted to keep them low so I wouldn't need a tall pier to see low in the South
Norm
Norm
#429
tim57064
-
-
topic starter
- Posts: 1,709
- Joined: 23 Aug 2012
Surveyor 1
Posted 12 November 2013 - 08:17 PM
Norm,Thanks for your reply.I am 6'3" and needed the wall height for that reason besides blocking the street light that used to shine brightly into my OBS. That is why I chose the 82" wall height.
Speaking of which,I almost forgot.
The power company came back last week and lowered the street light by installing a shorter mast I have yet to open the roof to check where the light hits now.
By installing the shorter mast,the light is now at least 2 feet shorter.Yet not all gone.
I did notice a big change in the directness of the light shining on the outside of the OBS.
Most of the light is now blocked by my woodworking shop.
#430
tim57064
-
-
topic starter
- Posts: 1,709
- Joined: 23 Aug 2012
Surveyor 1
Posted 12 November 2013 - 09:21 PM
Hello to all tonight.
In an earlier post this morning I said that I was going to build some shelves to mount 2 of my scopes on, to save floor space, in the OSB.
Well what I came up with I think turned out pretty good IMO.
A number of years ago I purchased a couple of Black Walnut trees that needed to be cut down for $50.00 a tree.
The largest of the 2 was almost 3 feet in diameter and over 50 feet tall.
Anyway,I ended up with 500 linear feet of lumber with a number of very wide boards.
They spent 3 years air dying before I started to use them.
I am now down to a very few 12'X 14" wide 4/4 boards,not the best of the bunch.
Last night I thought of how I was going to build the shelves and decided to use some of the walnut for them.
I built one shelf for my CR150 HD 6" Refractor with my CG5 Advanced mount and another for my Nexstar 8SE.
I started with the shelf for the Nexstar and decided that I wanted it to be about 37" long and wide enough to allow the scope to be about an inch off the wall.
I picked out a 4/4 thickness board that had a natural edge left on it.Better in my opinion for aesthetics.
Instead of thickness planing the board to 3/4" thick,I left it at the 4/4 thickness for stability and strength.
I used my random orbit sander to smooth the rough sawn boards yet left a little of the saw marks,very little,for a better appearance.
Okay,now for the supports.
I used the same Black Walnut ,only instead of 4/4 thickness I used a true 5/4 thick x 8"wide board to turn it into 1 1'4"x 2 inch boards for the vertical wall supports.
Then cut some 45 degree angle boards for the angle supports.
Now after all the sanding and assembly,I installed the first of three shelves.
Here is the first of a couple of pic's of the scope mount shelves.
I decided to wait 'til spring to apply a number of coats of varnish as the fumes can be quite intense and enter the house thru my garage. My wife does not appreciate that.
Attached Thumbnails

#431
tim57064
-
-
topic starter
- Posts: 1,709
- Joined: 23 Aug 2012
Surveyor 1
Posted 12 November 2013 - 09:46 PM
Now there is no need to go thru the whole explanation again into what I had done to build the second shelf except to say that this shelf is for my CR150 HD 6" F/8 Refractor and CG5 Advanced Mount.
I did use a natural edged board ,yet a little more straight than the other.
Also the length had to be a bit longer,38 3/4", for the fact that this scope is quite a bit bigger in length, as well as weight.
The CG5 mount adds a bit more to the overall weight.
I made the same style support brackets using the Walnut.
Here is an image of the 2 scopes with their new shelf mounts.
Hope you like what you see,my Wife approves.
They will look much better after the coats of varnish are applied.
Attached Thumbnails

#432
tim57064
-
-
topic starter
- Posts: 1,709
- Joined: 23 Aug 2012
Surveyor 1
Posted 12 November 2013 - 10:01 PM
I also have another shelf ready to be assembled using the same Walnut.
It is slightly smaller than the other 2 and will add the pic tomorrow after installing it. Here is another image of what I already have installed ,just a shot,from a different angle.
It is slightly smaller than the other 2 and will add the pic tomorrow after installing it. Here is another image of what I already have installed ,just a shot,from a different angle.
Attached Thumbnails

#433
Raginar
-
-

- Posts: 11,176
- Joined: 19 Oct 2010
Voyager 1
Posted 13 November 2013 - 10:56 AM
Please strap down that scope, it's scaring me 
#434
tim57064
-
-
topic starter
- Posts: 1,709
- Joined: 23 Aug 2012
Surveyor 1
Posted 13 November 2013 - 11:09 AM
Chris,Funny  Both scopes are bolted to the shelves and shelves are securely fastened to the walls with 3 1/2" #9 deck screws.
Oh ,I think you are speaking of the Nexstar 8. Well it will be bolted down when I take it out there permanently.There was and is plenty of room for it to sit on the shelf without it, for a couple of pic's.
What do you think of the idea though?Really
Both scopes are bolted to the shelves and shelves are securely fastened to the walls with 3 1/2" #9 deck screws.
Oh ,I think you are speaking of the Nexstar 8. Well it will be bolted down when I take it out there permanently.There was and is plenty of room for it to sit on the shelf without it, for a couple of pic's.
What do you think of the idea though?Really
#435
Raginar
-
-
- Posts: 11,176
- Joined: 19 Oct 2010
Voyager 1
Posted 13 November 2013 - 03:32 PM
It's good I was scared cuz I couldn't see your bolt in the Nexstar.
I was scared cuz I couldn't see your bolt in the Nexstar.
#436
hm insulators
-
-

- Posts: 7,454
- Joined: 22 Jan 2007
Fly Me to the Moon
Posted 14 November 2013 - 10:31 AM
Thanks Carol, I always have the box minimized and never scrolled down to see the rest of the Graemlins. Never noticed the scroll bar to the right,boy I'm not very observant,getting older sucks.
Like my mother says, "Growing old is not for sissies!"
I love the walnut shelves!

#437
tim57064
-
-
topic starter
- Posts: 1,709
- Joined: 23 Aug 2012
Surveyor 1
Posted 14 November 2013 - 11:03 AM
Jim,Thank you for your reply.
I was looking where to install the third shelf I had made and only after assembling the brackets,decided that if I were to install it ,there would be less wall space for any posters that I may like to place in the OBS. So I have decided not to install the third shelf.
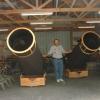
I had also decided to get some paint on my mounting plates,Rat Cage as some like to call it, of which I had made up by an individual with a CNC Water Jet Cutter.
This leaves an extremely smooth finish on the edges and since it is round,no injuries from hitting the corners.
I had him make the the plates out of 1/4" thick steel plate at a diameter of 12 inches.
He also cut out the center hole so that I could mount any of my mounts to the plates.
Now I have already used this in my friends OBS and it has proved to be quite stable with the 10" LX200 mounted on it.
I used 1/2" threaded rod of which is threaded into the top plate so that there is no protruding nut out of the top.
Here is a pic of what they look like during painting.
I used Rustoleum Professional High Performance spray paint.
Yesterday was not warm enough to apply a coat to both sides so will finish that today.
I was looking where to install the third shelf I had made and only after assembling the brackets,decided that if I were to install it ,there would be less wall space for any posters that I may like to place in the OBS. So I have decided not to install the third shelf.
I had also decided to get some paint on my mounting plates,Rat Cage as some like to call it, of which I had made up by an individual with a CNC Water Jet Cutter.
This leaves an extremely smooth finish on the edges and since it is round,no injuries from hitting the corners.
I had him make the the plates out of 1/4" thick steel plate at a diameter of 12 inches.
He also cut out the center hole so that I could mount any of my mounts to the plates.
Now I have already used this in my friends OBS and it has proved to be quite stable with the 10" LX200 mounted on it.
I used 1/2" threaded rod of which is threaded into the top plate so that there is no protruding nut out of the top.
Here is a pic of what they look like during painting.
I used Rustoleum Professional High Performance spray paint.
Yesterday was not warm enough to apply a coat to both sides so will finish that today.
Attached Thumbnails

#438
Aquarist
-

-
- Posts: 1,041
- Joined: 27 Aug 2012
Apollo
Posted 14 November 2013 - 11:15 AM
Please strap down that scope, it's scaring me
Yes, I too am nervous just thinking about that. Of course, I am a bit of a klutz so accidents are expected.
#439
tim57064
-
-
topic starter
- Posts: 1,709
- Joined: 23 Aug 2012
Surveyor 1
Posted 14 November 2013 - 12:00 PM
Steve,Thank You for your continued interest,support and replies. I think I have got to be the biggest Klutz of all as when working on nearly anything,I get knicked ,cut or otherwise hurt myself almost every time.
To let everyone know,The scope was up there only 'til I could get the pic taken. It will be bolted to the shelf. I too was worried about it,not being bolted down, even though it was only up there for 5 minutes.
I did,after installing the shelf,walk under it and hit my
head as that is a normal occurrence for me.
There will be a chair under the shelf so that will never happen again and the shelf is very well attached to the wall so it will not come down on someone that is sitting in the chair.
#440
tim57064
-
-
topic starter
- Posts: 1,709
- Joined: 23 Aug 2012
Surveyor 1
Posted 14 November 2013 - 12:04 PM
Here is a shot of the assembled and ready for painting the opposite side, support cage for my scopes.
Attached Thumbnails

#441
tim57064
-
-
topic starter
- Posts: 1,709
- Joined: 23 Aug 2012
Surveyor 1
Posted 14 November 2013 - 12:18 PM
Now finished painting,another shot.
Attached Thumbnails

#442
Raginar
-
-
- Posts: 11,176
- Joined: 19 Oct 2010
Voyager 1
Posted 14 November 2013 - 01:28 PM
Pretty cool
#443
tim57064
-
-
topic starter
- Posts: 1,709
- Joined: 23 Aug 2012
Surveyor 1
Posted 14 November 2013 - 07:45 PM
Thanks Chris,Here is an image of it installed,the "Rat Cage" on the permanent pier in the OBS,Finally. 
Attached Thumbnails

#444
tim57064
-
-
topic starter
- Posts: 1,709
- Joined: 23 Aug 2012
Surveyor 1
Posted 14 November 2013 - 08:08 PM
Also today after installing the scopes mounting plate,I spent the rest of the day trenching in the Cat5e cable from my woodworking shop to the OBS.
I ran it under the desk where my desktop will be placed.
That is also where I placed the new 5 Port Gigabit Ethernet switch.
After which I tested it with my laptop and it works great.
Here is a shot of it.
I ran it under the desk where my desktop will be placed.
That is also where I placed the new 5 Port Gigabit Ethernet switch.
After which I tested it with my laptop and it works great.
Here is a shot of it.
Attached Thumbnails

#445
BYoesle
-
-

- Posts: 8,514
- Joined: 12 Jun 2004
Cosmos
Posted 15 November 2013 - 08:38 PM
Nice to see all your progress Tim!
#446
Aquarist
-
-
- Posts: 1,041
- Joined: 27 Aug 2012
Apollo
Posted 15 November 2013 - 08:42 PM
So, when is "first light" in the new observatory????
#447
tim57064
-
-
topic starter
- Posts: 1,709
- Joined: 23 Aug 2012
Surveyor 1
Posted 15 November 2013 - 09:06 PM
Well,Another day has come and gone.
Because I had to run into town twice today,I got little done.
Although the one thing I was able to accomplish was deciding what style of heater I am going to use.
I made the decision to set it up to run off of propane.
The cost of running a gas line out to the OBS was way more than what I was willing to pay right now.
My neighbor let me know he has a number of propane tanks,the older style, that could not be used for their grill any longer.
He also had a couple of 100 lb tanks that he had no use for any longer and said I could have them all for my time showing him different objects in the sky thru my scopes.
Of course I accepted his offer as the 100 lb tanks alone would cost $100.00 used. The smaller tanks have fuel in them,I offered to give him something for them and he declined my offer and said they were mine if I wanted them.
As I said,I had gone into town.It was to get the heater. I chose one that could be used for either propane or natural gas.That way in the future if and when I installed a gas line from the house to the OBS,I would be able to use the same appliance.
I just happen to find the 10,000 btu unit at Northern Tool and Equipment, in Sioux Falls, for a very reasonable $119.00.
It has a full thermostat that allows you to set the heat to any desired temperature.
This is exactly what I wanted so that when I am not out there ,it can be set to about 40 degrees F.
That way I won't have to worry about my computer giving me trouble since I want to leave it out there.
Also will not cause a problem with moisture building up when I first go in and turn up the heat,because of the cold.
So now,the heater is installed and I am feeling comfortable enough to place everything in the OBS that I want in it.
Here is a pic of what it looks like.
Thanks for looking.
Attached Thumbnails

#448
tim57064
-
-
topic starter
- Posts: 1,709
- Joined: 23 Aug 2012
Surveyor 1
Posted 15 November 2013 - 09:24 PM
Thanks for your reply Bob,Everything is coming along nicely now and that it won't be long to where I will feel comfortable enough to install my scopes and everything else.
Steve,It seems as though it has taken forever to get to the point where no saw dust will accumulate.Yet I am at that point now except for the trim work. If the weather permits,not tonight,as clouds are always around, I am hoping that first light will be around the new moon.
I would like to get my desk top computer out there and what ever software I plan to use set up and get to figuring out how I will run the scopes and camera from my woodworking shop. Hopefully with everything hardwired,should be much easier than wifi or bluetooth. Have not figured it all out yet.
I do have a program called splashtop to where I can run things that are on the desktop from my laptop. That is a cool software program,I like it a lot.
I guess this is all for tonight.
Tomorrow,I have to secure the 100lb propane tank a little better than how I have it right now.
Now,Naming my OBS,is at the top of my list.
#449
tim57064
-
-
topic starter
- Posts: 1,709
- Joined: 23 Aug 2012
Surveyor 1
Posted 18 November 2013 - 09:51 PM
It Has been a few days since I posted anything,mainly because what I had gotten accomplished wasn't that interesting.
First off,I was working on sealing up the west side of the OBS ,where the roof makes contact with the walls.
What I had chosen for this was causing too much trouble with binding.The garage door bottom rubber was not working in that area, so I chose to use what is normally used on the outside of the garage door jam.
This material is much more pliable and not as susceptible to cold. I wish I had used it first as it works great for this area.
Attached Thumbnails

#450
tim57064
-
-
topic starter
- Posts: 1,709
- Joined: 23 Aug 2012
Surveyor 1
Posted 18 November 2013 - 10:22 PM
What else have I been up to? Well I made the jump to getting the scopes put in their respective places in the OBS.
My 10"LX200 is on the pier and the other 2 ,Nexstar 8SE and the CR150 HD6" Refractor are on their shelves with the mounting bolts in place.
So I have been trying to get everything put in it's place.
I temporarily installed the red rope lights to see what they would look like without the screening of some kind.
Also I got the window jamb in place with the mini blind installed .
Gotta ask the wife if she will make a curtain to aid in darkening it a little more though.
Oh and also installed my 42" LCD 120 hz hd set with the full motion mount. No Man Cave should be without the HD TV.
I had temporarily put a shelf under the TV because I had not fully tightened the bolts that keep it from tilting forward.
I also left the base on because the grandkids come over often to spend the night and like to watch their movies.
My wife goes a little nuts when she has to watch them over and over again with the kids, so I put the TV in the spare bedroom for the kids to watch in there.
Attached Thumbnails

CNers have asked about a donation box for Cloudy Nights over the years, so here you go. Donation is not required by any means, so please enjoy your stay.

Recent Topics
-
-
-
-
 Anyone try to image a target blocked by the new moon?
rj144 - Today, 10:55 PM
Beginning Deep Sky Imaging
-

-

-
 Animation of floating prom on NE Limb 5/10/2024
rigel123 - Today, 10:50 PM
Solar Observing and Imaging
-
-
-


